


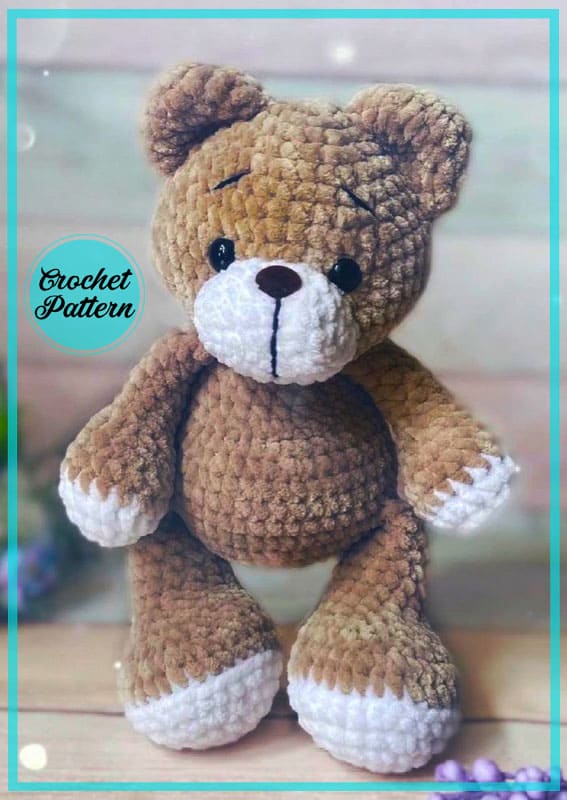
Today we add a new one to the crochet teddy bear patterns. The name of today’s amigurumi teddy bear is niko. Bear amigurumi patterns now have very different models. Today’s pattern has a rather plain appearance. But don’t let this mislead you. Just because it’s plain doesn’t mean it’s bad.
Velvet Teddy Bear Niko Crochet Toy Pattern
A very cute and soft amigurumi. You can find the necessary materials for amigurumi in the description. Then I tried to describe how to do it step by step. You can have a plush amigurumi teddy bear by following the steps. Now let’s crochet the teddy bear amigurumi step by step.
Designer: ani_toys_mk
LIST OF MATERIALS REQUIRED:
1.Yarn:
• Himalaya dolphin baby 100r / 120M
–80317- main color
–80301-additional color
• Yarnart Jeans 50g / 160m for embroidery and tightening muzzles
–53 – black
2. Hook – 3.5-4.0
3. Eyes on a secure mount 12mm.
4. Spout -12-13mm
5. Holofiber
6. Needle with a wide eye for sewing on details
7. Scissors
Toy size – 25 cm
Abbreviations
MR – Amigurumi Magic ring
sc : Single Crochet
inc : Increase
dec : Decrease
st: Stitch
sl-st : Slip Stitch
ch : Chain
BLO : Crochet into back loops only

Legs (2 PARTS)
(start crochetting with an additional color)
1. 6MR
2. 6 inc (12)
3. (1sc, inc)*6 (18)
4. 1sc, inc. (2sc, inc)*5, 1sc (24)
5.(3sc, inc)*6 (30)
Changing the yarn to the main color
6. BLO 30sc
7. 30sc
8. 9sc, 6dec, 9sc (24)
9. 7sc, 6dec, 7sc (19)
10. 6 sc, Зdec, 7sc (16)
Fill the leg with filler
11-14. 16sc (4 rnds)
15. (6sc, dec)*2 (14)
16-17. 14sc (2 rnds)
We crochet more + 2sc
Fold in half and close with 7sc together.
Fasten off and cut the yarn.
Arms (2 PARTS)
(We start with an additional color)
1. 6MR
2. 6 inc (12)
3. (2sc, inc)*4 (16)
Changing the yarn to the main color
4. BLO 16 sc
5. 16sc
6. 5sc, Зdec, 5sc (13)
7. 13sc
8. 4sc, Зdec, 3sc (10)
9-15. 10 sc (7 rnds)
Crochet + 2sc.
Fold in half and sew together 5sc.
Fasten off and cut the yarn.
Muzzle
Crochet with an additional color
1. 5 ch, from the second loop from the hook: inc, 2 sc, 3sc (in 1 st), 3 sc (10)
2. 2inc, 2sc, Зinc, 2sc, inc (16)
3. (1sc, inc)*2, 2sc, (1sc, inc)*3, 3sc, inc (22)
4. 22 sc.
Slst, fasten the yarn, leave a long end for sewing.
BODY
We crochet in the main color
1. 6MR
2. 6inc (12)
3. (1sc, inc)*6 (18)
4. 1 sc, inc. (2sc, inc)*5, 1sc (24)
5. (3sc, inc)*6 (30)
6. 2 sc, inc. (4sc, inc)*5, 2 sc (36)
7. (6sc, inc)*6 (42)
In the next row we crochet the legs
8. 7 sc, 7 sc together with the leg, 14sc, 7sc together with the leg, 7 sc (42)
9-11. 42sc (3 rnds)
12. (5 sc, dec)*6 (36)
13. 36sc
14. 13sc, 6dec, 11sc (30)
15. 30sc
16. (3sc, dec)*6 (24)
17. 24sc
18. (2sc, dec)*6 (18)
In the next row we crochet arms
19. 4sc, 5sc together with the arm, 3 sc, 5sc together with the arm, 1sc (18)
We crochet more + 1sc, slst.
Fasten the yarn, leave a long end for sewing.
HEAD
crochet with the basic Color
1. 6MR
2. 6inc (12)
3. (1sc, inc)*6 (18)
4. 1 sc, inc. (2sc, inc)*5, 1sc (24)
5. (3sc, inc)*6 (30)
6. 30sc
7. 2sc, inc. (4sc, inc)*5, 2 sc (36)
8. (5sc, inc)*6 (42)
9. Зsc, inc(6sc, inc)*5, 3sc (48)
10-13. 48sc (4 rnds)
14. (6sc, dec)*6 (42)
15. (5sc ,dec)*6 (36)
16. (4sc ,dec)*6 (30)
17. (3sc, dec)*6 (24)
18. (2sc, dec)*6 (18)
About crochet ss, fasten the yarn, cut.
Ears
1. 6MR
2. 6inc (12)
3. (1sc, inc)*6 (18)
4-5, 18 sc (2 rnds)
crochet slst, fasten the yarn, leave a long end to be sewn to the head. (Do not tie the ears together)
ASSEMBLY AND DESIGN
1. Well fill your head with filler, Pay special attention to the cheeks.
2. Insert the eyes in the 9th row, where they did (inc, 6sc, inc), i.e. insert the first eye into one increase, skip 6sc and insert the second eye into the next increase. Before fixing the eyes, check if they are evenly located! If not, then move 1sbn to the right or left.
3. Begin to sew the muzzle between the 9th and 15th rows. When sewn to the middle, fill with filler and insert the spout between 4-5 rows so that it is in the middle of the peephole. If everything is straight, we fix the nose and finish sewing on the muzzle.
4. Sew on the ears evenly between rows 2 and 8
5. We do an eyeliner
6. We embroider the face and eyebrows
7 sewing the head to the body
THAT’S ALL! NIKO READY

