


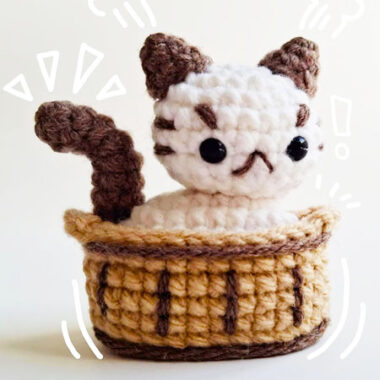
I would like to introduce you to a very easy amigurumi pattern from Marina Sitnikova. The name of the toy cat is Lola. Today we will make a crochet toy of a kitten named Lola. The height of the crochet toy is about 16 cm. The designer used YarnArt Jeans yarn and 2 mm crochet hook to make this cat. The legs, body and head of the kitten are crocheted in one piece and the other parts are completed by sewing.
Lola the Kitten with Pink Cheeks Amigurumi Pattern
The description of the amigurumi pattern is written in detail, and the author has many photos and explanations. If you are ready, let’s take a look at the stages of making the toy.
Designer: sitnikova_toys
Abbreviations
MR – Amigurumi Magic ring
sc : Single Crochet
inc : Increase
dec : Decrease
st: Stitch
ch : Chain
Arms (2 Times)
1. Row: 6sc in MR (6)
2. Row: 6inc (12)
3. Row: without changes 12sc
4. Row: (1 sc, inc)*6 (18)
5. Row: without changes 18sc
6. Row: (1 sc,dec)*6 (12)
7. Row (2sc,dec)*3 (9)
We fill only the palm, loosely
8-17 without changes 9sc (9)
Cut the yarn. We will sew the arms.

Tail
1. Row: 6sc in MR (6)
2. Row: 6inc (12)
3. Row (1 sc,inc)*6 (18)
4. Row without changes 1 8sc
5. Row (1 sc,dec)*6 (12)
6-7 Row: without changes 12sc
8. Row: (2sc,dec)*3 (9)
9-12. Row: without changes 9sc
13. Row : (2sc,dec)*2,2sc (7)
We fill only the lower part of the tail, loosely. If desired, we make a frame of the tail from wire, as in the photo.
14-19. Row without changes 7sc (7)
Leave the yarn for sewing Insert the frame into the tail.

Ears (2 times)
1 . Row: 6 sc in MR (6)
2. Row: 6inc (12)
3. Row: without changes 12sc (12)
4. Row (1 sc,inc)*6 (18)
5-8. Row without changes 18sc (18)
We leave the yarn for sewing.

Legs (2 times)
1 . Row: 6sc in MR (6)
2. Row: 6inc (12)
3. Row: (1 sc,inc)*6 (18)
4-10. Row: without changes 1 8sc (18)
Cut the yarn from the first leg.
Do not cut off the second leg!
Do not fill the legs yet.

Body
11. Row: We make ch from the second leg, take the first leg and crochet along it 18sc, 3sc along the ch, 18sc along the second leg and 3sc along the ch, put a loop marker, this is the end of the row. (42)

12.- 19. Row without changes 42 sc (42)
We stuff the legs and part of the body.
Next, we fill as we crochet.
20. Row: (5sc,dec)*6 (36)
21-22. Row without changes 36sc
23. Row (4sc,dec)*6 (30)
24 . Row without changes 30sc
25. Row start sewing 8sc arm, attach the arm and grab the arm and body loops 4sc, 11 sc on the body, 4sc with the second arm, 3sc (30)

26. Row: (3sc,dec)*6 (24)
27. Row: (2sc,dec)*6 (18)
Stuff your neck tightly to keep your head from dangling!

28. Row (1 sc,dec)*6 (12)
29. Row 12sc
30. Row: 12inc (24)
31 . Row: (3sc,inc)*6 (30)
We stuff our head as we knit.
32. Row: (4sc,inc)*6 (36)
33. Row (5sc,inc)*6 (42)
34. Row (6sc,inc)*6 (48)
35. Row (7sc,inc)*6 (54)
36.-46 Rows: without changes 54sc (54)
Insert the nose between 40-41 row.

You can embroider a nose if there is no suitable size.
47. Row: (7sc,dec)*6 (48)
48. Row: (6sc,dec)*6 (42)
49. Row: (5sc,dec)*6 (36)
50. Row (4sc,dec)*6 (30)
51. Row (3sc,dec)*6 (24)
52. Row (2sc,dec)*6 (18)
53. Row (1sc,dec)*6 (12)
54. Row (6dec) (6)
Pull off

Cheeks: (2times)
Pink yarn
10sc in MR
Leave the thread for sewing.

Spot for arms (2times)
Pink yarn
5sc in MR. We leave a long thread for sewing and embroidering fingers on the palms

Assembly
Sew on the ears
departing from the center of the head by 2sc.
We embroider eyes, eyebrows, antennae and mouth Sew on the cheeks We sew the tail between the 14th and 15th next to the body.
Sew the spots on the palm and embroider the fingers.

