


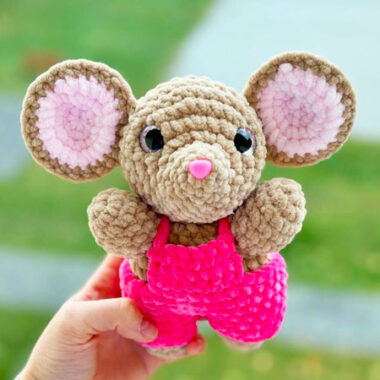
Today I will share with you the crochet pattern of a cute mouse amigurumi toy named Fatty designed by lucy_rose_toys. The size of the toy, which you can use as a keychain, is 9cm. The designer recommends using YarnArt Jeans brand yarn to make this toy and it will be enough for the crochet hook you will use to make the toy to be compatible with the yarn. You will need to use 4 or 5mm safety eyes for the eyes of the toy.
Fatty the Keychain Mouse Amigurumi Pattern
The photos of the toy are a test product. You can visit the designer’s Instagram profile to see more photos. The arms and legs of the mouse amigurumi toy are designed in 2 different variants. You can choose the method you want.
Designer: @lucy_rose_toys
Materials and tools
1- Yarn of two colors (1 – main color, 2 – comlementary color). Using Drops Nord (50g, 170 m) and 1,3 crochet hook a toy is about 8 cm tall, using Yarn Art Jeans (50 g, 160 m) and 1,5 crochet hook a toy is about 9 cm tall.
2- Crochet hook according to your yarn.
3- Yarn needle, sewing needle.
4- Yarn for nose and whiskers (for example, Vita Pelican 50 g, 330 m, 100% cotton, or Iris)
5- Two black beeds or toy eyes (4-5 mm), sewing thread of black colour.
6- Polyester fiberfill.
7- A piece of velcro tape if you use a fluffy yarn
Abbreviations
MR- magic ring
ch – chain stitch
st(s) – stitch(es)
slst – slip stitch
sc- single crochet
inc- increase (2 sc in the same st)
dec – decrease (crochet 2 st together)
(…) x n – repeat the instructions in the brackets n times
(n) – amount of sts in the row rnd(s) – round(s)

Ears (make two)
Yarn colour 2.
1 rnd: 6 sc in MR
2 rnd: 6 inc (12)
3 rnd: (1 sc, 1 inc) repeat 6 times (18)
4 rnd: (1 sc, 1 inc, 1 sc) repeat 6 times (24)
5 rnd: (3 sc, 1 inc) repeat 6 times (30)
Fasten off, cut the yarn.

Yarn colour 1.
1 rnd: 6 sc in MR
2 rnd: 6 inc (12)
3 rnd: (1 sc, 1 inc) repeat 6 times (18)
4 rnd: (1 sc, 1 inc, 1 sc) repeat 6 times (24)
5 rnd: (3 sc, 1 inc) repeat 6 times (30)
Don’t cut the yarn
Put together two details of the ear of both colours, wrong sides inside. Continue crocheting around the circle with main yarn, joining both details.

6 rnd: 30 sc
Fold the detail in half, the complementary colour inside. Crochet 3 sc joining both sides of the ear.
Fasten off leaving a long tail for sewing.

Arms (make two)
Yarn colour 2.
1 rnd: 6 sc in MR
2-3 rnds: 6 sc
Change yarn to colour 1.
4-5 rnds: 6 sc
6 rnd: 5 sc, 1 inc (7)
7 rnd: 7 sc
8 rnd: 6 sc, 1 inc (8)
9 rnd: 8 sc
Variant 1
If you want to sew arms in a fixed position:
10 rnd: fold the detail and crochet 4 sc joining both sides together. Fasten off, cut the yarn leaving a long tail for sewing.

Variant 2
If you want arms to move, you may use a button or a thread joint. In such case:

10 rnd: 4 dec
Cut the yarn leaving a long tail, close the remaining hole. Weave in the yarn through the front loops of all 4 stitches and pull tightly. Hide the remaining yarn tail inside the detail.
Don’t stuff the arms.
Tail
1 row: 41 ch
2 row: start in the second chain from the hook and crochet down the chain 1 slst in each chain = 40 slst
Cut the yarn leaving a long tail for sewing.

Legs (make two)
Yarn colour 2.
1 rnd: 6 sc in MR
2-3 rnds; 6 sc
Change yarn to colour 1.
4 rnd: 5 sc, 1 inc (7)
5 rnd: 7 sc
6 rnd: 6 sc, 1 inc (8)
7 rnd: 8 sc
8 rnd: 7 sc, 1 inc (9)
9 rnd: 9 sc
10 rnd: 8 sc, 1 inc (10)
11-12 rnds: 10 sc
Stuff only the half of the legs
Variant 1
If you want to sew the legs in a fixed position:
13 rnd: fold the detail and crochet 5 sc joining both sides together. Fasten off, cut the yarn leaving a long tail for sewing.

Variant 2
If you want legs to move, you may use a button or a thread joint. In such case:
13 rnd: 5 dec

Cut the yarn leaving a long tail, close the remaining hole. Weave in the yarn through the front loops of all 5 stitches and pull tightly. Hide the remaining yarn tail inside the detail.
Body
1 rnd: 9 ch
2 rnd: start in the second chain from the hook: 1 inc, 6 sc, 3 sc in the last st, turn and continue on the other side of the chain, 7 sc (18).
Continue crocheting in spiral.
3 rnd: 18 sc
4 rnd: 2 inc, 6 sc, 3 inc, 6 sc, 1 inc (24)
5 rnd: (1 sc, 1 inc) repeat 2 times, 6 sc, (1 sc, 1 inc) repeat 3 times, 7 sc, 1 inc (30)
6 rnd: 30 sc
7 rnd: (2 sc, 1 inc) repeat 2 times, 6 sc, (2 sc, 1 inc) repeat 3 times, 8 sc, 1 inc (36)
8 rnd: 36 sc
9 rnd: (3 sc, 1 inc) repeat 2 times, 6 sc, (3 sc, 1 inc) repeat 3 times, 9 sc, 1 inc (42)
10 rnd: 42 sc
11 rnd: 4 sc, 1 inc, 20 sc, 1 inc, 16 sc (44)
12 rnd: 44 sc
13 rnd: 5 sc, 1 inc, 21 sc, 1 inc, 16 sc (46)
14 rnd: 46 sc
15 rnd: 6 sc, 1 inc, 22 sc, 1 inc, 16 sc (48)
16 rnd: 48 sc
17 rnd: 7 sc, 1 inc, 23 sc, 1 inc, 16 sc (50)
18 – 22 rnds: 50 sc
23 rnd: 7 sc, 1 dec, 23 sc, 1 dec, 16 sc (48)
24-25 rnds: 48 sc
26 rnd: 7 sc, 1 dec, 22 sc, 1 dec, 15 sc (46)
27 rnd: 46 sc
28 rnd: 2 sc, (1 dec, 3 sc) repeat 3 times, 8 sc, (1 dec, 3 sc) repeat 3 times, 6 sc (40)
29-30 rnds: 40 sc
31 rnd: (3 sc, 1 dec) repeat 8 times (32)
32 rnd: (2 sc, 1 dec) repeat 8 times (24)
33 rnd: (1 sc, 1 dec) repeat 8 times (16)
Stuff the body tightly, but it must not be too
round (see the photo).
34 rnd: 9 dec (7)

Add some fiberfill if you need to. Cut the yarn leaving a long tail, close the remaining hole. Weave in the yarn through the front loops of all 7 stitches and pull tightly. Hide the remaining yarn tail inside the detail.
Assembling
Sew the ears onto the head. Sew the arms between 16 and 18 rounds, closer to the tummy. Sew the legs on both sides, under the ears between 27 and 28 rounds. Sew the tail to the back bottom.
The nose is embroidered between 12 and 13 rounds and is 3-4 stitches long. Sew the eyes on the same level with the nose, leave 1-2 stitches between the nose and eyes.
Embroider the whiskers.
If you crocheted with some fluffy yarn, use the velcro tape to comb the toy and make it more fluffy.
Your Little Mouse is ready!

