


I would like to introduce you to the spring bunnies amigurumi pattern designed by Irina Belousova. I want to emphasize that these are highly detailed toys, but the instructions for making the toy are extremely detailed, so if you don’t rush while making it, I believe you won’t face any difficulties. The height of the crocheted toy is approximately 19 cm.
Boy and Girl Bunnies Crochet Pattern
The designer used YarnArt Jeans yarn and a 1.75 mm crochet hook to create these bunnies. Additionally, in the pattern instructions, you will learn how to make pants, skirts, and bows to decorate your bunnies. The pattern’s description and instructions are very detailed and suitable for beginners.
Designer: crochet_by_belousova
Abbreviations
MR: Amigurumi Magic ring
sc : Single Crochet
inc : Increase
dec : Decrease
tr : Triple Crochet/ Treble Crochet
st: Stitch
dc : Double Crochet
hdc: Half Double Crochet
sl-st : Slip Stitch
ch : Chain
..in : make increase into same stitch as many as the number which is given in front of “inc” abbreviation (exp; 3inc, 4inc..).
FLO : Crochet into front loops only
BLO : Crochet into back loops only
Materials
1. Yarn.
When crocheting, I used YarnArt Jeans.
Colors: N 46 – gray, N 01 – white, N 72 – purple, N – 76 –
blue, N 74 – pink, N – 67 – lemon.
2.Hook
3. Filling – holofiber
4. Eye beads with a diameter of 8 mm
5.Switching needles
6. Needle for stitching
7.scissors
The size of the finished toy using these materials is about 7,5 inch
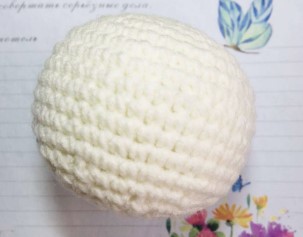
1.HEAD
We use yarn in color N 01:
We fill the part in the process of crocheting.
Round 1.) 6 sc in MR (6)
Round 2.) 6 inc (12)
Round 3.) (1 sc , inc)*6 (18)
Round 4.) 1 sc, inc, (2 sc, inc)*5, 1 sc (24)
Round 5.) (3 sc, inc)*6 (30)
Round 6.) 2 sc, inc, (4 sc, inc)*5, 2 sc (36)
Round 7.) (5 sc, inc)*6 (42)
Round 8.) – 13.) 42 sc (42, 6 rows)
Round 14.) 5 sc, dec (36)
Round 15.) 2 sc, dec, (4 sc, dec)*5, 2 sc (30)
Round 16.) (3 sc, dec)*6 (24)
Round 17.) 1 sc, dec, (2 sc, dec)*5, 1 sc (18)
Round 18.) (1 sc, dec)*6 (12)
Next, we make 2 dec, hdc, leave the yarn in order to tighten the hole.
Tighten the hole by threading the hook through each front half-loop, as shown in the photo, bring out (hide) the yarn into the product, cut.
The example shows how to tighten the hole.
Photo on the next page.
2. EARS (2 parts)
Do not fill the part.
Make the ears in two parts.
First:
Start with gray/lemon yarn.
Round 1.) 6 sc in MR (6)
Round 2.) 6 inc (12)
Round 3.) (1 sc, inc)*6 (18)
Round 4.) – 5.) 18 sc (18, 2 ряда)
Round 6.) (1 sc, dec)*6 (12)
Round 7.) 12 sc (12)
We fix the yarn, cut it off.
Second:
Start with white yarn.
Round 1.) 6 sc in MR (6)
Round 2.) 6 inc (12)
Round 3.) (1 sc, inc)*6 (18)
Round 4.) – 5.) 18 sc (18, 2 ряда)
Round 6.) (1 sc, dec)*6 (12)
Do not cut the yarn, we continue crocheting:
Make 12 sc along the first part,
12 sc – on the second.
Place a marker, mark the beginning of the row.
In total, there are 24 loops in the row.
Round 7.) (2 sc, dec)*6 (18)
Round 8.) – 9.) 18 sc (18, 2 ряда)
Round 10.) (1 sc, dec)*6 (12)
Round 11.) – 12.) 12 sc (12, 2 ряда)
HDC, fix the yarn, cut it off. If desired, you can glue/sew decor onto the ear.

3. RIGHT LEG
With white yarn.
We fill the part in the process of crocheting.
Round 1.) 6 sc in MR (6)
Round 2.) 6 inc (12)
Round 3.) – 8.) 12 sc (12, 6 rows)
We fix the yarn, cut it off.
4. LEFT LEG
We use white yarn.
We fill the part in the process of crocheting.
Round 1.) 6 sc in MR (6)
Round 2.) 6 inc (12)
Round 3.) – 9.) 12 sc (12, 7 rows)
We fix the yarn, cut it off.
Do not cut the yarn, continue to crocheting.
5. BODY
Make 3 ch, 12 sc along the right leg,
3 sc along the transition,
12 sc along the left,
3 sc along the transition.
We put a marker, mark the beginning of the row.
Round 1.) – 7.) 30 sc (30, 7 rows)
Round 8.) (4 sc, dec)*5 (25)
Round 9.) – 11.) 25 sc (25, 3 rows)
Round 12.) 5 sc, dec, 10 sc, dec, 6 sc (23)
Round 13.) – 14.) 23 sc (23)
Change the color to blue/lemon, continue to crochet:
Round 15.) (3 sc, inc)*5, 3 sc (28)
Round 16.) – 17.) 28 sc (28)
Make a hdc, fix the yarn, cut it off.
Turn the blue part back.

6. Arms (2 PARTS)
Details are not filled.
We crochet one hand according to the description:
Yarn gray / lemon color.
Round 1.) 6 sc in AR (6)
Round 2.) (1 sc, inc)*3 (9)
Round 3.) – 5.) 9 sc (9, 3 rows)
Change the color to white.
Round 6.) – 13.) 9 sc (9, 8 rows)
Fold the piece in half and close 4 sc for both side. Fix the yarn and cut it off.
MAke the second arm according to the above description with white yarn from rows 1 to 13.

7. TAIL
We use white yarn.
Round 1.) 6 sc in AR (6)
Round 2.) 6 inc (12)
Round 3.) 12 sc (12)
Round 4.) (2 sc, dec)*3 (9)
Make a hdc, fix the yarn, cut it off.
We fill the detail a little.

8. PANTS FOR A BOY
Make 30 ch, sl st we close the ring.
Round 1.) 2 ch, 29 dc, sl st,
Round 2.) 2 ch, 29 dc, sl st,
We continue to crochet.

Swallow.
Round 1.) 1 ch, 3 sc, turn
Round 2.) 1 ch, 3 sc, turn
Round 3.) 1 ch, 3 sc, slst
Sew/crochet visually in the middle of the pants in the opposite direction.
Turn inside out.

9. SKIRT FOR GIRLS
Make 30 ch, slst close the ring.
Round 1.) 2 ch, 1 dc, 29 inc from dc, sl st
Round 2.) 2 ch, 59 dc, sl st.
We fix the yarn, cut it off.

10. BOW FOR THE GIRL
In MR: 3 ch, 3 tr, 3 ch, sc,
3 ch, 3 tr, 3 ch, hdc
We tighten the MR, leaving small tails.
We tie the tails around the bow in the middle, tie a knot, cut the yarn.

11. Cheeks
In AR: 6 sc, sl st.
Tighten the hole.
We tie a knot with tails.

Assembly
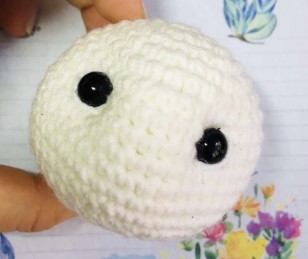
1.) Glue the eyes (half beads) with a diameter of 8 mm on the 8th – 9th row, the distance between them is 8 sc.
2.) Tighten the eyes with white yarn.
Step-by-step photos of the process are located after point N 2.
Mark with needles points from N 1 to N 4 as shown in the photo. Thread the white yarn into the needle.
Insert the needle into the last row of the head, bring it out at point N 1, then to N 2, then to N 3 and to N 4.

Pull the yarn.
Do the above steps 3 times. In the process, the yarn must be pulled evenly on both sides.
Then bring the needle out to the last row of the head.
Fix and cut off
3.) Decorate the lower eyelid.
Step-by-step photos of the process are located after point N 3.
Thread the white yarn into the needle in one yarn. Mark points N 1 to N 4.

Insert the needle into the last row of the head, bring it out at point N 1, then to N 2, then to N 3 and to N 4.
Bring the needle out into the last row of the head. Carefully pull the yarn by both ends to ensure even placement. Tie a knot, cut off the ends.
4.) Nose
Step-by-step photos of the process are located after point N 4.
Thread the black yarn into the needle in one yarn.
Mark points N 1 to N 4.

Insert the needle into the last row of the head, bring it out at point N 1, then to N 3, then to N 2, N 3, N 4, N 3.
Bring the needle out into the last row of the head. Carefully pull the yarn by both ends to ensure even placement. Tie a knot, cut off the ends.

5.) Eyelashes (for a girl)
Step-by-step photos of the process are located after point N 5.
Mark the points with needles between the 5th and 6th, 6th and 7th rows.
Embroider with two black yarn as shown in the photo below.

6.) Sew on the cheeks.
Sew on 5 sc on the 11th – 12th rows at a distance from the nose.
7.) Sew on the ears in the middle of the head from the 1st to the 2nd row as shown in the photo.

8.) Eyebrows
Mark the points with needles between the 4th and 5th, 7th and 8th rows as shown in the photo below. Eyebrow length = 3 sc.
Thread a black yarn into the needle with two yarn and embroider.

9.) Sew on the bow on the ears.
10.)Sew the head to the body.
11.) Sew the arms between the 12th and 13th rows of the body.

12.) Sew the tail from the 4th to the 6th row of the body as shown in the photo.
13.) Sew the pants/skirt between the 4th and 5th rows of the body.


