


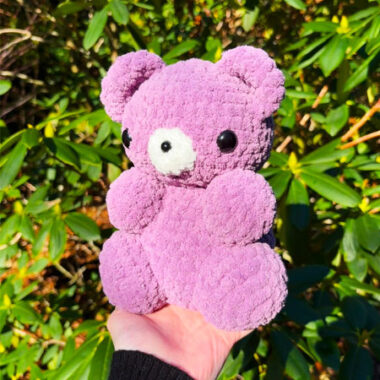
I want to introduce you to a very unusual amigurumi pattern for Halloween. You see a wonderful crochet teddy bear amigurumi and this teddy bear has turned into a wonderful fairy. When you make the crochet teddy bear, I think it will be a really great choice for Halloween. When you look at the first photo, I feel like the toy has a cape, but the toy has butterfly wings and these wings really have a wonderful design.
Crochet Brucie the Fairy Bear
We see that the toy is holding a tiny Star wand in its hand. In addition, small spots were made on the lower part of the teddy bear’s body using yellow yarn.
Designer: eliyarnart
Materials
• Hook: 5mm
• Brown chenille size 4 medium
• Purple chenille size 4 medium
• Dark purple chenille size 4 medium
• Yellow chenille size 4 medium
• Beige chenille size 4 medium
• Black cotton/acrylic yarn
• 12mm safety eyes
• Stuffing
• Tapestry needle
• Stitch markers
• Scissors
Abbreviations
• R: round
• St: Stitch
• mr: magic ring
• ch: chain
• sc: single crochet
• hdc: half double crochet
• dc: double crochet
• sl st: slip stitch
• inc: increase
• dec: decrease
• FO: fasten off
• cc: change color

Head
Use brown yarn
R1: 8sc in a mr (8) R2: 8inc (16)
R3: (sc, inc)x8 (24)
R4: (3sc, inc)x6 (30)
R5: (2sc, inc, 2sc)x6 (36)
R6-10: 36sc (36) – 5 rounds
R11: (4sc, dec)x6 (30)
R12: (3sc, dec)x6 (24)
R13: (4sc, dec)x4 (20)
Cut yarn, FO with invisibile join. Insert safety eyes on R9-10, 5 visible sts apart.
Add fiber fill, stuff a lot to get a rounded face (pic 1).

Body
Use brown yarn
R1: 5sc in a mr (5)
R2: 5inc (10)
R3: BLO 10SC (10)
R4: 10sc (10)
Cut yarn and FO with an invisibile join.
Make another leg but this time don’t cut the yarn and ch2 (pic 2).

R5: Insert the hook in any of the first leg sts (pic 3) and make 10sc, 2sc in the 2ch, 10sc, 2sc in the 2ch (24)
R6: 2sc, inc, (5sc, inc)x3, 3sc (28)
R7-11: 28sc (28) – 5 rounds
R12: (5sc, dec)x4 (24)
Start stuffing as you go, when you stuff the feet remember to keep them flat.
R13: (4sc, dec)x4 (20)
Finish stuffing.
Cut yarn leaving a long tail for Sewing (pic 4).

Arms (x2)
Use brown yarn
R1: 4sc in a mr (4)
R2: 4inc (8)
R3-5: 8sc (8) – 3 rounds
R6: fold the arm and close it making 4sc (4) – don’t stuff the arm Cut yarn leaving a long tail (pic 5).

Ears (x2)
Start with brown yarn
R1: 6sc in a mr (6)
R2: 2inc, sc, cc to beige sc in the same st, sc, cc to brown sc in the same st, 2inc (12)
R3: 2sc, dec, sc, cc to beige 3sc, cc to brown dec, 2sc (10)
Cut yarn leaving a long tail for Sewing (pic 6).

Snout
Use beige yarn
R1: 5sc in a mr (5)
R2: 5inc (10)
Cut yarn leaving a long tail for sewing and make an invisible join (pic 7).
Wings
Small part – left side
Use purple yarn
R1: 8sc in a mr (8)
R2: 8inc (16)
Cut yarn and make an invisible join
R3: Insert hook in any of the circle’s sts and with dark purple yarn make (sc, inc)x2, inc, (sc, hdc)in the same st, dc, ch2 sl st in the 2nd ch from the hook and sl st in the upper part of the dc, (hdc,sc)in the same st, (sc, inc)x4, sl st (26)
Cut yarn leaving a long tail for sewing (pic 8).
Small part – right side
Use purple yarn
R1: 8sc in a mr (8) R2: 8inc (16)
Cut yarn and make an invisible join
R3: Insert hook in any of the circle’s sts and with dark purple yarn make (sc, inc)x4, (sc, hdc)in the same st, dc, ch2 sl st in the 2nd ch from the hook and sl st in the upper part of the dc, (hdc,sc)in the same st, (sc, inc)x2, inc, sl st (26)
Cut yarn leaving a long tail for sewing (pic 8).

Big part – left side
Use purple yarn
R1: 8sc in a mr (8)
R2: 8inc (16)
R3: (sc, inc)x8 (24)
Cut yarn and make an invisible join
R4: insert the hook in any of the circle’s sts and with dark purple yarn make (2sc, inc)x3, sc, (sc, hdc)same st, dc, ch2, sl st in the 2nd ch from the hook, sl st in the upper part of the dc, (hdc, sc)same st, (2sc, inc)x3, 2sc, sl st. (32)
Cut yarn leaving a long tail for sewing (pic 8).
Big part – right side
Use purple yarn
R1: 8sc in a mr (8)
R2: 8inc (16)
R3: (sc, inc)x8 (24)
Cut yarn and make an invisible join
R4: insert the hook in any of the circle’s sts and with dark purple yarn make (2sc, inc)x3, 2sc, (sc, hdc)same st, dc, ch2, sl st in the 2nd chain from the hook, sl st in the upper part of the dc, (hdc, sc)same st, (2sc, inc)x3, sc, sl st. (32)
Cut yarn leaving a long tail for sewing (pic 8).
Star wand
Start with yellow yarn
R1: inside a mr make sc, (dc, picot st, sc)x4, for the last tip dc, picot st and sl st in the first sc changing color to dark purple.
R2: ch 11, starting from the 2nd ch from the hook 10sl st, sl st in the base where you made the sl st.
Cut yarn and FO just the yellow threads, we’ll use the dark purple yarn to sew the star wand to the bear’s hand

Sewing
• Sew the head to the body
• Sew ears between R3-5
• Sew arms where there’s the neck

• Sew snout between R9-11
• Sew the star wand using the purple threads going through the first 4sts of the wand, and then insert them in the 3rd round of the bear’s hand in different places (horizontally) and FO (pic 9).

• Sew the wings’ smaller part on R8-9 in the center, close to each other (pic 10)

• Sew the bigger part just up the small parts, start sewing in the same st you sewed the small part (pic 11)
• Add the stars to the body using yellow yarn (pic 12), you can make as many stars as you like

