


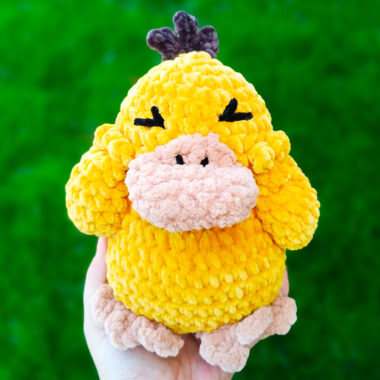
We can say that these types of amigurumi toys are usually designed for Christmas because they have a magnificent hat. Don’t even the tassels on the toy’s hat look perfect? First of all, I would like to talk a little about the design of the toy. I can easily say that the amigurumi duck toy with a big head has a very professional design. Honestly, I really liked the oval shape of its orange beak. Normally this detail is not included in the making of the duck’s beak, but in this toy even the beak has a detailed design.
White Duck with Christmas Hat Crochet Pattern
We can also see the same details on the duck’s legs and wings. You can also make the duck’s hat using the same color as the legs. The duck’s eyes are also positioned very close to each other.
Designer: coralloatelie
MATERIALS
Amigurumi Soft: Terracotta (7529) Sensation (6019) Orange (4456) White (8001)
Complementary
Fiber for stuffing
Tapestry needle
Crochet hook 2.2mm
Safety eyes 9x6mm flat ovals
Scissors
ABBREVIATIONS
AM – Magic Ring
sc – single crochet
inc – increase
dec – decrease
incT – triple increase (3 sc in the same stitch)
decT – triple decrease
sl st – slip stitch
dc – double crochet
HEAD
Start with white:
1. 6 sc in MR [6]
2. 6 increases [12]
3. (1 sc, 1 inc) x6 [18]
4. (2 sc, 1 inc) x6 [24]
5. (3 sc, 1 inc) x6 [30]
6. 2 sc, 1 incT, 5 sc, 1 incT, 7 sc, 1 incT, 6 sc, 1 incT, 6 sc [38]
7. 3 sc, 2 inc, 5 sc, 2 inc, 9 sc, 2 inc, 7 sc, 2 inc, 6 sc [46]
8. 3 sc, 2 inc, 8 sc, 2 inc, 10 sc, 2 inc, 9 sc, 2 inc, 8pb [54]
9-21. 54sc [54] (13 rows)
22. 3sc, 2dec, 8sc, 2dec, 10sc, 2dec, 9sc, 2dec, 8sc [46]

Place eyes on row 15 with 5sc between them
23. 3sc, 2dec, 5sc, 2dec, 9sc, 2dec, 7sc, 2dec, 6sc [38]
24. 2sc, 1decT, 5sc, 1decT, 7sc, 1decT, 6sc, 1decT, 6sc [30]
25. (3sc, 1dec) x6 [24]
26. (2sc, 1dec) x6 [18]
Place eyes on row 15 with 5sc between them stuffing
27. (1sc, 1dec) x6 [12]
Leave the head open. Cut the yarn and leave a long thread for sewing.

BEAK
Start with the orange color:
1. 6 chains, go back to the 2nd stitch: 4sc, 1incT, 3sc, 1inc [11]
2-3. 11sc [11] (2 rows)

4. Make 6sc by grabbing the two straps of the beak, flattening them.
Sew the middle of the beak to the row of the eyes and the sides 2 rows below to get that curved appearance as shown in the photo.

BODY
Start with the color White
1. 6sc in MR [6]
2. 6 inc [12]
3. (1sc, 1inc) x6 [18]
4. (2sc, 1inc) x6 [24]
5. (3sc, 1inc) x6 [30]
6. (4sc, 1inc) x6 [36]
7. (1sc, 1inc) x7, 22sc [43]
8. 8sc, 1incT, 34sc [45]
9-11. 45 sc [45] (3 rows)
12. 8 sc, 1decT, 34 sc [43]
13. (1 sc, 1dec) x7, 22 sc [36]
14. (4 sc, 1dec) x6 [30]
15. (1 sc, 1dec) x6 , 12sc [24]
Stuff with acrylic fiber
16. 24sc [24]
17. (2sc, 1dec) x6 [18]
18. 18sc [18]
19. (1sc, 1dec) x6 [12]
20-30. 12sc (11 rows)
Place the tube inside the neck 31. 6 dec [6]
Make the inverted AM and hide the thread. Cut a 3-inch piece of flexible dental tubing. You can also use a hot glue stick.

WINGS
Start with White
1. 6sc in MR [6]
2. 6sc [6]
3. 6inc [12]
4-6. 12sc (3 rows)
7. (1sc, 1inc) x6 [18]
8. 18sc [18]
9. (1sc, 1dec) x6 [12]
10. 6dec [6]
Make the MR inverted and leave the yarn on the side for sewing.

PAWS
Start with the color Orange
1. 6sc in MR [6]
2. 6sc [6]
3. 6inc [12]
Close the circle and make 6sc taking the two loops
Make 2 chains, go back to the 3rd stitch on the needle doing:
(1inc dc, 1slst) x3 [9]
Leave the thread for sewing, place it on the top of the paw.

HAT
Start with the color Sensation
1. 6sc in MR [6]
2. 6sc [6]
3. 6inc [12]
Switch to Terracotta
4. 12sc [12]
5. (1sc, 1inc) x6 [18]
Switch to Sensation
8. 18sc [18]
9. (2sc, 1inc) x6 [24]
Switch to Terracotta
10. 24sc [24]
11. (3sc, 1inc) x6 [30]

Fasten off and leave a long thread for sewing.
To make the pompom on top, pass the white thread through your fingers 35 times;
Remove the thread from your finger and with a piece of thread of the same color tie a knot in the middle; Cut the sides and remove the excess, leaving a round shape;
Sew to the tip of the hat.

SEWING
Sew the hat however you prefer, we chose to sew it on the side of the head. There is no need to add stuffing;
The head was sewn slightly tilted to the side;
Sew the wings on the sides of the body, the butt should be on the back of the head;
The paws are sewn on the bottom of the body.
BRAULIO IS READY
