


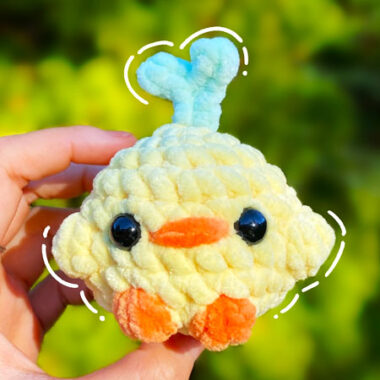
Friends, today I am with you with a very creative design. We can say that it is a duck amigurumi toy hidden inside a pine tree or dressed in a pine tree costume. I think it is a very surprising design for Christmas and I will make this toy for myself. The toy is actually simple to make but since it is a layered tree design, it will take some time to make the toy.
Amigurumi Quacking Christmas Tree Pattern
You also need to crochet the duck that is inside the Christmas tree and is not visible. You can see the photos related to this subject a little below. Now, if you are ready, let’s take a look at the amigurumi pattern.
Designer: fluffy_hooks
MATERIALS
– WHITE, ORANGE & GREEN YARN (optional: use 3 different shades of green)
– YARN COLOURS OF CHOICE FOR EMBROIDERING DETAILS (I USED HOBBII HONEY BUNNY)
– CROCHET HOOK (I USED 5MM)
– SAFETY EYES (I USED 10MM)
– STUFFING
– STITCH MARKER
– DARNING NEEDLE
– SCISSORS
DISCLAIMER
depending on the yarn type that you use, you may end up with a slightly different looking result
ABBREVIATIONS
CH – chain
SC – single crochet
DC – double crochet
INC – increase
DEC – invisible decrease
FLO – front loop only
SLST – slip stitch
FO – fasten off
ST(S) – stitch(es)
BODY in white
R1: 8sc in MR (8)
R2: 8inc (16)
R3-R8: 16sc (16) *6 rounds*
insert the eyes between R5-6, 4sts apart, start stuffing the body and continue as you go
R9: (3sc, inc)x4 (20)
R10: (3sc, inc)x5 (25)
R11: 25sc (25)
R12: (4sc, inc)x5 (30)
R13-R16: 30sc (30) *4 rounds*
R17: (4sc, dec)x5 (25)
R18: 25sc (25)
R19: (3sc, dec)x5 (20)
R20: (3sc, dec)x4 (16)
R21: 8dec (8)
finish stuffing the body, FO, sew the hole closed, weave in the loose end

FEETX2 in orange
R1: 3sc in MR (3)
close the MR, FO, leave a tail for sewing attach the feet between R18-R19, 3sts apart
BEAK in orange
using orange yarn embroider the beak between R5-R6 (right between the eyes) make it 2sts wide
NOTE
I suggest to keep your tension a bit more loose for the next step and make sure the parts fit around the duck’s body
SMALL TREE (HAT) in green
R1: 6sc in MR (6)
R2: 6inc (12)
R3: 12sc (12)
R4: (sc, inc)x6 (18)
R5: 18sc (18)
for the next round mark the first unworked backloop for sewing to the body
R6: FLO 18sc (18)
R7: [slst, 2dc in the same st, slst]x6 (24)
FO, leave a long tail for sewing to the body, weave the tail to the first unworked backloop
MEDIUM TREE (SKIRT) in green
ch25, slst in the 1st st to make a circle
R1: sc in the 2nd ch from the hook, 23sc (24)
R2: (3sc, inc)x6 (30)
R3: 30sc (30)
R4: FLO 30sc (30)
R6: [slst, 2dc in the same st, slst]x10 (40)
FO, leave a long tail for sewing to the body, weave this tail to the top of this tree part (the opposite of the frills)
LARGE TREE (SKIRT) in green
ch31, slst in the 1st st to make a circle
R1: sc in the 2nd ch from the hook, 29sc (30)
R2: (2sc, inc, 2sc)x6 (36)
R3: 36sc (36)
R4: FLO 36sc (36)
R6: [slst, 2dc in the same st, slst]x12 (48)
FO, leave a long tail for sewing to the body, weave this tail to the top of this tree part (the opposite of the frills)

ASSEMBLY
1. starting from the LARGE TREE, sew it between R12-13 of the body
FO, cut the yarn & weave in any lose tails
2. sew the MEDIUM TREE between R7-8 of the body (or R8-9 depending on your preference)
FO, cut the yarn & weave in any lose tails
3. attatch the SMALL TREE by sewing the unworked backloops of the hat between R3-4 of the body, stuff the hat lightly FO, cut the yarn & weave in any lose ends
DETAILS
you can use different colours of yarn to embroider colourful sprinkles onto the tree parts to imitate christmas decorations. To make a little star topper:
*use thinner yarn for better result* in MR (1sc, 1dc, ch2, 1dc) x5, close MR slst into 1st sc. Attatch to the top of the hat.
CONGRATULATIONS
you have successfully completed your Quacking Christmas Tree!
