


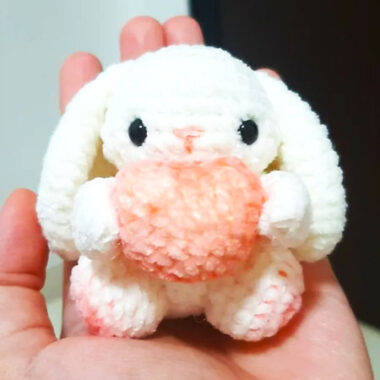
I would like to introduce you to a cute bunny pattern with basic features. Actually, I will start by making some changes to the simple crochet patterns I shared in the past, which were not very detailed. Today, we are starting with this bunny. The bunny has a very standard design, but especially in the areas around its eyes and mouth, a bit of tightening is done. If you haven’t done this process before, you will encounter a round head.
Plush Bunny Fuzzy Crochet Pattern Step by Step
Actually, you can make a little skirt for this standard bunny, but it’s not included in the pattern. If you look at the bunny patterns I shared before, you can easily learn how to make a simple skirt for this toy. So, if you’re ready, let’s get started and crochet the toy.
Designer: mir_detstva_as
Materials:
1. Suitable yarn in two colors (I am using YarnArt DOLCE)
2. Suitable crochet hook (I am using 4.0 mm)
3. Eyes (I am using 8 mm half beads)
4. Yarn for embroidering the nose and mouth (I am using a plastic nose for toys)
5. Stuffing
6. Glue, needle, scissors
Abbreviations:
ch– chain
2ch, 6sc– Make an increase (inc), crochet two chain stitches, and in the second chain from the hook, make an increase by crocheting 6 single crochet stitches.
sc– single crochet
inc– increase
hdc– half double crochet
dec– decrease
slst– slip stitch
The size of the finished toy without the ears is 17 cm.

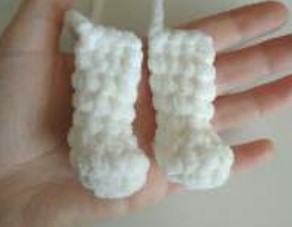
Lower Paws (two pieces)
Only stuff the lower part.
1. 2ch, 6sc
2. 6inc = 12sc
3. 12sc
4. 4dec, 4sc = 8sc
5-9. 8sc
Fold and crochet 3-4 sc stitches through both edges. Secure the yarn and cut it. Crochet the second paw in the same way.
Body and Head
The body and head are crocheted as one piece. Stuff as you go.
1. 2ch, 6sc
2. 6inc = 12sc
3. (sc, inc) repeat 6 times = 18sc
4. (2sc, inc) repeat 6 times = 24sc
5. (3sc, inc) repeat 6 times = 30sc In the next row, we will crochet the paws in.

Continue crocheting…
6. 3 sc with paw, 12 sc, 3 sc with paw, 12 sc = 30 sc. In the next row, we will crochet the tail. You can also crochet it separately and sew it on. For convenience, you can place a marker at the end of the row. I do not use a marker.
7. Crochet one row of sc without changes. Where the tail will be, crochet 5 double crochet stitches (DC) into one stitch. Finish the row with sc = 30 sc. If you are crocheting the tail separately, simply crochet 30 sc stitches.
8. 30sc. If you plan to crochet with a sweater, change the yarn to the color of the sweater.
9-11. 30sc
12. (3sc, dec) repeat 6 times = 24sc
13. (2sc, dec) repeat 6 times = 18sc
14. 18sc
15. (sc, dec) repeat 6 times = 12sc Next, the head.

Continue crocheting with head
Change the yarn to the main color.
16. 12inc = 24sc
17. (3sc, inc) repeat 6 times = 30sc
18. (4sc, inc) repeat 6 times = 36sc
19-22. 36sc
23. (4sc, dec) repeat 6 times = 30sc
24. (3sc, dec) repeat 6 times = 24sc
25. 24sc
26. (2sc, dec) repeat 6 times = 18sc
27. (sc, dec) repeat 6 times = 12sc
28. 6 dec. Secure the yarn and cut it.

Upper Paws (two pieces)
Stuff loosely, only the lower part.
1. 2ch, 5sc
2. 5inc = 10sc
3. 10sc
4. 2dec, 6sc = 8sc
5. 8sc. Change the color..
6-8. 8 sc. Fold and crochet 3 sc stitches through both edges.

Ears (two pieces)
Do not stuff the ears.
1. 2ch, 6sc
2. 6inc = 12sc
3. (sc, inc) repeat 6 times = 18sc
4-5. 18sc
6. dec, 7sc, dec, 7sc = 16sc
7. dec, 6sc, dec, 6sc = 14sc
8. dec, 5sc, dec, 5sc = 12sc
9. dec, 4sc, dec, 4sc = 10sc
10. 10sc
Secure the yarn and cut it, leaving a long end for sewing.

Finishing
Sew on the upper paws and ears. Optionally, make a simple tightening (mouth, eyes, mouth).
Glue on the eyes and nose (if it’s pre-made).
If you don’t have a nose, embroider the nose and eyebrows.

That’s it, the toy is ready.
When publishing the finished toy, please mention the author of the tutorial.


