


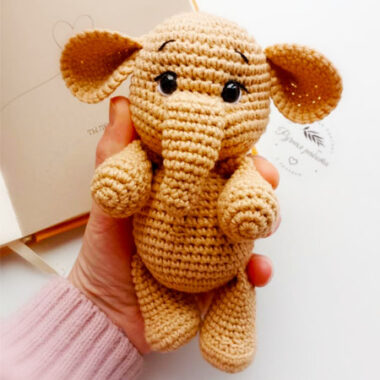
We can see that in elephant amigurumi toys, especially the head of the toy is designed to be quite large. It is quite obvious that a similar design prevails in this toy. But this elephant should be the size of an amigurumi toy, it has very elegant and thin ears. Although the ears of the amigurumi elephant are large, they create an elegant appearance due to their folded structure and thin appearance. Similarly, we see that the arms and legs of the toy are quite small.
Cute Elephant Marry Keychain Amigurumi Pattern
The trunk of the amigurumi elephant toy has a thick and simple structure. I think the black-eyed elephant would look great as a keychain.
Designer: ellescrochet
Abbreviations
– MR – magic ring
– sc – single crochet
– inc – increase
– dec – decrease
– sl st – slip stitch
– ch – chain stitch
– [] – repeats
– () – number of stitches at the end of the row
Materials List
– Balloon amigo yarn in fencing color (2866)
– Eye with safety lock at 09.
– Crochet hook compatible with the chosen yarn.
– Tapestry needle.
– Stuffing.
With the materials used, Theo ended up with 10cm.
Head and body – Use the yarn in the color fencing
1) 6sc in a magic ring (6)
2) 6 increases (12)
3) [1sc, inc] x6 (18)
4) [2sc, inc] x6 (24)
5) [3sc, inc] x6 (30)
6) [4sc, inc] x6 (36)
7) [5sc, inc] x6 (42)
8) [6sc, inc] x6 (48)
9 to 16) sc around (48) – 8 rows
Eye position: the eyes with slats should be positioned between rows 12 and 13 with 9 stitches between them.
17) [6sc, dec] x6 (42)
18) [5sc, dec] x6 (36)
19) [4sc, dec] x6 (30)
20) [3sc, dec] x6 (24)
In row 21 you will work on reinforcing Theo’s neck.
21 – a) make sl st all around, picking up only the back loop of the stitches – BLO. This sequence of sl sts is not considered a row.
21 – b) sc all around, picking up the front loop of the stitch – FLO (24) Fill the head with silicone fiber.
22) sc around (24) – 1 row
23) [3sc, inc] x6 (30)
24 and 25) sc around (30) – 2 rows
26) [4sc, inc] x6 (36)
27 and 28) sc around (32) – 2 rows
29) [5sc, inc] x6 (42)
30) sc around (42) – 1 row
31) [5sc, dec] x6 (36)
32) [4sc, dec] x6 (30)
33) [3sc, dec] x6 (24)
34) [2sc, dec] x6 (18)
Fill the body with silicone fiberfill.
35) [1sc, dec] x6 (12)
Finish the piece with an inverted magic ring and hide the excess yarn in the work.
Ears – Use the yarn in the color fencing; make two pieces.
1) 6sc in a magic ring (6)
2) 6 increases (12)
3) [1sc, inc] x6 (18)
4) [2sc, inc] x6 (24)
5) [3sc, inc] x6 (30)
6) [4sc, inc] x6 (36)
7) fold the ear in half and make 3sc catching both sides of the row.
Leave a long enough thread for sewing; position the ears on the head between rows 10 and 11, sew.
Trunk – Use the yarn in the color fencing
1) 6sc in a magic ring (6)
2) [1sc, inc] x3 (9)
3) sc all around catching the back loop of the stitch – BLO (9)
4 to 7) sc all around (9) – 4 rows
8) [2sc, inc] x3 (12)
9) sc all around (12) – 1 row
10) [2sc, inc] x4 (16)
11) fold the trunk in half and make 8sc catching both sides of the row.
Leave a long enough thread for sewing; position the trunk between rows 13 and 14, sew.
Arms – Use the yarn in the color fencing; make two pieces.
1) 8sc in a magic ring (8)
2 to 7) sc all around (8) – 6 rows
8) Fold the arm opening in half and make 4sc taking both sides of the row.
Leave a long enough thread for sewing; the arms do not need stuffing. Position the arms on the side of the body, between rows 21 and 22, and sew.
Legs – Use the yarn in the color fencing; make two pieces.
In this piece we will work with the oval crochet, therefore, we will start with chains and not with a magic ring.
1) make 6 chains, go back to the second chain and work: 4sc, 3sc in the same stitch, 3sc, 2sc in the same stitch (12)
2) inc, 3sc, 3inc, 3sc, 2inc (18)
3 and 4) sc all around (18) – 2 rows
5) 4sc, 4dec, 6sc (14)
6) 2sc, 4dec, 4sc (10)
Insert the stuffing until row 6.
7 and 8) sc all around (10) – 2 rows
9) fold the leg opening in half and make 5sc taking both sides of the row.
Leave a tail long enough for sewing. Position the legs on the side of the body, between rows 30 and 31, and sew.

