


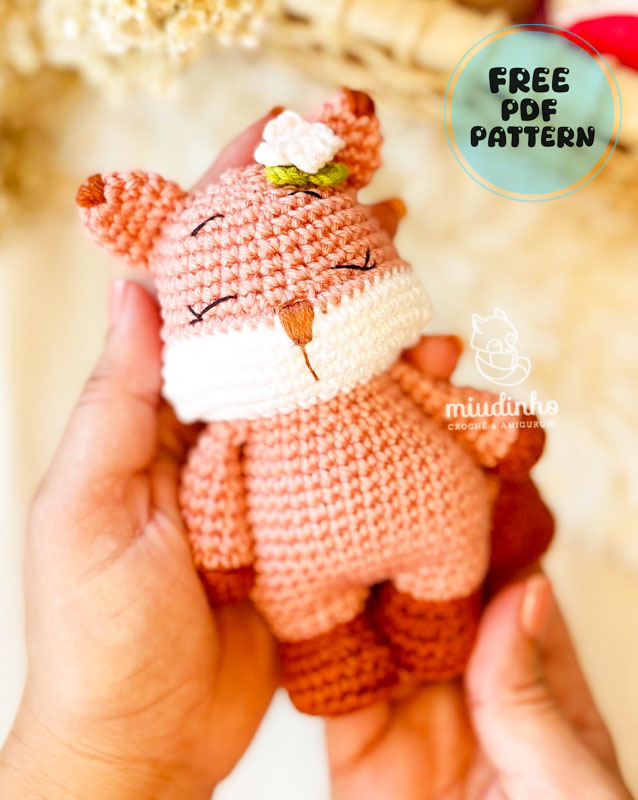
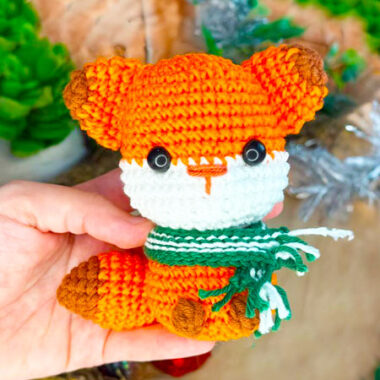
The fox amigurumi toy really looks like a girl doll, doesn’t it? To do this, you just need to add a few touches to the amigurumi toy. First, we can talk about the toy’s eyes and eyelashes. If you make long eyelashes on the toy you made, you can see that it immediately turns into a girl doll. Another alternative would be to add a clasp on the top of the fox amigurumi toy’s head. We can see that different shades of orange are used in the construction of the toy.
Cute fox with Flower Buckle Amigurumi Toy
Especially on the tips of the toy’s arms and legs and on the tips of the ears, a shade of color that we can call brick color is used. In the toy, white color is used only in the face area, and it looks like the crochet fox toy has chubby cheeks.
Designer: miudinhocroche https://www.instagram.com/miudinhocroche/
Materials list
Amigurumi yarn in 3 colors
2.5mm crochet hook
Stuffing (silicon fiber)
Tapestry needle
Colors: Tamara, satin, white
Abbreviations
am: magic ring
sc: single crochet
sl st: slip stitch
dec: decrease
ch: chain
Height: 13mm
Width: 9.5
Arms (make 2)
Start with Tamara color
1. 6 sc in the MR (6)
2. 1 inc 6x (12)
3. 12 sc (12)
Switch to Satin yarn
4. 12 sc only in the back loops (12)
5. 1 dec, 4 sc 2x (10)
6-9. 10 sc (10) [4 rows]
10. 1 dec, 3 sc 2x (8)
11. 8 sc (8)
12. Fold and close the piece with 4 sc and leave a long tail for sewing.

Ears (make 2)
Start with Satin
1. 6 sc in MR (6)
2. 1 sc, 1 inc 3x (9)
3. 2 sc, 1 inc 3x (12)
Switch to Satin yarn
4-5. 12 sc (12) [2 rows]
Cut a long piece of yarn for sewing.
Embroidery: Embroider the tip of the ear with brown, making 5 turns.

Legs (make 2)
Start with Tamara
1. 6 sc in MR (6)
2. 1 inc (6x) (12)
3. 1 sc, 1 inc (6x) (18)
4. 18 sc in back loops (18)
5. 18 sc (18)
6. 4 sc, 1 dec (5x), 4 sc (13)
7. 11 sc, 1 dec (12)
Switch to Satin yarn
8. 12 sc in back loops (12)
9. 12 sc (12)

For the left leg:
add + 4 sc, cut and finish to join with the right leg.
For the right leg:
add + 9 sc, don’t cut the thread, let’s join the legs.

Body
Make 2 chains to join the right leg to the left leg with 1 sc.
10. 11 sc, 2 sc in the chain, 12 sc, 2 sc in the chain (28)
11. 3 sc, 1 inc (3x), 1 inc (2x), 1 inc, 3 sc (3x), 1 inc (2x) (38)
12-15. 38sc (38) [4rows]
16. 7 sc, 1 dec, 18 sc, 1 dec, 9sc (36)
17. 36sc (36)
18. 7 sc, 1 dec, 18 sc, 1 dec, 7 sc (34)
19. 6 sc, 1 dec (2x), 14 sc, 1 dec (2x), 6 sc (30)
20. 30 sc (6x) (30)
21. 3 sc, 1 dec (6x) (24)
22. 24 sc (24)
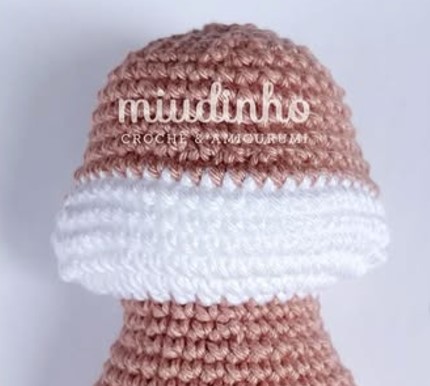
To start the head, make + 6 sc with Satin yarn to reach the side of the body. Cut the yarn and change to white.

Head
Change to White yarn
23. 24sc (24)
24. 1 inc (24x) (48)
25. 1 inc (3x), 20sc, 1 inc (4x), 20sc, 1 inc (56)
26. 56sc (56)
27. 1 dec (2x), 20sc, 1 dec (4x), 20sc, 1 dec (2x) (48)
28. 2sc, 1 dec, 17sc, 1 dec, 2sc, 1 dec 19sc, 1 dec (44)
Change to Satin yarn
29. 44sc (44)
30. 1 dec, 20sc, 1 dec, 6sc, 1 dec (4x), 6sc (38)
31. 1 dec, 18 sc, 1 dec, 16 sc (36)
29-31. 36 sc (36) [3 rows]
32. 4 sc, 1 dec (6x) (30)
33. 3 sc, 1 dec (6x) (24)
34. 2 sc, 1 dec (6x) (18)
35. 1 sc, 1 dec (6x) (12)
36. 1 dec (6x) (6)
Finish the piece with an inverted magic ring.
Snout Embroidery:
Embroider the snout between rows 29 and 30.

Eye Embroidery:
Embroider the eyes on row 31, with 3 stitches and leave 4 sc between them.
Eyebrow Embroidery:
Embroider the eyebrows 4 rows above the eyes with 2 sc. Leave 4 sc between them.

pb=sc
Tail
Continue with Tamara yarn
1. 6 sc (6)
2. 1 inc (6x) (12)
3. 12 sc (12)
4. 2 sc, 1 inc (4x) (16)
5. 3 sc, 1 inc (4x) (20)
6. 4 sc, 1 inc (4x) (24)
7. 5 sc, 1 inc (4x) (28)
8. 28 sc (28)
Switch to Satin yarn
9. 28 sc in back loops (28)
10. 28 sc (28)
11. 5 sc, dec (4x) (24)
12. 4 sc, 1 dec (4x) (20)
13. 3 sc, 1 dec (4x) (16)
14. 2 sc, 1 dec (4x) (12)
15-16. 12 sc (12) [2 rows]
17. Close the piece and finish with 6 sc (6)

Tail sewing:
Sew the tail between rows 16 and 17.

That’s it. Crochet Fox is ready!
