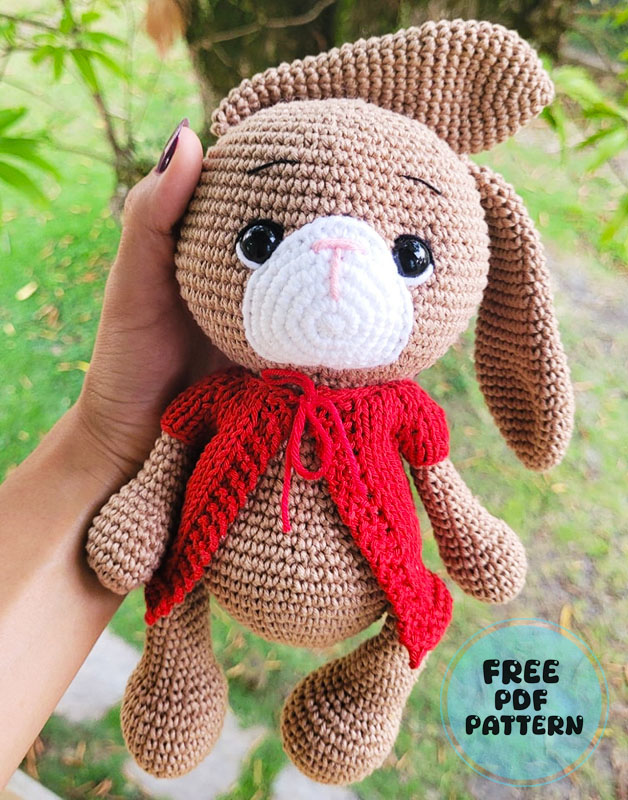
Plush big floppy ears bunny PDF amigurumi free pattern

Are you looking for a very cute crochet bunny amigurumi with giant ears and wonderful eyes? Then you can knit this cute plush amigurumi that we shared with you for free.
Hello everyone, guys. I wanted to make a different entry today. Actually, I know that I shared a lot of bunny amigurumi. But I think it’s one of the cutest. Don’t worry about the ingredients.
You can find all the necessary materials in the detailed section. First of all thank you to @nastyakravchenko27, who designed this wonderful amigurumis. You can follow the Instagram address.
When you go to Instagram account, I would appreciate if you thank him in my place. There are beautiful amigurumis. Of course, I think one of the most beautiful is this crochet bunny model. Of course, you can knit it in different colors.
This is up to your creativity. It looks pretty cute as it is already plush. If you follow my posts, you can see a lot of plush amigurumi. Please continue to follow our page.
I will be very happy if you share the pictures with me after completing the amigurumi.

Materials

✓ Yarn “Himalaya Dolphin Baby” (gray 80325) (2 skeins)
✓ Yarn “Himalaya Dolphin Baby” (white 80301)
✓ Yarn “Alize softy” (white No. 55)
✓ Floor hooks numbered 5 (4); No. 2.5 (3); No. (8)
✓ Disks (3cm – 4pcs); (4cm – 4pcs), or joints of the same size;
✓ Cotter pins 4cm and 3.3cm long
✓ Eyes 18mm
✓ Spout 18mm
✓ Cilia
✓ Glue moment
✓ Round nose pliers
✓ Markers
✓ Scissors
✓ Thick thread for sewing parts
✓ Needle

Abbreviations
sc : Single Crochet
inc : Increase
dec : Decrease
tr : Triple Crochet/ Treble Crochet
st: Stitch
dc : Double Crochet
hdc: Half Double Crochet
sl-st : Slip Stitch
ch : Chain
..in : make increase into same stitch as many as the number which is given in front of “inc” abbreviation (exp; 3inc, 4inc..).
FLO : Crochet into front loops only
BLO : Crochet into back loops only
BL : Bobble Stitch – do 5dc all in the same stitch and then yarn over and pull through all the loops on your hook (the original loop + 1 loop for each partially completed dc).

  • 1 (11)
  • 1 (10)
  • 1 (9)
  • 1 (8)
  • 1 (7)

1. Legs:
1. Start knitting in white. We collect a chain of 5 ch
2. In the second loop from the hook 1sc, 2sc, in the last 4th loop, knit 5sc, turn; 2sc, 3sc in one loop (13)
3. inc, 3sc, 4inc, 3sc, 2inc (20)
4. 2inc, 4sc, (inc, 1sc)*3, 4sc, inc, 3sc (26)
5, 6. 26sc
7. 7sc, (dec, 1sc)*4, 7sc (22)
8. 6sc, 2dec, 1sc, 2dec, 7sc (18)
9. 7sc, 2dec, 7sc (16)
10. Change color to gray: 16sc
11. 6sc, 2dec, 6sc (14)
12. 7sc, inc, 6sc (15) +1sc to offset a row
13. 6sc, inc, 8sc (16)
14. 8sc, inc, 7sc (17)
15. 8sc, inc, 8sc (18)
16. inc, 17sc (19)
17. 19 sc
After we finish knitting row 17, we will insert a disc with a cotter pin (joint).
Right leg:
Between rows 15 and 16 we insert a disc with a cotter pin, go down 1 row, in row 16 we had an increase, we count from it (including an increase) 5sc, insert a disc with a cotter pin (joint). Next, we finish knitting the leg, (18, 19 and 20 rows).
Don’t forget to fill the leg!
18. 1sc, dec, 16sc (18)
19. (1sc, dec)*6 (12)
20. 6 dec. Cut the thread, pull off the hole, hide the tip.
The right leg is ready!

We knit the left leg in the same way as the right one, only we will insert the disc with the cotter pin from the other
sides.
Left leg:
Between 15 and 16 rows we insert a disc with a cotter pin (joint), go down 2 rows,
back from the end of the 17th row we count 5sc, insert the disc with the cotter pin (joint).
Next, we finish knitting the leg (rows 18, 19 and 20).
Don’t forget to fill the leg!
The left leg is ready!

2. Paws:
1. 6sc in MR (start knitting in white)
2. 6inc (12)
3. 2sc, inc, (1sc, inc)*3, 3sc (16)
4, 5. 16sc
6. 4sc, 4dec, 4sc (12)
7. 12sc
8. Change color to gray 12sc
9, 10. 12sc
11. inc, 5sc, inc, 5sc (14)
12. – 14. 14sc

After we finish knitting row 14, we will insert a disc with a cotter pin (joint).
Right Paws:
We count forward 5sc, insert a disc with a cotter pin (joint) between rows 13 and 14.
Don’t forget to stuff the Paws!
We finish knitting the paws, knit 15 and 16 rows.
15. 1sc, dec, 5sc, dec, 4sc (12)
16. 6 dec. Cut the thread, pull off the hole, hide the tip.
The right Paws is ready!

Left Paws:
After we finish knitting row 14, we will insert a disc with a cotter pin (joint).
We count back 3sc, between the 13th and 14th rows we insert a disc with a cotter pin (joint).
Don’t forget to stuff the Paws!
We finish knitting the paws, knit 15 and 16 rows.
The left Paws is ready!

3. Body:
1. 6sc in MR
2. 6inc (12)
3. (1sc, inc)*6 (18)
4. (2sc, inc)*6 (24)
5. (3sc, inc)*6 (30)
6. (4sc, inc)*6 (36)
7. 36sc
8. (5sc, inc)*6 (42)
9. – 14. 42sc (6 rows)
15. 14 sc, dec, 1sc, 4dec, 1sc, dec, 14sc (36)
16. (4sc, dec)*6 (30)
After we finish knitting row 16, we will fasten the legs!
From the MR (amigurumi ring) we count 7 rows, insert the legs between 7 and 8 rows.
The distance between the fastening points of the legs in front is 18 sc (taking into account the deductions, i.e. counts as 1sc).
Next, we continue to knit the body to the end.
17. – 19. 30sc (3 rows)
20. (3sc, dec)*6 (24)
21. – 22. 24 sc (at the end of the 22nd row we knit + 3sc to shift the row)
23. (2sc, dec)*6 (18)
24. 18sc. Fasten the thread, cut off, hide.
Insert the legs:
We fasten the legs between the 19 and 20 rows, the distance between them in front is 12sc (decrease as 1sc)
The bunny’s body is ready!

4. Head:
1. 6sc in MR
2. 6inc (12)
3. (1sc, inc)*6 (18)
4. (2sc, inc)*6 (24)
5. (3sc, inc)*6 (30)
6. (4sc, inc)*6 (36)
7. (5sc, inc)*6 (42)
8. 42sc
9. (6sc, inc)*6 (48)
10. – 14. 48sc (5 rows)
15. 3sc, dec, (6sc, dec)*5, 3sc (42)
16. (5sc, dec)*6 (36)
17. 2sc, dec, (4sc, dec)*5, 2sc (30)
18. (3sc, dec)*6 (24)
1sc, dec, (2sc, dec)*5, 1sc (18)

Muzzle: (Alize softy yarn)
1. We knit a chain of 6 ch
2.4sc, 5sc in one loop, reversal, 3sc, 3sc in one loop. Then we knit in a circle.
3. inc, 4sc, 4inc, 3sc, 3inc
4. 1sc, inc, 4sc, (inc, 1sc)*4, 3sc, (inc, 1sc)*3
5. inc, 4sc, inc, (2sc, inc)*4, 4sc, (inc, 2sc)*3
6. – 7. 38sc. (Alize softy yarn is very difficult, especially when crocheting with it, so if you have 1 – 2 sc more, don’t worry)
We make out the face =)
We glue the cilia to the eyes.
Insert the eyes between the 9th and 10th rows, the distance between the eyes is 7sc.
Insert the nose into the muzzle, then sew on the muzzle.
Sew on from the beginning of the 9th row to the end of the 16th.
We fill the face a little.
We make a tightening from the nose to the very bottom of the muzzle.

5. Ears:
1. 8 hdc in MR sl st
2. 8inc of hdc (16) sl st
3. (1hdc, inc)*8 (24)
4. 24hdc
5. (2hdc, inc)*8 (32)
6. – 7. 32hdc
8. 6hdc, dec, 14hdc, dec, 8hdc (30)
9. 30hdc
10. 6hdc, dec, 13hdc, dec, 7hdc (28)
11. 28hdc
12. 7hdc, dec, 12hdc, dec, 5hdc (26)
13.7hdc, dec, 10hdc, dec, 5hdc (24)
14. 6hdc, dec, 10hdc, dec, 4hdc (22)
15. 22hdc + for row slip
16. 5hdc, dec, 9hdc, dec, 4hdc (20)
17. 5hdc, dec, 8hdc, dec, 3hdc (18)
18. 18hdc + 2hdc for row slip
19. 3hdc, dec, 8hdc, dec, 3hdc (16)
20. 3hdc, dec, 6hdc, dec, 3hdc (14)
21. 3hdc, dec, 5hdc, dec, 2hdc (12)
22. 3hdc, dec, 4hdc, dec, 1hdc (10) + 1 hdc for row slip
23. 10 hdc. Cut the thread, fasten it, hide it.
The ears are ready!

Tail:
1. 6sc in MR
2. 6inc (12)
3. (1sc, inc)*6 (18)
4. – 5. 18sc
6. (1sc, dec)*6 (12)
7. 6 dec. Cut the thread, fasten and hide.
Assembly:
We sew the head to the body, then we sew the ears, and last but not least
sew on the tail.

I hope you like this cute amigurumi toy. Stay tuned for more free amigurumi patterns pdf. You can also visit my blog for more bunny crochet patterns pdf.

Leave a Reply