


I want to introduce you to one of the most creative bunny designs I have ever seen. The free bunny pattern made me very happy and I hope it makes you happy too. Today we will make a crochet bunny toy designed by eliyarnart. If you want to take a look at the other photos of the toy, I recommend you to visit eliyarnart’s Instagram profile. eliyarnart has a lot of free plush amigurumi patterns.
Bunny with Carrot Car Crochet Pattern Step by Step
The designer uses chenille yarn to make a carrot car bunny and crochets the toy using a 5mm crochet hook. It is recommended that you use 12mm safety eyes to make the bunny’s eyes.
Designer: eliyarnart
Materials
• Hook: 5mm, 3mm
• Orange chenille size 4 medium
• Green chenille size 4 medium
• White chenille size 4 medium
• Light blue chenille size 4 medium
• Brown chenille size 4 medium
• Pink chenille size 4 medium
• orange cotton/ acrylic yarn
• pink cotton/acrylic yarn light blue cotton/ acrylic yarn
• yellow cotton/acrylic yarn
• safety eyes 12mm
• iron Wire
• Stuffing
• Tapestry needle
• Stitch markers
• Scissors
• hot glue
Abbreviations
• R: round
• St: Stitch
• mr: magic ring
• ch: chain
• sc: single crochet
• hdc: half double crochet
• dc: double crochet
• sl st: slip stitch
• inc: increase
• dec: decrease
• FO: fasten off
• cc: change color
• BLO: Back Loop only

Carrot
Use orange yarn and 5mm hook
R1: 6sc in a mr (6)
R2: (sc, inc) repeat 3 times (9)
R3: 9sc (9)
R4: sc, (inc, 2sc) repeat 2 times, inc, sc (12)
R5: 12sc (12)
R6: (inc, 3sc) repeat 3 times (15)
R7: 15sc (15)
R8: 2sc, (inc, 4sc) repeat 2 times, inc, 2sc (18)
R9: 18sc (18)
R10: (5sc, inc) repeat 3 times (21)
R11: 21sc (21)
R12: 3sc, (inc, 6sc) repeat 2 times, inc, 3sc (24)
R13: 24sc (24)
R14: (7sc, inc) repeat 3 times (27)
R15: 27sc
R16: 4sc, (inc, 8sc) repeat 2 times, inc, 4sc (30)
R17: 30sc (30)
Start stuffing as you go
R18: (9sc, inc) repeat 3 times (33)
R19: 33sc (33)
R20: 5sc, (inc, 10) repeat 2 times, inc, 5sc (36)
R21: 36sc (36)
R22: 3sc, dec, (7sc, dec) repeat 3 times, 4sc (32)
R23: (2sc, dec) repeat 8 times (24)
R24: (sc, dec) repeat 8 times (16)
R25: 8dec (8)
Cut yarn and sew closed.

Wheels (x4)
Use light blue and 5mm hook
R1: 4sc in a mr (4)
R2: 4inc (8)
Cut yarn and make an invisible join (no need to leave a long tail for Sewing)
Make a total of 8 circles
Then take two circles attached the two back sides so that both front sides can be seen, insert the hook in any st of the two circles and join them with 8sl sts using brown yarn. Cut yarn leaving a long tail for sewing and make an invisible join.

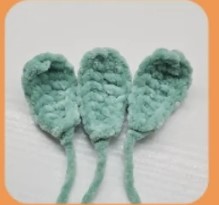
Leaves (x3)
Use green yarn and 5mm hook Slip knot leaving a long tail (you I will use it for sewing) Ch10, starting from the 3rd ch from the hook make: 3dc, 2hdc, 2sc, sl st, another sl st on the other side of the ch, 2sc, 2hdc, 3dc, sl st on the last ch.
Cut yarn and FO.
Head
Use white yarn and 5mm hook
R1: 6sc in a mr (6)
R2: 6inc (12)
R3: (sc, inc) repeat 6 times (18)
R4: (2sc, inc) repeat 6 times (24)
R5-6: 24sc (24) – 2 rounds
R7: 4sc, 4inc, 8sc, 4inc, 4sc (32)
R8: sc, dec, (2sc, dec) repeat 7 times, sc (24)
R9: (2sc, dec) repeat 6 times (18)
Cut yarn and FO with an invisible join. (don’t sew closed) Insert safety eyes (12mm) between R 6-7, 4 visible sts apart.
Add fiber fill paying attention to filling the cheeks.

Body
Use white yarn and 5mm hook
R1: 9ch, starting from the 2nd ch from the hook make 7sc, 3sc in the same st, 6sc, inc (18)
R2: (2sc, inc) repeat 6 times (24)
R3: BLO 24sc (24)
R4: (2sc, dec) repeat 6 times (18)
Cut yarn leaving a long tail for sewing. Add fiber fill.

Arms (x2)
Use white yarn and 5mm hook
R1: 5sc in a mr (5)
R2: 5sc (5)
Cut yarn.
Leave a long tail for sewing. Stuff if needed

Ears (x2)
Start with white yarn and 5mm hook
R1: 4sc in a mr (4)
R2: 4inc (8)
R3-5: white sc, pink 2sc, white 5sc (8) – 3 rounds
Cut yarn and leave a long tail for Sewing.
Don’t stuff.

Flowers (x3)
Use any colour you like and a 3mm hook
Make a mr and ch2, (hdc, sl st, ch2) repeat 4 times in the last petal make 1hdc and sl st
Cut yarn leaving a long tail for sewing.

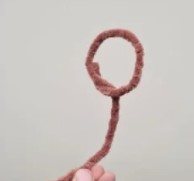
Steering wheel
Cut a string of iron wire 25cm long.
wrap the brown chenille around the wire and secure it with hot glue.
Now shape the steering wheel like in the pic (don’t worry too much about the size of the circle, you’ll adjust it later)
Sewing
Sew the head to the body (starting from the side) – add stuffing if needed
Sew the body to the carrot on R16-19, going through the FLO st of R3
Sew arms between R3-4
Sew ears between R2-4
Sew cheeks and nose like in the pic
sew the flowers on the head
Sew the front wheels on R7-9
Sew the back wheels on R17-19
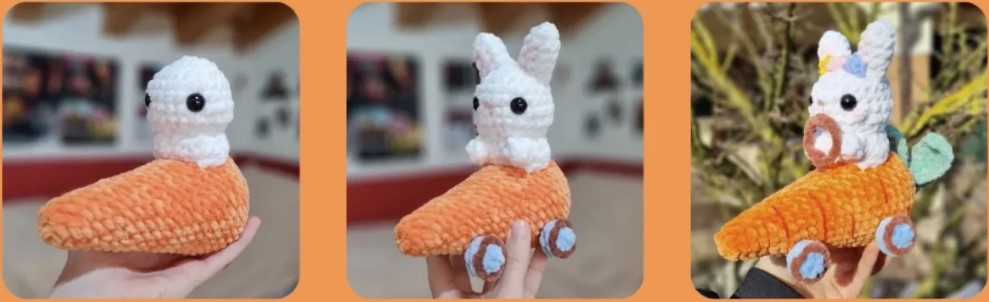
Sew the leaves on top of the carrot, in the center, like in the pic insert the wheel inside the carrot on R13-14 in the center of the bunny and adjust the size of the steering wheel by wrapping it with orange cotton/acrylic yarn sew the carrot’s details as you prefer


