


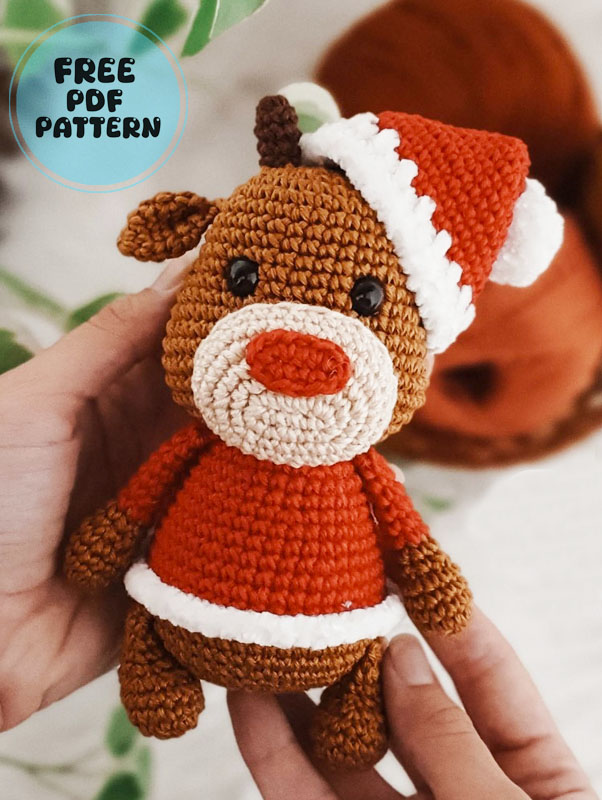
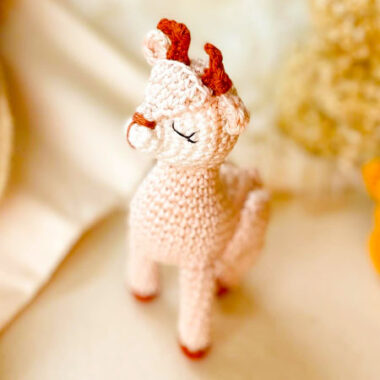
I am happy to introduce you to the crochet deer amigurumi pattern, a wonderful design by the famous Brazilian amigurumi designer ellescrochet. The crochet deer is designed for Christmas and proves it to us very clearly. The tip of the deer’s nose, which has a big muzzle, is made in red. The crochet deer has a white sweater and we see that the deer toy has very short legs. Also, the name of this cute deer is Rudolph. Rudolph has tiny horns and tiny ears. If it weren’t for these tiny horns, you might confuse deer with a teddy bear.
Crochet Christmas Deer PDF Pattern
There is a detailed amigurumi pattern for this crochet toy deer, which looks very nice when combined with a Christmas hat. Unfortunately, there are no images of the steps of making the toy, but since the pattern has an explanatory text, I don’t think you will have any difficulty making the toy.
Designer: ellescrochet
Abbreviations
– am – magic ring
– sc – single crochet
– inc – increase
– ch – chain stitch
– dec – decrease
– [] – repeats
– () – number of stitches at the end of the row
Materials List
– Amigurumi yarn in craft colors (7148), carmine (3528), porcelain (7564) and brigadeiro (7569)
– Plush amigurumi yarn in white (8001)
– Eyes with safety lock no. 09.
– Crochet hook compatible with the chosen yarn.
– Tapestry needle.
– Stuffing.
Head and body – Use craft colored yarn.
1) 6sc in a magic ring (6)
2) 6 inc (12)
3) [1sc, inc] x6 (18)
4) [2sc, inc] x6 (24)
5) [3sc, inc] x6 (30)
6) [4sc, inc] x6 (36)
7-11) sc in each row (36) – 5 rows
12) 7sc, 3inc, 15sc, 3inc, 8sc (42)
13 and 14) sc in each row (42) – 2 rows
15) 7sc, [1sc, inc] x3, 15sc, [1sc, inc] x3, 8sc (48)
16 and 17) sc in each row (48) – 2 rows
Position Eyes: The eyes with safety lock should be positioned between rows 11 and 12, 7 stitches apart.
18) [6sc, dec] x6 (42)
19) sc all around (42) – 1 row
20) [5sc, dec] x6 (36)
21) [4sc, dec] x6 (30)
22) [3sc, dec] x6 (24)
In row 23, you will work with the reinforcement of the mini Rodolfo’s neck. Pay attention in this part, we will make the color change in row 23- b; Fill the head with silicone fiber.
23 – a) make sl st all around, taking the back loop of the stitch (BLO). This sl st sequence is not considered a row.
Change to the amigurumi yarn in the color carmine.
23 – b) work sc all around, picking up the front loop of the stitch (FLO).
24) [3sc, inc] x6 (30)
25 and 26) sc all around (30) – 2 rows
27) [4sc, inc] x6 (36)
28 and 29) sc all around (36) – 2 rows
30) [5sc, inc] x6 (42)
31 and 32) sc all around (42) – 2 rows
33) [6sc, inc] x6 (48)
Change to the amigurumi yarn in the color craft.
34) sc all around, picking up the back loop – BLO (48)
35 and 36) sc all around (48) – 2 rows
37) [6sc, dec] x6 (42)
38) [5sc, dec] x6 (36)
39) [4sc, dec] x6 (30)
40) [3sc, dec] x6 (24)
41) [2sc, dec] x6 (18)
Fill the body with silicone fiber.
42) [1sc, dec] x6 (12)
43) 4 decreases (8)
Finish with an inverted magic ring and hide the excess yarn in the work.
Ears – Use craft color yarn.
1) 6sc in a magic ring (6)
2) [1sc, inc] x3 (9)
3) sc all around (9) – 1 row
4) [2sc, inc] x3 (12)
5) sc all around (12) – 1 row
6) fold the ear opening in half and work sc picking up the stitches on both sides of the row (6)
7) fold the ear in half again and work sc, taking the stitches on both sides of the row (3)
Leave a long thread for sewing; the ears do not need filling. Sew the ears between rows 7 and 8 on the head.
Arms Start with craft color yarn; make two pieces.
1) 6sc in a magic ring (6)
2) 6 inc (12)
3 to 5) sc around (12) – 3 rows
6) [1sc, dec] x4 (8)
7) sc around (8) – 1 row
Change to crimson yarn; stuff until row 7.
8 to 13) sc around (8)
14) fold the arm opening in half and work sc picking up the stitches on both sides of the row (4)
Leave a long tail for sewing. Sew the arms between rows 23 and 24 of the body.
Legs – Use craft-colored yarn; make two pieces
In this piece we will work with oval crochet, therefore, we will start with chains and not with a magic ring.
1) Make 6 chains, go back to the second chain and work: 4sc, 3sc in the same stitch, 3sc, 2sc in the same stitch (12)
2) inc, 3sc, 3inc, 3sc, 2 inc (18)
3 and 4) sc all around (18) – 2 rows
5) 4sc, 4dec, 6sc (14)
6) 2sc, 4dec, 4sc (10)
Fill the leg with silicone fiber until row 6.
7 and 8) sc all around (10) – 2 rows
9) fold the leg opening in half and work sc picking up the stitches on both sides of the row (5)
Leave a long tail for sewing. Sew the legs between rows 35 and 36 of the body.
Muzzle – Use porcelain-colored yarn.
In this piece we will work with oval crochet, therefore, we will start with chains and not with a magic ring.
1) Make 6 chains, return to the second chain and work: 4sc, 3sc in the same stitch, 3sc, 2sc in the same stitch (12)
2) inc, 3sc, 3inc, 3sc, 2 inc (18)
3) 1sc, inc, 3sc, [1sc, inc] x3, 3sc, [1sc, inc] x2 (24)
4) 2sc, inc, 3sc, [2sc, inc] x3, 3sc, [2sc, inc] x2 (30)
5 and 6) sc all around (30) – 2 rows
Leave a long thread for sewing. Sew the snout between rows 13 and 22 of the head; Before finishing the sewing, add stuffing.
Nose – Use crimson yarn.
In this piece, we will be working with oval crochet, so we will start with chains and not with a magic ring.
1) Make 6 chains, go back to the second row and work: 4sc, 3sc in the same stitch, 3sc, 2sc in the same stitch (12)
Close the row with 1slst; Leave a long thread for sewing. Sew the nose between rows 2 and 4 of the snout.
Horns – Use brigadeiro-colored yarn; make two pieces.
1) 6sc in a magic ring (6)
2 to 4) sc all around (6) – 3 rows
Leave a long thread for sewing; there is no need to stuff this piece. Sew the horns between rows 2 and 4 of the head.
Christmas hat- Start with the crimson colored yarn.
1) 6sc in a magic ring (6)
2) [1sc, inc] x3 (9)
3) sc in each stitch (9) – 1 row
4) [2sc, inc] x3 (12)
5) [3sc, inc] x3 (15)
6) [4sc, inc] x3 (18)
7) [5sc, inc] x3 (21)
8) [6sc, inc] x3 (24)
9) [7sc, inc] x3 (27)
10) [8sc, inc] x3 (30)
11) [9sc, inc] x3 (33)
12) [10sc, inc] x3 (36)
13-17) sc in each stitch (36) – 5 rows
Switch to the white plush amigurumi yarn.
18) [1sc, 1sc extended] x18 (36)
19) sc around (36) – 1 row
Hide the excess yarn in the work.
Pompom – use white plush yarn.
1) 6 sc in a magic ring (6)
2) 6 increases (12)
3 and 4) sc all around (12) – 2 rows
5) 6 decreases (6)
Place some fiberfill on the pompom and leave a long tail for sewing. Sew the pompom on row 4 of the hat.
Hem of the coat – Use white plush yarn.
To make the hem of mini Rudolph’s coat, you must work in the free loops of row 34. Start with a false single crochet.
1) Make 1sc for each free loop of row 34.
Hide the excess yarn in the work.
