


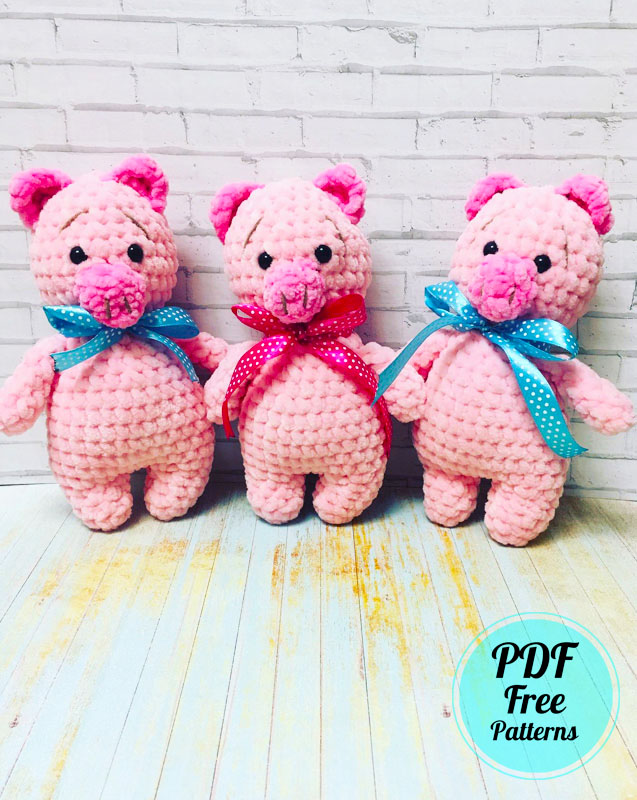
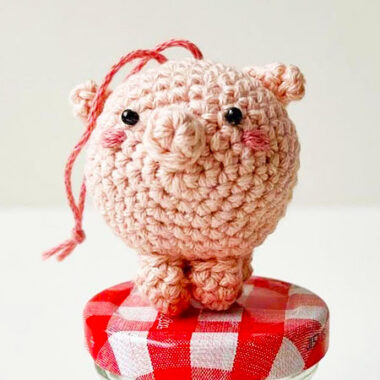
Amigurumi pig making can sometimes be very easy and sometimes very difficult. Today, I will share a pig amigurumi pattern that is very easy but looks very cute. It is very clear that the amigurumi toy looks very soft and cute because velvet yarn is used in its making. Although the amigurumi is quite simple, its ears and nose look very nice, so it has a realistic and cute shape. You can also use this kind of amigurumi toys for decorative purposes for Christmas.
Pig Muddy for Beginners Crochet Pattern
Plush toys attract great attention during the winter season, and the piglet I shared today was made using plush yarn. The most striking part of the toy, which has a detailed pattern, is perhaps the tip of its nose. In crochet toys, it is very important to make such small touches that create big changes.
Designer: swyazano
Materials:
– Yarn: Himalaya Dolphin Baby ( ≈ 1/2 skein)
– Hook size: 4.00 mm
– Safety eyes 8 mm
– Fiberfill
– Embroidery floss for nostrils and brows
Abbreviations
sc : Single Crochet
inc : Increase
dec : Decrease
st: Stitch
sl-st : Slip Stitch
ch : Chain
BLO : Crochet into back loops only
To make an Amigurumi pig toy, we first start with tiny pieces.
Arms (x 2)
Rnd 1: 6 sc in Magic Ring (6)
Rnd 2-6: 6 sc (5 rnds)
Sl st. Fold the top opening flat and and 3 sc through both sides across.
Fasten off, and leave a tail for sewing.
After crocheting the arms of the amigurumi toy, we make the muzzle part.
Muzzle
With dark colour:
Rnd 1: 8 sc in Magic Ring (8)
With main colour:
Rnd 2: BLO 8 sc
Rnd 3: 8 sc
Sl st. Fasten off, and leave a tail for sewing.
Now we will crochet the ears of the amigurumi pig. I must say they look pretty tiny.
Ears (x 2)
Make 6 ch
Rnd 1: From the 2nd ch from hook: 5 sc in 5 stitch, 1 turning chain
Rnd 2: dec, 1 sc, dec,1 turning chain
Rnd 3: dec with 3 stitch, 1 ch
Fasten off, and leave a tail for sewing. (img 1)

Now we will crochet the most important and large parts of the amigurumi pig.
Legs, Body and Head
Legs (x 2)
Rnd 1: 6 sc in Magic Ring (6)
Rnd 2: (1 sc, inc) repeat 3 times (9)
Rnd 3: dec, 3 sc, inc, 3 sc (9)
Rnd 4: 9 sc
Rnd 5: dec, 3 sc, inc, 3 sc (9)
Slst.
Don’t cut the yarn when you will finish the second leg!

From the 2nd leg: 2 ch, join with the first leg. (img 2)
Continue crocheting the body in the round:
Rnd 6: 6 sc on the first leg, 8 inc, 8 sc (30)
Rnd 7: 30 sc
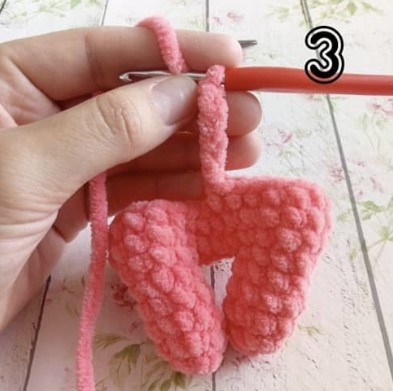
Rnd 8: 29 sc, 6 ch (for tail) – inc in second ch from hook, 4 inc in next 4 sc, 1 sc on the body (30) (img 3,4)

Rnd 9-11: 30 sc (3 rnds)
Rnd 12: (3 sc , dec) repeat 6 times (24)
Rnd 13: 24 sc
Rnd 14: (2 sc, dec) repeat 6 times (18)
Rnd 15: 18 sc, joining arms: 4 sc, 3 sc together with sc of the first arm, 6 sc, 3 sc together with sc of the second arm, 2 sc (18)
Rnd 16: (4 sc, dec) repeat 3 times (15)
Rnd 17: (4 sc, inc) repeat 3 times (18)
Rnd 18: (2 sc, inc) repeat 6 times (24)
Rnd 19: (3 sc, inc) repeat 6 times (30)
Rnd 20-22: 30 sc (3 rnds)
Rnd 23: (3 sc, dec) repeat 6 times (24)
Rnd 24: 24 sc
Rnd 25: (2 sc, dec) repeat 6 times (18)
Rnd 26: (1 sc, dec) repeat 6 times (12)
Rnd 27: 6 dec
Sl st. Fasten off, and leave a tail for sewing.
Make eyes indents at the level of R 21-22, at the distance of 4 stitches from each other.
