


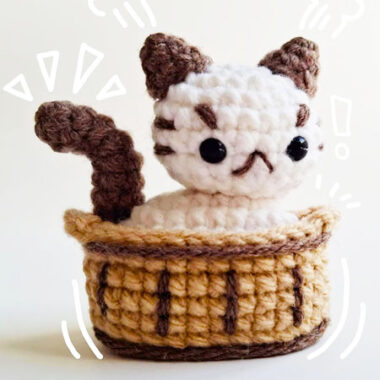
Today is the weekend and the first day of December. There are only 3 weeks left until Christmas and this cute keychain kitty can accompany you for a long time. All you need to do is set aside some time during the weekend. Although the crocheted kitty is made by putting together a lot of pieces, I can easily say that the crocheted kitty is extremely durable since all the pieces are sewn.
Christmas Kitty Amigurumi Toy
As for the accessories of the toy, we see that it has a Christmas hat and a red bow tie-shaped hair clip. The kitty also has a very large and thick scarf compared to its body.
Designer: _.minanmia._
Note before starting: This is a crochet pattern written in English and US terminology. The crocheting part is beginner- friendly but requires a bit of sewing. This pattern is worked in joint rounds (denoted by slst, CH1 at the end of each round) and rows. There are pictures and diagrams of this pattern, which provide a better demonstration of the pattern.
Materials:
Yarn and according hook
Scissor
Needle
Stuffing
Felt
Optionals (Stitch marker, Keyring, Charms, Positioning Pins).
Abbreviations
MR = Magic Ring
slst = slip stitch
ch = chain
Sc = single
inc = 2 sc in the same stitch
dec = decrease
hdc = half double crochet
dc = double crochet
BLO= Back Loop Only
FLO= Front Loop Only
BBL = Bobble stitch (made of 4 unfinished dc)
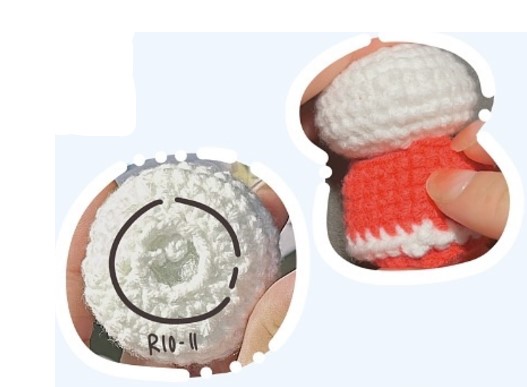
Head – joint rounds – white yarn
R1: 8sc in MR, slst, CH1 (8)
R2: 8inc, slst, CH1 (16)
R3: [sc, inc]*8, slst, CH1 (24)
R4: [3sc, inc]*6, slst, CH1 (30)
R5-8 (4 rounds): sc around, slst, CH1 (30)
If you use safety eyes, add eyes to R6, 4sts away from each other.
R10: [sc, dec]*10, slst, CH1 (20)
Fully stuff.
R11: 10dec, slst, CH1 (10)
Fasten off, cut yarn, hide the end.

Body – joint rounds red + white yarn
Start with red yarn.
R1: (from 2nd CH from the hook) 6sc in MR, slst, CH1 (6)
R2: 6inc, slst, CH1 (12)
R3: [sc, inc]*6, slst, CH1 (18)
R4: [sc, inc, sc]*6, slst, CH1 (24)
R5. 1 (BLO): sc around, slst, CH1 (24)
R5. 2 (in white – FLO): sc around, slst, CH1 (24)
R6 (in both loops of R5.1 and BLO of R5.2): sc around, slst, CH1 (24)
R7: 4sc, dec, 12sc, dec, 4sc, slst, CH1 (22)
R8-9 (2 rounds): sc around, slst, CH1 (22)
R10: 4sc, dec, 10sc, dec, 4sc, slst, CH1 (20)
Fully stuff.
Fasten off, cut yarn, leave a long tail to sew.

Hand*2 – joint rounds – white + red yarn
Start with white yarn.
R1: 6sc in MR, slst, CH1 (6)
R2: sc around, slst, CH1 (6)
Change to red yarn,
R3-4: (2 rounds): sc around, slst, CH1 (6)
Lightly stuff.
Fold the hand in half and work across both sides.
R5: 3sc, slst, CH1 (3)
Fasten off, cut yarn, leave a long tail to sew.

Leg*2 – joint rounds – brown yarn
Start with brown yarn.
R1: 5sc in MR, slst, CH1 (5)
R2: 5inc, slst, CH1 (10)
R3 (BLO): sc around, slst, CH1 (10)
Lightly stuff.
Fasten off, cut yarn, leave a long tail to sew.

Ear*2 – joint rounds – white yarn
Start with white yarn.
R1: 4sc in MR, slst, CH1 (4)
R2: [sc, inc]*2, slst, CH1 (6)
R3: [2sc, inc]*2, slst, CH1 (8)
No need to stuff.
Fasten off, cut yarn, leave a long tail to sew.

Hat – joint rounds – red + white yarn
Start with red yarn.
R1: 4sc in MR, slst, CH1 (4)
R2: sc around, slst, CH1 (4)
R3: [sc, inc]*2, slst, CH1 (6)
R4: sc around, slst, CH1 (6)
R5: [2sc, inc]*2, slst, CH1 (8)
R6: sc around, slst, CH1 (8)
Fully stuff.

Sew shut the hat with Back loop of R6. Change to white,
R7 (FLO of R6): sc around, slst, CH1 (8)
R8 (in both loops): sc around, slst, CH1 (8)
Fasten off, leave a long tail to sew.
Sew R8 to R5-6 of the Hat.

Bow – joint rounds – red yarn
Start with CH4.
R1: (from the 2nd CH from the hook) inc, sc, (in 1st) 4sc, sc, inc, slst, CH1 (10)
Fasten off, leave a long tail to sew.
Roll the tail around the centre of the bow for 2 rounds, tie a knot to secure.

Scarf – rows – yellow yarn
Start with CH34.
R1: (from the 3rd CH from the hook) 32dc, CH2, slst, CH1 (32)
Note: if you find the scarf too short, you can add a few more CH, together with a few more dc.
Fasten off, cut yarn, leave a long tail to sew.

Tail + Hat Pompom – rows – white yarn
Start with CH3.
R1: (from the 3rd CH from the hook) BBL, CH2, slst, CH1 (1)
Fasten off, cut yarn, leave a long tail to sew.

Assembly
• Sew Body R10 to Head R10-11, (sew stitch by stitch). The ending-round lines should be aligned.
• Sew two ears on R1-2 and R4-5 of the Head.
• 2 ears are 6sts away from each other on R2 and 13sts from each other on R4

• Sew two legs on R1-5 of the Body.

• 2 legs are right next to each other.
• Flatten the bottom by sewing through R1 of the Body and pull the yarn tightly.

• Sew two hands on R10-9 of the Body.
• 2 hands are 4sts away from the round- ending line on R10 and are sew to the next 3sts

• Sew the tail to R7 of Body, on the round ending line stitch.
• Glue the hat to R1 of the Head, between 2 Ears.

• Sew the Pompom to R1 of the Hat.
• Glue the scarf to the body.
• Sew the bow to the right ear.

• Cut felt as described.
• Glue the piece to the face as according to the diagram.

• Add a keyring.
• That’s every thing hehehehe!!!

