


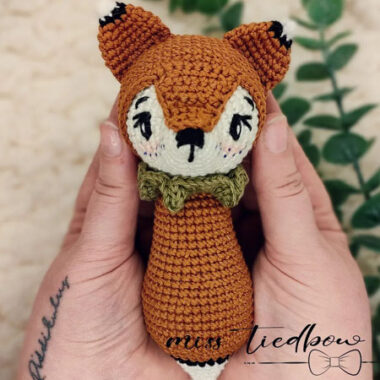
How about making a cute and fluffy fox amigurumi toy. The toy resembles a strawberry but is introduced to us as Blossom. Also, the cute fox’s name is Hazel. As you can understand from her name, she is a toy girl. Different shades of pink and white are used in making the fox amigurumi toy with a cute bag. Chenille yarn is recommended as the type of yarn you should use when making the toy.
Hazel the Blossom Fox Crochet Pattern
You will need a 5mm and 3.5mm crochet hook when making the crochet fox. It is also recommended that you use 12mm safety eyes for the fox’s eyes. You can use felt for the fox’s nose.
Designer: eliyarnart
Materials
• Hook: 5mm (for the fox) and 3,5mm (for the leafs)
• Pink chenille size 4 medium
• Peach chenille size 4 medium
• White chenille size 4 medium
• Green velvet size 3 light
• 12mm safety eyes Stuffing
• Tapestry needle
• Stitch markers
• Scissors
Abbreviations
• R: round
• St: Stitch
• mr: magic ring
• ch: chain
• sc: single crochet
• hdc: half double crochet
• dc: double crochet
• sl st: slip stitch
• inc: increase
• dec: decrease
• FO: fasten off
• cc: change colour

Head
Use pink yarn
R1: 8sc in a mr (8)
R2: 8inc (16)
R3: (sc, inc) repeat 8 times (24)
R4: (3sc, inc) repeat 6 times (30)
R5: (2sc, inc, 2sc) repeat 6 times (36)
R6-9: 36sc (36) – 4 rounds
R10: cc to white and make 9sc, 3inc, 12sc, 3inc, 9sc (42)
R11: (5sc, dec) repeat 6 times (36)
R12: (4sc, dec) repeat 6 times (30)
R13: (3sc, dec) repeat 6 times (24)
R14: (4sc, dec) repeat 4 times (20)
Cut yarn, FO with invisibile join.
Insert safety eyes on R9-10, 4 visibile sts apart.
Add fiber fill, stuff a lot to get a rounded face and paying attention to filling the cheeks.

Body
Use pink yarn
R1: 5sc in a mr (5)
R2: 5inc (10)
R3: BLO 10sc (10)
R4: 10sc (10)
Cut yarn and FO with an invisibile join.
Make another leg but this time don’t cut yarn and ch2 (pic 3).
R5: Insert the hook in any of the first leg sts (pic 3) and make 10sc, 2sc in the 2ch, 10sc, 2sc in the 2ch (24) (pic 4)
R6: 2sc, inc, (5sc, inc) repeat 3 times, 3sc (28)
R7-12: 28sc (28) – 6 rounds
R13: (5sc, dec) repeat 4 times (24)
Start stuffing as you go, when you stuff the feet remember to keep them flat.
R14: (4sc, dec) repeat 4 times (20)
Finish stuffing.
Cut yarn leaving a long tail for sewing.

Arms (x2)
Start with white yarn
R1: 4sc in a mr (4)
R2: 4inc (8)
Cc to pink yarn
R3-5: 8sc (8) – 3 rounds
R6: fold the arm and close it making 3sc (3) – don’t stuff the arm Cut yarn leaving a long tail (pic 5).

Ears (x2)
Start pink yarn
R1: 5sc in a mr (5)
R2: sc, 4inc (9)
R3: sc, cc to peach inc, cc to pink sc, inc, 4sc, inc (12)
R4: sc, cc to peach 3sc, cc to pink 8sc (12)
R5: sc, cc to peach sc, inc, sc, cc to pink sc, inc, 5sc, inc (15)
Cut yarn leaving a long tail for Sewing

Snout
Use pink yarn
R1: 5sc in a mr (5)
R2: 5inc (10)
R3: sc, inc, 8sc (11)
Cut yarn leaving a long tail for Sewing
Tail
Start with peach yarn
R1: 7sc in a mr (7)
R2: 7sc (7)
R3: dec, sc, 3inc, sc (9)
R4: 9sc (9)
R5: dec, sc, 5inc, sc (13)
cc to pink
R6: 13sc (13)
R7: dec, 2sc, 5inc, 2sc, dec (16)
R8: 16sc (16)
R9: (2sc, dec) repeat 4 times (12)
R10: (sc, dec) repeat 4 times (8)
FO and leave a long tail for sewing, add stuffing

Leafs
Use a 3,5mm hook and green yarn slip knot, ch9, starting from the 2nd ch from the hook make sc, hdc, dc, hdc, sc
(ch12, starting from the 2nd ch from the hook make sc, hdc, dc, hdc, sc) repeat 3 times
Flower Bag
Use peach yarn, make 2
R1: 6sc in a mr (6)
R2: (sl st, ch2, dc, hdc,)in the same st x5 (5 petals)
FO and leave one of the flower with a long tail for sewing

Sewing
Sew the head to the body Sew ears between R3-7
Sew arms between R13-14
Sew snout between R9-11
Sew the tail on R7-8
Sew the 2 flowers together and add a bit of stuffing, then complete the bag by adding the leafs string
Sew the details: nose and eyebrows (R7-8, 2sts wide, just up the eyes)
Congrats. You’ve finished your Blossom Fox.

