


Hello friends. Unfortunately, I am having trouble with the owl amigurumi pattern. There are very few owl amigurumi patterns and most of them are paid patterns. Finding a free crochet owl pattern is nearly impossible. However, I try to continue my posts as much as possible.
Mako The Owl Crochet Pattern
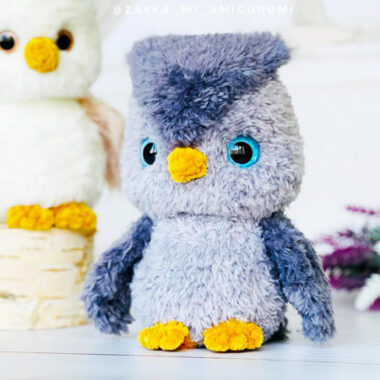
Today, I will share a beginner owl amigurumi pattern. I hope you will like it. This pattern is written using US terminology and is worked in continuous rounds unless otherwise stated. I recommend you always mark the start of each round, using a stitch marker. If made with the described materials, the toy will be about 11 cm/4.3 inches tall, from the top of the ears to the bottom.
Designer: @faerie_stitches
Materials
DK Yarn (I used DROPS ♥ You #8 in navy blue, light lilac, white and mint, as well as
old pink for the embroidery). One ball of each color should be enough.
Crochet hook (I used 2.5mm).
Stuffing
Black embroidery thread
Embroidery/tapestry needle
Stitch markers
Abbreviations
st stitch
ch chain
sc single crochet
sltl slip stitch
inc increase (2 sc in same st)
dec invisible decrease
rnd round
BLO back loop only
Belly (light lilac)
Rnd 1: ch 4, sc into 2nd st from hook, sc in next st, 3 sc in next st, turn your work and continue on the underside of the foundation chain, sc in next st, 2 sc in next st [8]
Slst into the next stitch. This slst is now the new end of round 1, so the next stitch you crochet will be the 1st stitch of round 2.
Rnd 2: (sc in next st, inc in next 3 st) x 2 [14]
Rnd 3: (sc in next st, (sc in next st, inc in next st) x 3) x 2 [20]
Rnd 4: (sc in next st, (inc in next st, sc in next 2 st) x 3) x 2 [26]
Rnd 5: (sc in next st, (sc in next 3 st, inc in next st) x 3) x 2 [32]
Rnd 6: (sc in next st, (inc in next st, sc in next 4 st) x 3) x 2 [38]
Fasten off, leaving a long tail for sewing.
Eyes
(white)
Rnd 1: start 6 sc in a magic ring [6]
Rnd 2: inc in all 6 st [12]
Fasten off, leaving a long tail for sewing.
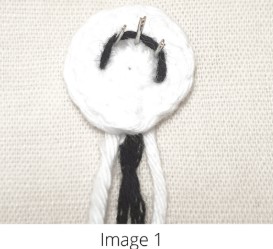
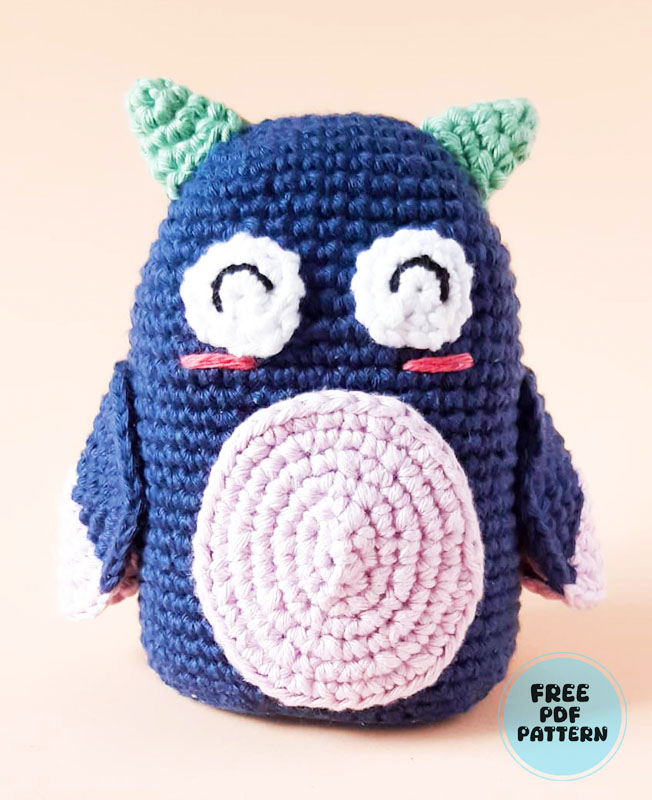
To embroider the eyes, insert pins in the places where you want the thread to go and use them to guide the thread, like in Image 1. When you are satisfied with the position of the yarn, sew the points where the pins are, by coming out and going back into the same stitch with the thread tail, like in Image 2.
Ears (mint)
Rnd1: start 4 sc in a magic ring [4]
Rnd 2: (sc in next st, inc in next st) x 2 [6]
Rnd 3: (sc in next 2 st, inc in next st) x 2 [8]
Rnd 4: (sc in next 3 st, inc in next st) x 2 [10]
Fasten off, leaving a long tail for sewing. The ears don’t need to be stuffed.
Wings
Before crocheting the wings, you might want to read the note about color changes at the beginning of the pattern. If you are not confident doing color changes, you can choose to crochet the entire wing in one color.
The wings are crocheted with alternating yarns (light lilac and blue). The color you use is indicated before each section.
Rnd 1: (light lilac) start 6 sc in a magic ring [6]
Rnd 2: (light lilac) inc in next 2 st, sc in next st, (blue) sc in same st, inc in next 3 st [12]
Rnd 3: (blue) sc in next st, (light lilac) (inc in next st, sc in next st) x 2, (blue) inc in next st, (sc in next st, inc in next st) x 3 [18]
Rnd 4: (blue) sc in next 2 st, (light lilac) inc in next st, sc in next 2 st, inc in next st, sc in next st, (blue) sc in next st, inc in next st, (sc in next 2 st, inc in next st) x 3 [24]
Rnd 5: (blue) sc in next 3 st, (light lilac) inc in next st, sc in next 3 st, inc in next st, sc in next st, (blue) sc in next 2 st, inc in next st, (sc in next 3 st, inc in next st) x 3 [30]
Rnd 6: (blue) sc in next 4 st, (light lilac) inc in next st, sc in next 4 st, inc in next st, sc in next st, (blue) sc in next 3 st, inc in next st, (sc in next 4 st, inc in next st) x 3 [36]
Fasten off, and weave in the ends.
Body (blue)
Rnd 1: ch 8, sc into 2nd st from hook, sc in next 5 st, 3 sc in next st, turn your work and continue on the underside of the foundation chain, sc in next 5 st, 2 sc in next st [16]
Slst into the next stitch. This slst is now the new end of round 1, so the next stitch you crochet will be the 1st stitch of round 2.
Rnd 2: (sc in next 5 st, inc in next 3 st) x 2 [22]
Rnd 3: (sc in next 5 st, (sc in next st, inc in next st) x 3) x 2 [28]
Rnd 4: sc in all 28 st [28]
Rnd 5: (sc in next 5 st, (inc in next st, sc in next 2 st) x 3) x 2 [34]
Rnd 6: sc in all 34 st [34]
Rnd 7: (sc in next 5 st, (sc in next 3 st, inc in next st) x 3) x 2 [40]
Rnd 8: sc in all 40 st [40]
Rnd 9: (sc in next 5 st, (inc in next st, sc in next 4 st) x 3) x 2 [46]
Rnd 10-29: sc in all 46 st [46]
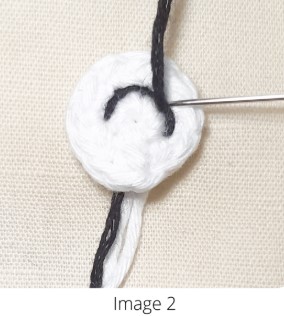
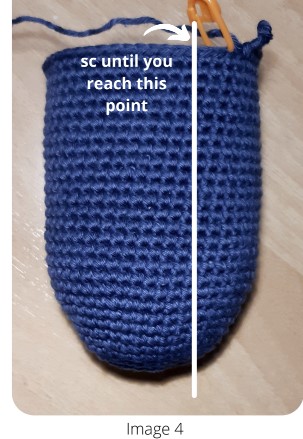
Before continuing with the next round, make sure the next stitch you will crochet is aligned with the first stitch of round 2, as indicated in Images 3 and 4. If as you crochet your stitches tend to drift to the left/right, you might need to crochet a few more sc to “catch up”. After doing this, treat the next stitch you crochet as the start of round 30.
Rnd 30: (sc in next 5 st, (dec, sc in next 4 st) x 3) x 2 [40]
Before continuing with the rest of the body, sew to the body all the other parts:
Sew the ears to the body, on top of the head and over rounds 2 to 6.
Sew the eyes to the body, over rounds 8 to 12 and about 2 stitches apart.
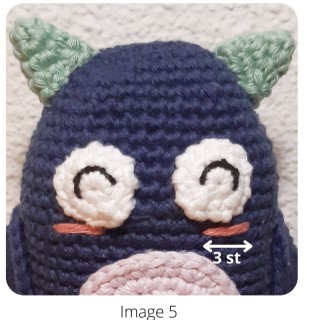
Embroider the cheeks according to Image 5.
Sew the belly to the body, two rounds under the eyes.
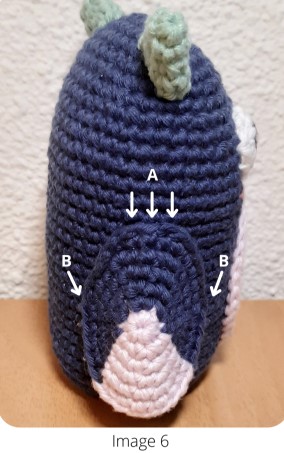
For sewing the wings, identify the top 3 stitches of each wing. With a new piece of yarn, sew the wings to the body on round 14, over these 3 stitches, like indicated as A in Image 6. Then, sew two more stitches, like indicated as B in Image 6, bending the wing as to give the wings a curved shape.
Continue with the body:
Rnd 31: BLO ((sc in next 5 st, (sc in next 3 st, dec) x 3) x 2) [34]
Rnd 32: (sc in next 5 st, (dec, sc in next 2 st) x 3) x 2 [28]
Stuff the body. Try not to stuff the bottom part too hard, so that the bottom will keep flat.
Rnd 33: (sc in next 5 st, (sc in next st, dec) x 3) x 2 [22]
Rnd 34: (sc in next 5 st, dec x 3) x 2 [16]
Fasten off and leave a long tail. With the embroidery needle, weave the yarn tail through the front loop of each stitch (alternating sides) and pull to close. Weave in the yarn tail.
Congratulations, you finished your Mocho The Owl!

