


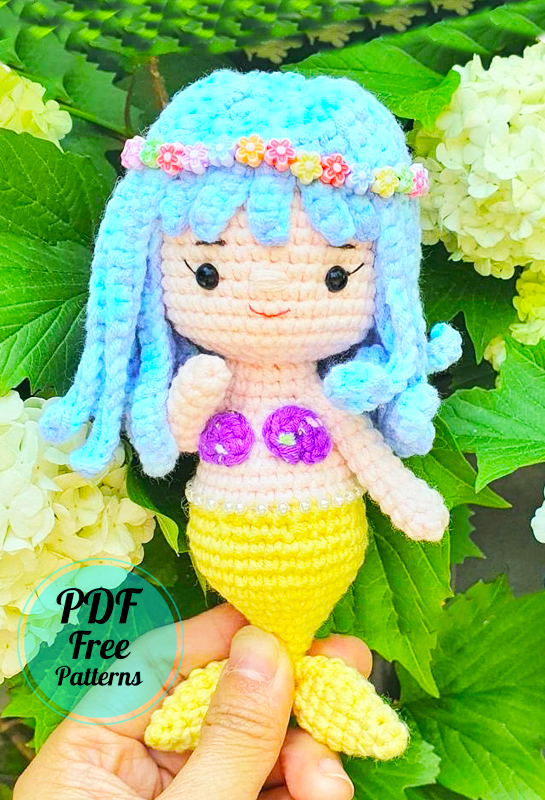
My dears, today I am going to share a wonderful crochet mermaid pattern. As you know, I continue to share free amigurumi patterns daily. Some patterns can be detailed and difficult, while others can be quite easy. The doll amigurumi pattern I shared today is in the easy class. Although it varies from person to person, I can easily say that it is an easy crochet pattern among dolls. It’s also a pretty small amigurumi.
Summer Mermaid Doll Amigurumi Pattern
Although crochet mermaid toys usually have a long body and tail design, we see a simpler design used here. However, the shape and color of the crochet mermaid’s hair is so magnificent that small details almost disappear from your sight.
Designer: stuffedamigurumi
Materials
Milk cotton yarn
Hook size 2.5mm 4/0.
Abbreviations
MR – Amigurumi Magic ring
sc : Single Crochet
inc : Increase
dec : Decrease
st: Stitch
dc : Double Crochet
sl-st or Slst: Slip Stitch
ch : Chain
FLO : Crochet into front loops only
BLO : Crochet into back loops only
HEAD
R1: MR 7sc
R2: 7inc (14)
R3: 7*(sc, inc) (21)
R4: 7*(2sc, inc) (28)
R5: 7*(3sc, inc) (35)
R6: 7*4(4sc, inc) (42)
R7-18: 42sc
R19: 14*(sc, dec) (28)
R20: 14dec
FO.
ARMS
R1: MR, 6sc
R2-11: 6sc
FO. Leave a long tail for sewing.
BODY
Yellow yarn
R1: MR, 4sc
R2: 2*(sc, inc) (6)
R3: 3inc, 3sc (9)
R4: 9sc
R5: 3*(sc, inc), 3sc (12)
R6: 3*(2sc, inc), 3sc (15)
R7: 3*(3sc, inc), 3sc (18)
R8: 3*(4sc, inc), 3sc (21)
R9: 7*(2sc, inc) (28)
R10: 7*(3sc, inc) (35)
R11-13: 35sc
R14: 7*(3sc, dec) (28)
R15: 28sc
Change to skin color yarn
R16-17: 28sc
R18: 7*(2sc, dec) (21)
R19: 21sc
R20: 7*(sc, dec) (14) Link to arms
R21: 3sc, 4sc on arm 1, skip 4sc on arm 1 and on the body, 4sc on the body, 4sc on arm 2, skip 4sc on arm 2 and on the body, 1sc on the body = 14sc
R22-23: 14sc
FO. Leave a long tail for sewing.
FISH TAIL (2)
R1: MR, 4sc
R2: 2*(sc, inc) (6)
R3: 3*(sc, inc) (9)
R4: 3*(2sc, inc) (12)
R5-6: 12sc
R7: 3*(2sc, dec) (9)
R8: 3*(sc, dec) (6)
FO. Leave a long tail for sewing.
HAIR (WIG)
R1: MR, 8sc
R2: BLO 8inc (16)
FLO
26ch -> 25sc, slst in the same st, 26ch -> 25sc; slst next st, 26ch -> 25sc, slst in the same st, 26ch -> 25sc… continue until 5 sts left. Slst next st, 9ch -> 8sc, slst next st, 9ch -> 8sc… continue to the end. This layer we will have 22 long strands and 5 short strands for the bangs.
BLO
26ch -> 25sc, slst in the same st, 26ch -> 25sc; slst next st, 26ch -> 25sc, slst in the same st, 26ch -> 25sc… continue to the end. This layer we will get 16 long strands.
FINISH
• Fill the head, body with fiberfill
• Assembly pieces as the sample
• Safety eyes 6mm
• Use pins to form the wig on the head, use hot glue gun to fix each strands/layer. Put the wig upside down.
• Use small pearls, flower-shaped buttons for decoration.
• Shells on the chest: MR, ch1, 7hdc, ch1, slst into the MR, tighten it. Glue on the chest.

