


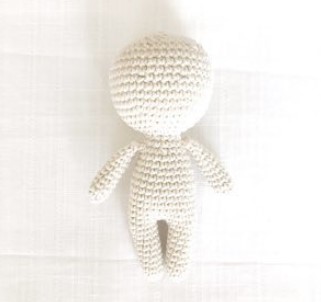
Want to make an awesome witch doll amigurumi together? We will achieve this together with the amazing crochet doll pattern that I will share today. The crochet doll you see in the picture consists of quite a lot of parts. I think the easiest of these is to make the body of the amigurumi doll.
Witch with Broom Amigurumi Pattern
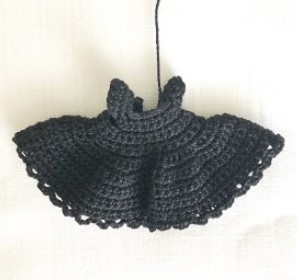
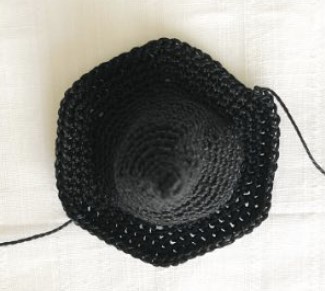
Her dress and hair are done in a very difficult way. It also includes a wonderful hat in a doll crochet pattern. If you wish, you can use this simple hat pattern for different amigurumi toys. On the front of the crocheted toy’s dress we see a spider and a tiny spider web. A really nice detail for Halloween.
Designer: tatiana_arpag
WHAT YOU NEED
* 3-4 ply cotton or cotton blend yarn of ivory/light beige and orange colors
* 2 ply cotton black yarn
* 2 mm crochet hook
* Sew on 4-6 mm eyes
* Some white and pink hand embroidery thread for the doll face
* Fiber fill
* Upholstery needle
Abbreviations
MR – Amigurumi Magic ring
sc : Single Crochet
inc : Increase
dec : Decrease
st: Stitch
dc : Double Crochet
hdc: Half Double Crochet
ch : Chain

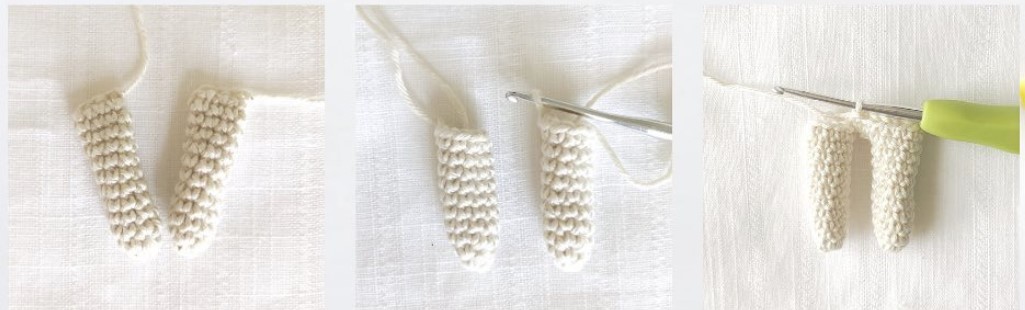
ARMS
I recommend to start crocheting with the arms.
R1: 6 SC into the magic loop [6]
R2: (2 SC, inc)*2 times [8]
R3-R11: 8 SC
Fill in the lower part of the arms, make 1 chain and join two, sides of the shoulder by making 3 SC.
LEGS
R1: 6 SC into the magic loop [6]
R2: (2 SC, inc)*2 times [8]
R3: (3 SC, inc)*2 times [10]
R4-R11: 10 SC
Finish off, make another leg, but do not cut the yarn. Make 2 chains, 10 SC along the first leg, 2 SC into the chains between the legs, 10 SC along the second leg, 2 SC into the chains [24]
Here I make another 5 SC so that my next rounds start on the doll’s side.
Body
R12-R18: 24 SC
R19: (10 SC, 2 dec)*2 times [22]
R20: 22 SC
R21: (9 SC, 2 dec)*2 times [20]
R22: 20 SCFill in the legs of the dOll
R23: (3 SC, 2 dec)*4 times [16]
R24: in this round, we will attach arms. (3 SC, joining one arm to the body, 5 SC)*2 times. Make sure that arms are symmetrical with respect to legs [16]
R25: (2 SC, 2 dec)*4 times [12]
R26: (1 SC, inc)*6 times [18]

Head
R27: (2 SC, inc)*6 times [24]
R28: (3 SC, inc)*6 times [30]
R29: (4 SC, inc)*6 times [36]
R30: (5 SC, inc)*6 times [42]
R31-R37: 42 SC, in R34 make holes for eyes: instead of 1 SC make 1 chain, repeat two times with the 5 SC distance between the holes.
In R35 make SC under each chain of the previous round.
In R37 Start filling the toy.
R38: (5 SC, dec)*6 times [36]
R39: (4 SC, dec)*6 times [30]
R40: (3 SC, dec)*6 times [24]
R41: (2 SC, dec)*6 times [18]
R42: (1 SC, dec)*6 times [12]
Fill the toy
R43: dec*6 times [6]
Finish off, hide the thread into the toy.
Face
Sew on the eyes: insert the needle through tl1e top of the head into one hole, attach one button, insert the needle back into the hole and out of the second hole, attach the button, and bring the needle back into the original point at the top of the head.

Do not hide the thread yet.
Sew the nose by making 3-4 horizontal stitches. Make one horizontal pink stitch for the mouth 1 SC. below the nose, two white half circles around the eyes, black eyebrows.
After that, slightly pull the thread that attaches the eyes-buttons, fix the thread and hide it inside the toy.
EARS
Make 4 SC into the magic loop, pin the ears to the head and sew them on only from the back side of the ears.

Hair
Chain 12. This will be the centerline of the doll’s hair.
Now chain 31 more and make 30 SC along this chain, slip stitch into the next chain of the centerline.
Repeat this 11 times until the end of the centerline (chain 31, 30 SC along this chain, slip stitch into the next chain of the centerline)
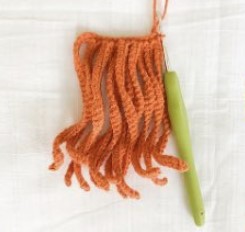
We have now 12 locks on one side of the centerline.
Similarly, crochet 11 locks on the other side of the centerline.

Finish off, cut the thread leaving a long tail, pin the hair to the head and stitch it on along the centerline and at the distance of about half inch from the centerline.
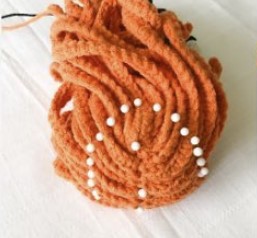
After the hair is attached, you can give it a more finished look by fixing two front strands at the back of the head
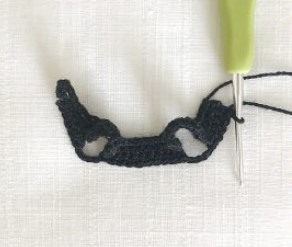
Dress
Chain 18 + 7 (for the loop for button) I recommend to leave longer thread at the beginning that we can use later to sew on the button.
Crochet 2 Rows of raglan:
Row 1: start into the 8th chain from the hook, 2 SC, 3 SC in each loop, 3 SC, 3 SC in each loop, 4 SC, 3 sc in each loop, 3 SC, 3sc in each loop, 2 sc
Row 2: chain 1, turn around, 3 SC, 3SC in each, (1 SC, 1 HDC) in each, (2 DC in each)*3 times, (1 HDC, 1 SC) in each, 3 SC in each, 6 SC, 3 SC in each, (1 SC, 1 HDC) in each, (2 DC in each)*3 times, (1 HDC, 1 SC) in each, 3 SC in each, 3 SC

Row 3: chain 1, turn around, 5 SC, chain 4, skip the next 12 loops, 10 SC, chain 4, skip the next 12 loops, 5 SC [28]
Rows 4-7: 28 SC
Row 8: (2 SC in each)*28 times [56]
At the end of row 8 make a slip stitch into the first loop of the row, continue crocheting along the closed rounds, but changing directions accordingly.
Row 9: chain 1, turn around, (1 SC, 2 SC in each)”28 times, slip stich [84]
Rows 10-18: 84 SCRow 19: (1 SC, chain 3, skip one loop, 1 SC) until the end of the row
Sew on the button using the long thread left at the beginning of the neckline.
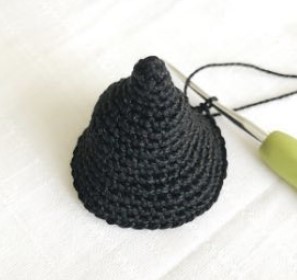
Hat
R1: 6 SC into the magic loop [6]
R2: [6]
R3: (2 sc, inc)*2 times [8]
R4: (3 sc, inc)*2 times [10]
R5: (4 Sc, inc)*2 times [12]
R6: (2 sc, inc)*4 times 16]
R7: (3 sc, inc)*2 times, 8 SC [18]
R8: [18]
R9: (2 SC, inc)*6 times [24]
R10-R11: [24]
R12: 12 SC, (3 SC, inc)*3 times [27]
R13: 12 SC, (4 SC, inc)*3 times [30]
R14: (4 SC, inc)*6 times [36]
R15-R16: [36]
R17: (5 SC, inc)*3 times, 18 SC [39]
R18: (6 SC, inc)*3 times, 18 SC [42]
R19: [42]
R20: crochet into the back loop (6 SC, 2 SC in each)*6 times [48]
R21: (7 SC, inc)*6 times [54]
R22: (8 SC, inc)*6 times [60]
R23: (9 SC, inc)*6 times [66]
BROOM
For the broom I found a slim short stick, wrapped it with a cotton yarn, attached dried pine leaves with the hot glue, and wrapped them with the same cotton yarn.
Yay! The doll is ready!
If you wish, you can add some blush for cheeks for more finished look and attach the hat and the broom to the doll with a couple of invisible stitches.

HAPPY CROCHETING!

