


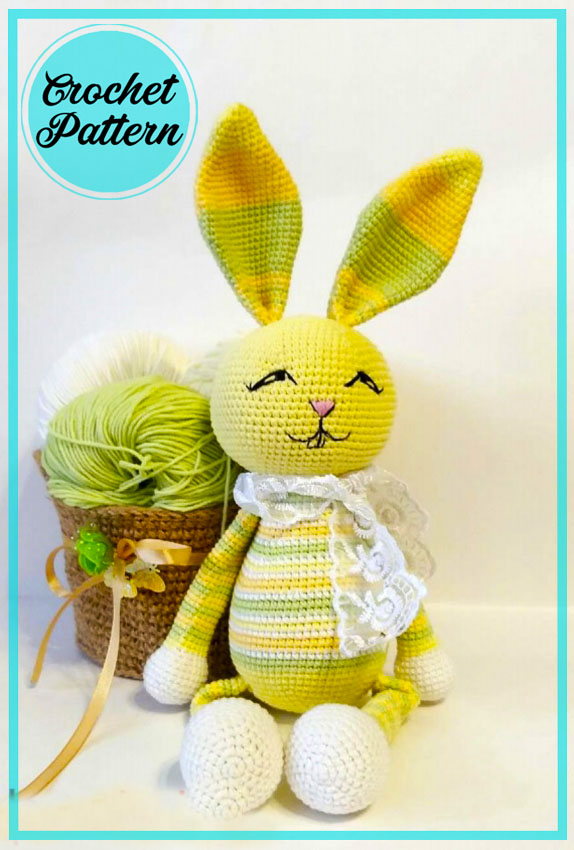
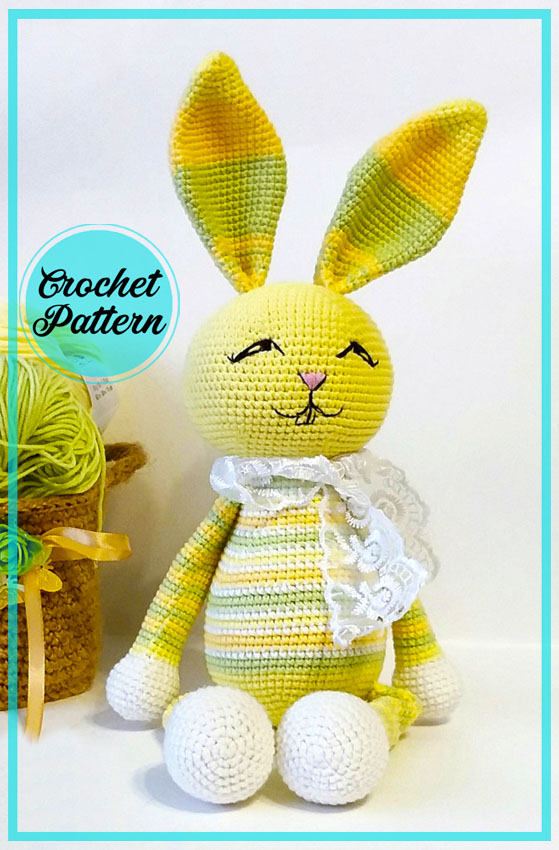
Today I want to share with you the free amigurumi pattern on crochet spring bunny designed by Olga Zimina. The height of the cute crochet bunny is about 35 cm when standing and 25 cm when sitting. The designer used YarnArt Jeans yarn and a 1.75 mm crochet hook to make the bunny.
If desired, wooden buttons can be attached to the arms and legs to make these pieces mobile. The pattern description is quite detailed, and the crochet bunny itself consists of simple pieces, so the pattern is suitable for beginners.
Designer: Olga Zimina
Materials:
1. Jeans yarn (160 / 50g) or any other. Use the colors you like, I have yellow, lemon yellow, green and white.
2. Crochet hook suitable for your yarn, I have # 1.75
3. Filler for toys
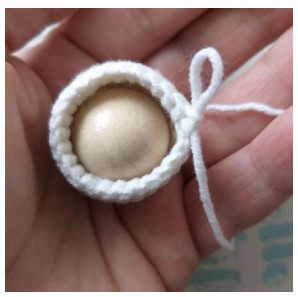
4. Four beads in the paws, 20 mm in diameter (optional)
5. Black thin yarn for face embroidery
6. Needle for stitching parts
Abbreviations
MR – Amigurumi Magic ring
sc : Single Crochet
inc : Increase
dec : Decrease
st: Stitch
sl-st : Slip Stitch
ch : Chain
1. Head:
Round 1. 6sc in MR
Round 2. 6inc (12)
Round 3. (sc,inc)*6 (18)
Round 4. (2sc,inc)*6 (24)
Round 5. (3sc,inc)*6 (30)
Round 6. (4sc,inc)*6 (36)
Round 7. (5sc,inc)*6 (42)
Round 8. (6sc,inc)*6 (48)
Round 9. (7sc,inc)*6 (54)
Round 10. (8sc,inc)*6 (60)
Round 11. (9sc,inc)*6 (66)
Round 12. (10sc,inc)*6 (72)
Round 13.-24. 72 sc (12 rows)
Round 25. (10sc,dec)*6 (66)
Round 26. (9sc,dec)*6 (60)
Round 27. (8sc, dec)*6 (54)
Round 28. (7sc,dec)*6 (48)
Round 29. (6sc,dec)*6 (42)
Round 30. (5sc,dec)*6 (36)
Round 31. (4sc,dec)*6 (30)
Round 32. (3sc,dec)*6 (24)
Round 33. (2sc,dec)*6 (18) Fill your head.
Round 34. (sc,dec)*6 (12)
Round 35. 6dec Pull the hole, cut the yarn, leaving the end for sewing.
Mark the places of embroidery with pins and embroider the muzzle with black yarn.

2. Ears (2pcs):
Round 1. 6 in MR
Round 2. 6inc (12)
Round 3. 12sc
Round 4. (inc, 5sc)*2 (14)
Round 5. (inc,6sc)*2 (16)
Round 6. (inc, 7sc)*2 (18)
Round 7. (5sc,inc)*3 (21)
Round 8. (6sc,inc)*3 (24)
Round 9. (inc, 11sc)*2 (26)
Round 10. (inc, 12sc)*2 (28)
Round 11. (inc, 13sc)*2 (30)
Round 12. (inc, 14sc)*2 (32)
Round 13. (inc, 15sc)*2 (34)
Round 14. (inc, 16sc)*2 (36)
Round 15. (inc,17sc)*2 (38)
Round 16.-21. 38sc
Round 22. (dec,17sc)*2 (36)
Round 23. (dec,16sc)*2 (34)
Round 24. (dec,15sc)*2 (32)
Round 25. 32sc
Round 26. (dec,14sc)*2 (30)
Round 27. (dec,8sc)*3 (27)
Round 28. 27sc
Round 29. (dec,7sc)*3 (24)
Round 30.-34. 24sc
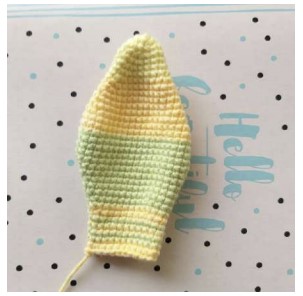
Fold the piece into four layers and crochet 5sc across all layers.
Fasten the yarn, leave the end for sewing.
Sew the ears to the head.

3. Body
Round 1. 6sc in MR
Round 2. 6inc (12)
Round 3. (sc,inc)*6 (18)
Round 4. (2sc,inc)*6 (24)
Round 5. (3sc,inc)*6 (30)
Round 6. (4sc,inc)*6 (36)
Round 7. (5sc,inc)*6 (42)
Round 8. (6sc,inc)*6 (48)
Round 9. (7sc,inc)*6 (54)
Round 10. (8sc,inc)*6 (60)
Round 11. (9sc,inc)*6 (66)
Round 12.-24. 66sc ( 13 rows)
Round 25. (9sc,dec)*6 (60)
Round 26. (18sc,dec)*3 (57)
Round 27. (17sc, dec)*3 (54)
Round 28. (16sc,dec)*3 (51)
Round 29. (15sc,dec)*3 (48)
Round 30. (14sc,dec)*3 (45)
Round 31. (13sc,dec)*3 (42)
Round 32. (12sc,dec)*3 (39)
Round 33. (11sc,dec)*3 (36)
Round 34.-39. 36sc
Round 40. (4sc,dec)*6 (30)
Round 41. 30sc
Round 42. (3sc,dec)*6 (24) Fill the body.
Round 43. (2sc.dec)*6 (18)
Round 44. (sc,dec)*6 (12)
Round 45. 6dec
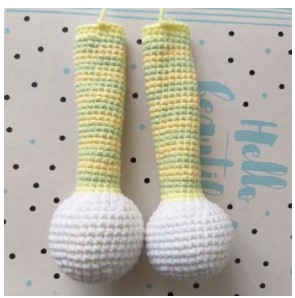
5. Hind feet (2times):
Round 1. 6sc in MR
Round 2. 6inc (12)
Round 3. (sc,inc)*6 (18)
Round 4. (2sc,inc)*6 (24)
Round 5. (3sc,inc)*6 (30)
Round 6. (4sc,inc)*6 (36)
Round 7.-12. 36sc
Round 13. (4sc,dec)*6 (30)
Round 14. (3sc,dec)*6 (24) Insert bead.
Round 15. (2sc,dec)*6 (18)
Round 16.-45. 18sc (30 rows)
Leave the yarn for sewing.
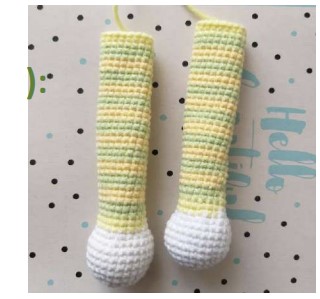
6. Front legs (2pcs):
Round 1. 6sc in MR
Round 2. 6inc (12)
Round 3. (sc,inc)*6 (18)
Round 4. (2sc,inc)*6 (24)
Round 5. (7sc,inc)*3 (27)
Round 6.-9. 27sc
Round 10. (7sc, dec)*3 (24) Insert bead.
Round 11. (2sc,dec)*6 (18)
Round 12.-41. 18sc (30 rows)
Leave the yarn for sewing.
Tail:
Round 1. 6sc in MR
Round 2. 6inc (12)
Round 3. (sc,inc)*6 (18)
Round 4. (2sc,inc)*6 (24)
Round 5. (3sc,inc)*6 (30)
Round 6.-9. 30sc
Round 10. (3sc,dec)*6 (24)
Round 11. (2sc,dec)*6 (18)
Leave the yarn for sewing.
7. Assembly:
Sew the paws to the body on the sides. The lower and upper legs are in line.
Fill the tail and sew on the back. My hare sits on its own, leaning on its tail, without any help.
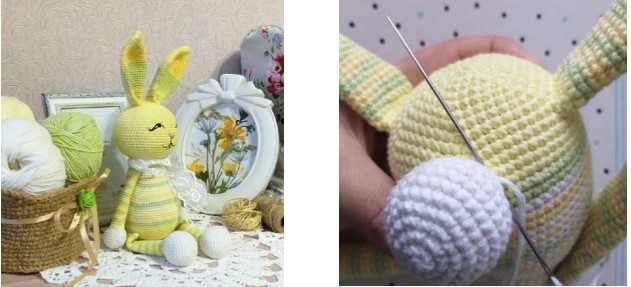
Sew the head to the body.
In front of the Hare, you can arrange it as your imagination allows you, I just tied the lace.
Your Spring Bunny is ready!


