


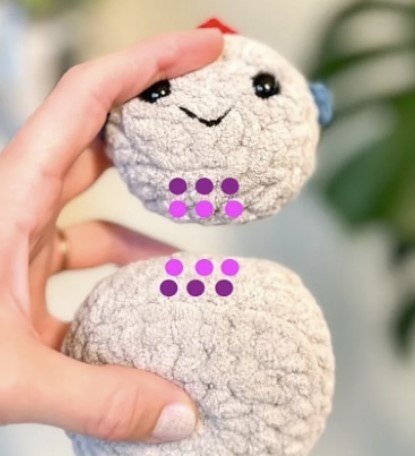
How about making a plush robot? We see that this design, which stands out with its very nice color choices, is an asymmetrical color choice, but you can also use symmetrical colors if you wish. You need to use a very thick crochet hook when making the toy. You will need to use 12mm safety eyes in the eyes when making the crochet robot. Super bulky yarn was used in the making of the crochet doll, which has a very soft texture.
Reggie Robot Amigurumi Pattern
It can be a nice decoration in your child’s room, and it can also be turned into a great baby toy by using yarn eyes. We see that the toy has a square-shaped body and a very thin arm and leg design.
Designer: wilolistitches
Materials
6.5 and 7 mm hooks
Super bulky yarn, weight 6 Black worsted weight yarn
12mm safety eyes
Polyfill
Stitch markers
Tapestry needle
Key
mr: magic ring
sc: single crochet
st3tog: stitch 3 sc together (insert hook into front** loop of the next stitch, yarn over, pull up a loop. Repeat in the next 2 st. You now have 4 loops on your hook. Yarn over and pull through all 4 loops on hook.) **unless otherwise indicated
bobble st: bobble stitch (yarn over, insert hook into st, yarn over and pull up a loop, yarn over and pull through the last 2 loops on hook. Repeat this until you have 5 loops on hook, then yarn over and pull through all 5 loops.)
FLO: front loops only
BLO: back loops only
FO: fasten off
() x#: repeat what’s inside the parentheses # times
[]: number of stitches at end of round
Head
Use main color & 6.5mm hook
Round 1: 4 sc in mr [4]
Round 2: (3 sc in same st) x4 [12]
Round 3: Sc, (3 sc in same st, 2 sc) X3, 3 sc in same st, sc [20]
Round 4: In BLO, 20 sc [20]
Round 5-6*: 20 sc [20] *2 rounds; 40 sts total
Round 7: In BLO: sc, (st3tog, 2 sc) x3, st3tog, sc [12]
Place safety eyes between rounds 2 and 3 with about 4 visible sts in between them. Stuff the head.
Round 8: (st3tog) x4 [4]
FO and weave tail through FLO of round 8. Pull to close and tuck in ends.

Head Knobs
Use accent colors & 7mm hook. The head knobs will be surface crocheted on round 5 of the head; one centered on each side and one on top.
In the same st: sl st, ch 1, sl st. FO, tie a knot, and tuck in ends.
Body
Use main color & 6.5mm hook
Round 1: 4 sc in mr [4]
Round 2: (3 sc in same st) x4 [12]
Round 3: Sc, (3 sc in same st, 2 sc) X3, 3 sc in same st, sc [20]
Round 4: 2 sc, (3 sc in same st, 4 sc) X3, 3 sc in same st, 2 sc [28]
Round 5: In BLO, 28 sc [28]
Round 6-7*: 28 sc [28] *2 rounds; 56 sts total
Round 8: In BLO: 2 sc, (st3tog, 4 sc) x3, st3tog, 2 sc [20]
Round 9: Sc, (st3tog, 2 sc) x3, st3tog, sc [12]
Stuff body.
Round 10: (st3tog) x4 [4]
FO and weave tail through FLO of round 10. Pull to close and tuck in ends.
Assembly
Use a 14″ piece of main color yarn to sew the head onto the body, using the photo below as a guide. The sts will go into rounds 5&6 of the head and 6&7 of the body. Tie the tails together and tuck in ends.
Arms/Legs
Use accent colors & 7mm hook. Arms will be surface crocheted on round 6 towards the top corners on either side of the body. Legs will be placed on round 6 on the bottom of the body with 4 visible sts in between them. With the robot’s front facing you: sl st, ch 9.
Starting in 2nd ch from hook: bobble st, 7 sl st, sl st into the same st on the body. FO, tie a knot, and tuck in ends.
Repeat for each arm/leg.
Details
Embroider a mouth between rounds 1 and 2 of the head. Embroider zig zags, buttons, or whatever else you want onto the body.


