


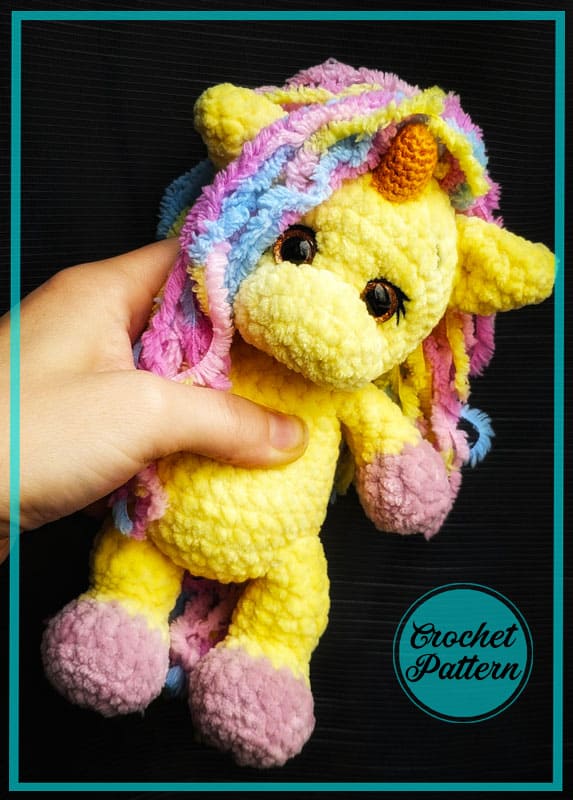
Dear friends, today we will crochet a very cute unicorn amigurumi pattern. As you know, the unicorn is a mythological creature. This amigurumi looks very cute so I wanted to share it with you. A cute unicorn amigurumi made using velvet yarn. The mane of the amigurumi looks quite beautiful.
Raindrop the Baby Unicorn Plush Amigurumi Toy
Also, you don’t use velvet yarn when crocheting your horn. You should pay attention to color transitions. However, since you are using a velvet yarn, it will not be noticed too much. You will see the necessary materials in the description section. Now let’s crochet the unicorn amigurumi step by step. This Unicorn Amigurumi is “mary_plush” author’s work and is intended only for your personal use.
Designer: mary_plush
Necessary materials
1. A skein of plush yarn in the main color
2. Just a little extra hoof color
3. Any yarn for the mane and tail
4. Hook to match your yarn
5. Eyes from 10mm, depending on the selected yarn
6. Filler
7. yarns of floss or Iris for embroidery of eyebrows and eyelids, as well as for tightening
8. Long needle for tightening
9. Tailoring yarns for sewing on details
10. Cotton or yarn with lurex for crochetting the horn
Abbreviations
MR – Amigurumi Magic ring
sc : Single Crochet
inc : Increase
dec : Decrease
st: Stitch
hdc: Half Double Crochet
sl-st : Slip Stitch
ch : Chain
BLO : Crochet into back loops only
Arms
1. 6 sc in MR
2. 6 inc – 12
3. 12 sc BLO
4. 12 hdc
5. 12 sc
Change the yarn
6. (2sc, dec) * 3 – 9
7-12. 9 sc
We fill the arms up to the 6th row. Make a dec, fold in half and sew through 4 sc.
Legs
1. 6 sc in MR
2. 6 inc – 12
3. (2 sc, inc) * – 16
4. 16 BLO
5. 16 hdc
6. 16 sc
Change the yarn
7. (2 sc, dec) *4 – 12
8 – 9. 12 sc
10. (2 sc, dec) *3 – 9
11. 3 sc , 3inc, 3 sc – 12
12-16. 12
Fasten the yarn, cut. We stuff the legs tightly up to 7 rows. We do not fill further!
Body
The start of the row marker runs down the center of the back.
We fill the body while crochetting.
1. 6 sc in MR
2. 6 inc – 12
3. (1 sc, inc) *6 – 18
7.4. (2 sc, inc) *6 – 24
5. (5 sc, inc) *4 – 28
6. (6 sc, inc) *4 – 32
We crochet the legs:
7. 4 sc, 6 sc with a leg (attach the leg and crochet it through), 12 sc on the tummy, 6 sc with a leg (attach the leg and crochet it through), 4 sc – 32
If the legs are on a yarn fastening, then attach them in the 7th row. Step back from the marker by 4-5 sc. Then crochet according to the description.
8-10. 32 sc
11. 10 sc, (1sc, dec) *4, 10sc – 28
12-13. 28 sc
14. 10 sc, 4 dec, 10 sc- 24
15. 24 sc
In the next row we crochet arms
16. 5 sc, 4sc with a arm, 6sc, 4 sc with a arm, 5 sc – 24
If the arms are fastened with yarn, then we attach them in row 16.
16. (2 sc, dec) *6 – 18
17.18 sc
18. (4 sc, dec) * 3 – 15
Fasten off and cut the yarn.
Head
The marker for the beginning of the row goes from the bottom of the head in the center. We stuff it as we crochet.
1. 4 ch, in the 2nd loop from the hook, inc, 1sc , 4 in 1, on the other side 1 sc, inc – 10
2. inc, 2 sc, 4 inc, 2 sc, inc – 16
3. (3sc, inc) *4- 20
4-5. 20 sc. We crochet 7 sc, put a marker exactly in the middle of the muzzle and begin crocheting the head. The marker goes along the center from the bottom of the head.
6. 5 sc, 10 inc, 5 sc – 30
7. 6 sc, (inc, 1 sc) *3, 5 sc, (1 sc, inc) *3, 7 sc – 36
8-13. 36 sc
Insert eyes in the 7th row, the distance between them 7 sc.
14. (4 sc, dec) *6 – 30
15. (3 sc, dec) * 6 – 24
16. ( 2 sc, dec) * 6 – 18
17. (1 sc, dec) * 6 – 12
18. 6 dec
Fasten off and cut the yarn.
Ears
1. 6 in MR
2. 6 sc
3. (inc, 2sc)*2 – 8
4. 8 sc
5. (inc, 3 sc) *2 – 10
6. 10 sc.
Count 5 sc and make slst at 6 sc. Fasten off and cut the yarn.
Horn
1. 8 in MR
2. 8 sc
3. (inc, 1sc)*4- 12
4. 12 sc
5. (inc, 3 sc) *3- 15
6. 15 sc.
7. (inc, 4sc)*3 – 18
8-9.18 sc
Try on the horn, if you like this length of the horn, then fix the yarn and cut it off. If not, then crochet a couple more rows like this:
10. (inc, 5sc)*3 – 21
11-12. 21 sc
Assembly
Tightening the muzzle.
Mark points 1,2,3,4,5,6 with needles.
Find the first row on the muzzle (where you made 4 ch), step back 3 rows down – this is p 1. Insert the needle and bring it out to p 2, next to the eye. Step back 2 sc and insert into p 3. Return to p 1. Tighten the thread. Repeat one more time.
Next, insert the needle into p 1, step back 1 sc and bring it out to p 5, step back 2 sc, insert the needle into p 6 and return to the formed mouth.

Tighten the thread, repeat one more time. Secure the thread. To make the eyes “sink” a little, tighten inward. From p 1 (mouth), bring the needle out to p 3, step back a couple of sc and bring them out on the back of the head. Tighten the thread. Insert the needle into the same point and bring it out to p 5, step back a few sc and bring it out again at the back of the head. Fasten the thread, cut it.
Embroider eyelashes, eyebrows. Sew on the ears, in any position you like. Sew on the horn in the middle of the forehead. Mane.

You can knit the required number of curls. For such a baby, I simply make them from multi-colored threads. I unwind the required thickness and length, tightly wind it in the middle with a thread and sew it to the head.
The same with the tail.
That’s all, your baby unicorn is ready!

