


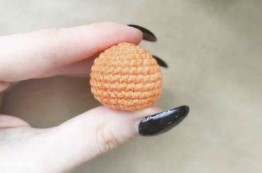
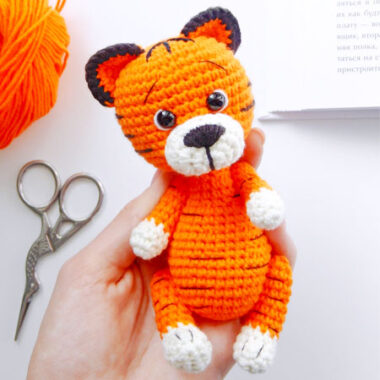
Are you ready to crochet the smallest of the tiger amigurumi patterns? Today we will crochet a wonderful tiger amigurumi. A pretty little tiger amigurumi. 5 cm in size. You can use the crochet tiger amigurumi as a key chain. Because it has a very small size. Also, I should say this.
Mini Tiger Keychain Amigurumi Pattern
A very cute and realistic amigurumi. His eyes can cause some trouble for you. That’s why you should take care of your eyes. Such accessories can easily fall off. The tiger amigurumi pattern is completely free. Now let’s crochet the tiger amigurumi step by step.
Materials (edit)
Orange and white YarnArt Jeans yarn
Black yarn “Iris” or “Mouline”
Hook No. 2
Small beady eyes
Filler
Well, of course, you will need a good mood!
The height of the toy when using such materials is 5 cm
Abbreviations
MR – Amigurumi Magic ring
sc : Single Crochet
inc : Increase
dec : Decrease
st: Stitch
sl-st : Slip Stitch
ch : Chain
HEAD:
1 Rnd: 6 sc in MR (6)
2 Rnd: inc*6 (12)
3 Rnd: (1 sc, inc)*6 (18)
4 Rnd: 1 sc, inc, (2 sc, inc)*5, 1 sc (24)
5 Rnd: (3 sc, inc)*6 (30)
6-9 Rnd: (4 rnds) (30)
10 Rnd: (3 sc, dec)*6 (24)
11 Rnd: (2 sc, dec)*6 (18)
12 Rnd: (1 sc, dec)*6 (12)
Fasten off, cut the yarn.
BODY:
1 Rnd: 6 sc in MR (6)
2 Rnd: inc*6 (12)
3 Rnd: (1 sc, inc)*6 (18)
4-6 Rnd: (3 rnds) (18)
7 Rnd: (1 sc, dec)*6 (12)
8 Rnd: (1 rndd) (12)
Fasten off, leave the yarn for sewing.
EAR: (2 pcs.)
We crochet in orange:
1 Rnd: 7 sc in MR(7)
Fasten, leave the yarn for sewing.
Next, we take the black yarn “Iris”, or “Mouline”. We step back from the edge of the ear 1 sc, attach a black yarn, crochet 5 sc for the loops of the main part of the ear, then slst, fasten and cut the yarn.
Muzzle:
We crochet in white:
1 Rnd: 8 sc in MR (8)
2 Rnd: (1 rnd) (8)
Fasten off, leave the yarn for sewing.
HANDS: (2 pcs.)
1 Rnd: 5 sc in MR (5)
2-3 Rnd: (2 rnds) (5)
Fold in half, crochet by both sides 2 sc. Fasten, leave the yarn for sewing.
LEGS: (2 pcs.)
1 Rnd: 6 sc in MR (6)
2-3 Rnd: (2 rnds) (6)
Fold in half, crochet by both sides 3 sc. Fasten, leave the yarn for sewing.
Assembly:
1) Sew the head to the body.
2) Sew the handles to the body (close to the head), sew the legs between 4-5 rows (you can also hem the legs on the sides so that they do not stick out).
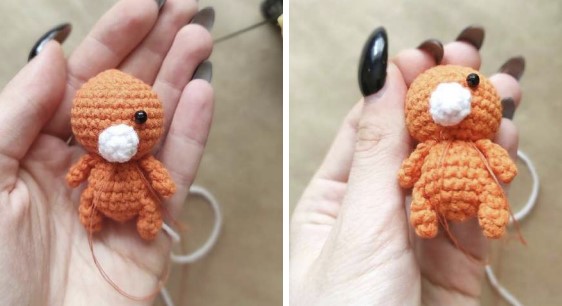
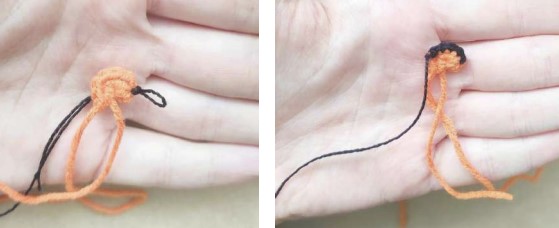
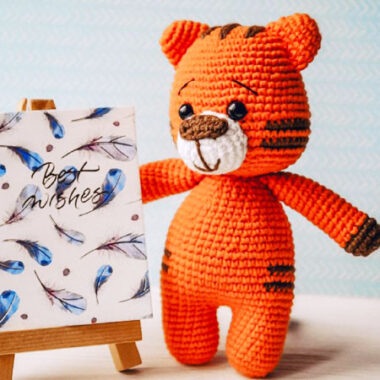
3) Sew the muzzle and ears to the head. Next, we sew or insert the eyes. If you sew on the eyes, like me, then we immediately make a tie (i.e. when we sew, we pull the yarn) (see photo below) We repeat these actions 2-3 times, then we tie the remaining ends in 2-3 knots and hide yarns.
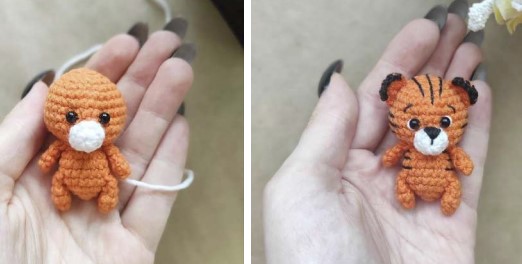
4) We embroider whites for the eyes, eyebrows, stripes on the body and head.
5) We crochet a tail. We attach an orange yarn to the back of the body, crochet 6 ch, and along this chain we crochet 5 slst, fasten, hide the yarn.

