


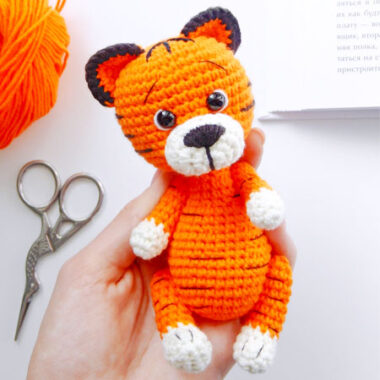
I would like to share with you the Sissy plush tiger amigurumi pattern designed by Alena Kalabina. Are you ready to make this tiger amigurumi toy that looks very impressive with its soft texture and green eyes? Although the toy has a very simple design, we can say that it looks professional thanks to its colorful eyes and prominent eyebrows.
Sissy the Plush Tiger Amigurumi Free Pattern
The height of the crochet tiger toy is approximately 30 cm. To make such a large tiger, the Designer used YarnArt Dolce plush yarn and a 3.5 mm crochet hook. The head and body of the tiger cub are crocheted in one piece.
Author: Kalabina Alena
Necessary materials:
1. Yarn art Dolce yarn color pumpkin 778, or Himalaya Dolphin baby 80368 (consumption 85 gr), white color Yarn art Dolce 741 (consumption 17g), chocolate Himalaya Dolphin baby 80343 (consumption 5g)
2. Glitter eyes 16mm green
3. Chipboard discs 30 mm and cotter pins 25 * 2mm
4. Velvet nose 16 mm (glue at the end with super glue)
5. Crochet hook 3.5 mm (knit tight enough)
6. Long needle with a large eye for embroidery
Abbreviations
MR – Amigurumi Magic ring
App – application
ll – lift loop
sc : Single Crochet
inc : Increase
dec : Decrease
st: Stitch
ch : Chain

Lower legs (2 parts)
Round 1. Start with white 3 ch +1 lifting loop
Round 2. 1 sc in second loop from hook, 1sc, 3sc in last st, 1 sc, inc, slst.
Round 3. inc,1sc,3 inc,1sc,2 inc, slst.
Round 4. inc,3sc,inc,1sc,inc,1sc,inc,2sc,inc,1sc,inc,slst.
Round 5. 19 sc, change to main color
Round 6. 19 sc
Round 7. 4 sc,4 dec,7 sc (15) (decreases strictly in the middle)
Round 8. 5 sc,1 dec,8 sc (14)
Next, we crochet 7 rows, fill the leg (not much up)
Between 12 and 13 next we insert a disc with a cotter pin B next. in a row we make decreases in 1 sc, pull off the hole with a needle.

Who does not make a cotter pin, after the 15th row, you can fold in half and close with 6 sc (we will sew the paws to the body)
Arms (2 parts)
Round 1. 6 in MR white
Round 2. 6 inc (12) change color
Round 3. 12 sc
Round 4. 2 dec (10)
8 rows without inc, fold in half, 4 sc, leave thread to sew on
Ears (2 parts)
Round 1. 6 in MR
Round 2. 6 inc (12) ,cut the thread
Round 3. Knit in dark color – 12 sc, leave thread for sewing
Head
Round 1.6 sc in MR
Round 2. 6 inc (12)
Round 3. 1 sc, inc* 6 time (18)
Round 4. 2 sc,inc*6 time (24)
Round 5. 3 sc,inc*6 time (30)
Round 6. 4 sc,inc*6 time (36)
Round 7. 5 sc,inc*6 time (42)
Round 8. 6 sc,inc*6 time (48)
4 rounds without inc (48)
We insert eyes on the plug m / y 9 and 10 next Between the eyes 5 sc (I heat the plug with a lighter)
Round 13. 6 sc,dec*6 time (42)
Round 14. 5 sc,dec*6 time (36)
Round 15. 4 sc,dec*6 time (30)
Round 16. 3 sc,dec*6 time (24)
Round 17. 2 sc,dec*6 time (18)
1 row without dec (this is the neck)
Round 19. 2 sc,inc*6 time (24)
Round 20. 3 sc,inc*6 time (30)
8 rounds without inc and dec
Round 29. 4 sc,inc*6 time (36)
1 row without incovok
In the next row, insert the lower legs on the Splint mount

How to insert split pins there is a video on my Instagram page
Round 31. 4 sc,dec*6 time (30)
Round 32. 3 sc,dec*6 time (24)
Round 33. 2 sc,dec*6 time (18)
Round 34. 1 sc,dec*6 time (12)
Round 35.decreases up to 6 sc, pull the thread

Nose
Round 1. White 3 ch, sc in 2nd loop from hook, in last loop 3 sc, on reverse side 1 sc, 2 sc, slst.
Round 2.increase in each loop
Round 3.wave in 1 sc
Round 4.19 sc, leave thread for sewing

Tail
Round 1. White 6 in MR
Round 2.6 sc, change color
11 rows without inc, fold in half, 3 sc, leave thread to sew on

We embroider the eyebrows, stripes along the body with a dark color

