


Friends, today I will share the amigurumi pattern of one of the cutest animals in africa. As you know, I love to share crochet animal amigurumi patterns. Also, my posts are usually in the form of plush amigurumi patterns. Today I will share a crochet giraffe amigurumi pattern. A pretty simple free giraffe pattern made entirely using velvet yarn. With such simple patterns, you can improve yourself and give nice gifts to your loved ones. Dear needlewomen, I present to your attention a description of how to make a small giraffe amigurumi crocheted from plush yarn.
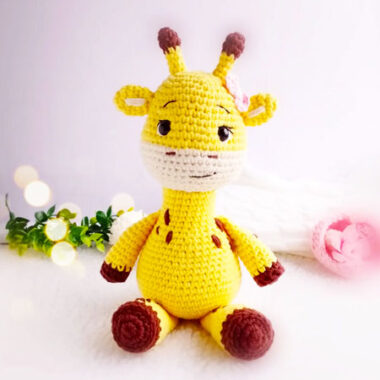
Lovely Plush Big Giraffe Crochet Pattern Step by Step
The height of the finished toy is about 22 cm. The height of your giraffe may vary, depending on the yarn, hook and crocheting density.
Designer: @skvorushkindom
Materials and tools:
Yarn: YarnArt Dolce, hook number 4.5; beads for eyes, strong yarns for sewing them on, needles for sewing on eyes and sewing parts.
Abbreviations
MR – Amigurumi Magic ring
sc : Single Crochet
inc : Increase
dec : Decrease
st: Stitch
ch : Chain
Ears (2 parts):
1.2ch, 6sc in second loop from hook
2. (sc, inc)*3 = 9
3. (2sc, inc)*3 = 12
4-5 – 2 row = 12
6. (sc, dec)*4 = 8
Fold the ear in half, sew together 4 sc, yarn fasten and hide.
Horns (2 parts):
In brown:
1.2ch, 6sc into second loop from hook
2. (sc, inc)*3 = 9
3. = 9
4. (sc, dec)*3=6
Yellow:
5-7 – 3 row = 6
Fasten off the yarn. It is not necessary to fold in half – the horns are sewn in a circle. Fill tightly with filler.
Upper legs (2 parts):
Brown:
1.2ch, 6sc into second loop from hook
2. (sc, inc)*3 = 9
3. = 9
Yellow:
4-9 – 6 rows = 9
10. (sc, dec)*3 = 6, at your discretion – add a little filler to the foot, sew 2 sides together – 3sc, fasten the yarn and hide.
Arms:
Brown:
1.2ch, 6sc into second loop from hook
2. inc*6 = 12
3. (sc, inc)*6 = 18
4. = 18
5. (2sc, inc)*6 = 24
6. = 24
7. (7sc, inc)*3 = 27
Yellow:
8-13= 27
14. (7sc, dec)*3 = 24
15. (2sc, dec)*6 = 18
16. (sc, dec)*6 = 12, fill tightly with filler
17.dec * 6 = 6, fasten and hide the yarn.
Body (upper legs are attached during crocheting):
We start crocheting from the lower left leg.
Brown:
1. 2ch, 6sc in the second loop from the hook
2. (sc, inc)*3 = 9
3. = 9
Yellow:
4-7 – 4 rows = 9
Similarly, crochet the second leg, then connect:
8. ch; 9 sc on the left leg; 10th sc in the base of the 1st sc on the left leg; sc on ch; 9sc on the right leg; 10th sc in the base of the 1st sc on the right leg = 22, here I recommend making a mark for the beginning of the row
9. 10 sc, 3 inc (in the center in front – over ch and adjacent sc), 9 sc, inc = 26
10. sc, inc, 24 sc = 27 – the last inc of the previous row and inc of this row – in the center at the back, over the adjacent to ch sc
11-15 – 5 rows = 27
16. In this row, we make 3 decreases, symmetrical to the increases in the 9th row, i.e. in the center in front: 11 sc, 3 dec, 10 sc = 24
Since the center shifts a little, it is possible to shift the decreases by 1 sc.
17. = 24
18. (2sc, dec)*6 = 18
19. Sew the upper legs: 5 sc; 3 sc, grabbing the loops of the upper leg; 6 sc; 3 sc, grabbing the loops of the upper leg; sc.
Important: depending on the crocheting density, yarn and hook size, differences in the shifting of crocheting are possible. If you do not like the resulting location of the upper legs (it should be symmetrical, on the sides of the body) – shift them by 1-2 sc.
20. (4sc, dec)*3 = 15
21-25 – 5 rows = 15.
26. crochet several sc so that the last row ends on the side, in my case – 3 sc, fasten the yarn and hide. Tightly stuff the legs and body with filler.
Assembly and design:
Sew the head to the body in a circle.
We outline the location of the horns and ears on the head. Sew the horns in a circle, sew the ears, folding the edge in half. I recommend to sew with a strong yarn, not plush (for example, with Iris yarns – not even in color, they are not noticeable).
Sew on bead eyes, embroider the nose on the muzzle with a plush yarn of yellow color.
Ponytail – a pigtail of 3 double plush yarns (2 yellow, 1 brown – slightly longer than yellow ones, fasten in the back in the center, hide the knots)
Assembly and decoration:
Sew the head to the body in a circle.
Mark the location of the horns and ears on the head. Sew the horns in a circle, sew the ears, folding the edge in half. I recommend sewing with a strong yarn, not plush (for example, with “Iris” yarn – not even in color, not noticeable).
Sew on the beady eyes, embroider the nose on the muzzle with a yellow plush yarn.
Tail – a braid of 3 double plush yarn (2 yellow, 1 brown – slightly longer than yellow, fasten at the back in the center, hide the knots)
Your little plush giraffe is ready!
