


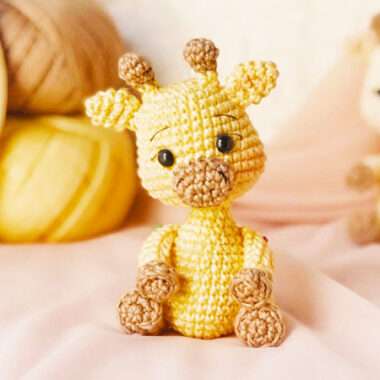
Friends, how about we make a beautiful giraffe amigurumi toy together? I think this giraffe, which is an extremely detailed amigurumi pattern, has a very professional design, especially the head. The toy has very elegant horns, and I think these horns are fixed with the help of wire. We can see that the inside of the giraffe’s ears, which have tiny ears, are made with white thread. The head of the giraffe amigurumi toy is made in two different colors.
Giraffe Cecilia Crochet Toy
Although the spots on the body of the giraffe amigurumi toy are randomly positioned, the size of these spots seems quite small. Maybe increasing the size of the spots might be the right choice.
Designer: maegurumi.atelie
Materials:
Soft amigurumi yarn
Yellow 1217
Brown 7311
White amigurumi yarn (for eye details)
Pink amigurumi yarn (bow) Black Anne yarn (face details)
Stuffing
Tapestry needle
Eyes N.9
•Final size 28cm.
•Sitting 20cm
Abbreviations
– MR – Magic ring
– sc – Single crochet
– slst – Slip stitch
– Inc – Increase
– dec – Decrease
– ch – Chain
– {} – Repeats
– (0) – Number of final stitches
The making of the giraffe amigurumi toy has a very detailed explanation and we will follow these steps one by one.
Body
1st MR 6 sc
2nd 6 inc (12sc)
3rd {1sc,1inc}x6(18sc)
4th {2sc,1inc}x6(24sc)
5th {3sc,1inc}x6(30sc)
6th {4sc,1inc}x6(36sc)
7th {5sc,1inc}x6(42sc)
8th {6sc,1inc}x6(48sc)
9th {7sc,1inc}x6(54sc)
10th and 13th 54sc
14° {7sc, 1 dec}x6(48sc)
15th and 16th 48sc
17° {6sc,1 dec}x6(42sc)
18° 42sc
19° {5sc,1 dec}x6(36sc)
20° 36sc
21° {4sc,1 dec}x6(30sc)
22° 30sc
23° {3sc,1 dec}x6 (24sc )
24° to 29° 24sc
Fasten off and leave a tail of yarn for sewing.

The body of the toy is made in 29 rounds and you should understand by looking at the photo that you will start making the lower part of the body of the toy first.
Arm (Brown)
1st MR 6 Sc
2nd 6inc (12sc)
3rd 12 BPsc
4th 12sc
•Change color.
(Yellow)
5th to 11th 12sc
12th {2sc,1 dec} x3 (9sc)
13th to 15th 9sc
16th make 4 stitches close picking up both sides.
Sew on Row 23

When making the arms of the giraffe, the first 5 rounds are made with brown yarn and the remaining part is made with yellow yarn.
Leg
(Brown)
1st MR 6 Sc
2nd 6 inc (12 sc)
3rd {1 sc, inc} x6 (18 sc)
4th 18 BPsc
5th 18 sc
•Change color.
(Yellow)
6th to 10th 18 sc
11th {4 sc, 1 dec} x3 (15 sc)
12th to 15th 15 sc
16th {3 sc, 1 dec} x3 (12 sc)
17th 12 sc
18th {2 sc, 1 dec} x3 (9 sc)
19th close, grabbing both sides, staying with 5 stitches.
Sew in Rows 3rd and 6th

You may have noticed that the legs of the toy are thicker than the arms. Please note that a different crochet technique is used here.
Head
(Yellow)
1st MR 6 sc
2nd 6inc
3rd {1sc,1inc}x6 (18sc)
4th {2sc,1inc}x6 (24sc)
5th {3sc,1inc}x6(30sc)
6th {4sc,1inc}x6(36sc)
7th to 9th 36sc
10° {5sc,1inc}x6 (42sc)
11° 42sc
12° {6sc,1inc}x6(48sc)
13th and 14th 48sc
•Change Color.
(Flakes) 1706
15° to 17° 48sc
18° {6 sc, 1 dec}x6(42 sc)
19° 42sc
20° {5sc,1 dec}x6(36sc)
21° {4sc,1 dec}x6(30sc)
22° {3sc,1 dec}x6(24sc)
•Fasten off.
Place the eyes on rows 12 and 13 ° With 9 st apart.

The giraffe’s head is made using 2 colors and you just need to position the eyes as in the description.
Tail
(Yellow)
1st 15ch, go back to the 2nd ch.
And make 14sc.
Cut 5 pieces of brown yarn and make the detail of the tip
Sew on the 13th row

The giraffe has a very elegant tail. When crocheting this tail, don’t forget to make the brown part.
Bow
1st Am. 2 Ch, 2 Dc, 2 Ch, 1 Slst, repeat 2 ch, 2 Dc, 2 Ch, 1 Slst now about 3 rows around the bow and fasten off
Ear (Yellow)
1st Am. 6sc
2nd {1sc,1inc}x3(9sc)
3rd to 5th 9sc
6th {1 sc,1 dec}x3(6sc)
•Fasten off, leaving a tail for sewing.
Sew on Rows 3 and 4

Now it’s time to make the giraffe’s tiny ears. You can leave long threads as you see in the photo. This will make your sewing easier.
Horn (Brown)
1st MR 6sc
2nd and 3rd 6sc
•Change color.
(Yellow)
4th to 7th 6sc
•Fasten off, leaving a little yarn to sew on Rows 8th and 10th

Finally, you can make the giraffe’s tiny horns using 2 colors.
Little Giraffe Cecilia
I hope you liked the Giraffe Cecilia I created with a lot of love, if you make it don’t forget to tag me I’ll love to see lots of Cecilias out there!!
