


Today we will crochet a white and quite different bunny amigurumi pattern. The bunny looks a little different. Also, her dress is so cute. You can see all the details of the pattern step by step. His ears look rather short. I agree with you on this. But Olda is a cute bunny. It doesn’t have a special name.
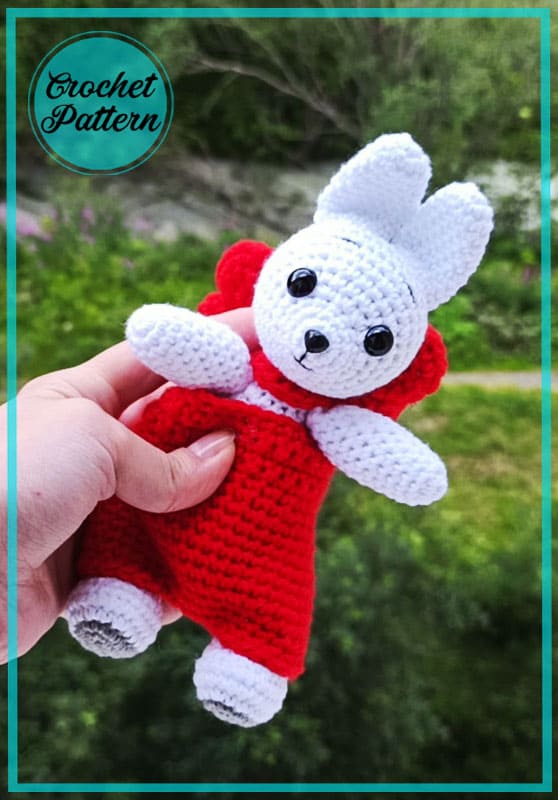
White Bunny with Red Pants Crochet Free Pattern
You can put a name after you crochet the amigurumi. I continue to share crochet amigurumi patterns for free. The eyes and nose of the bunny amigurumi look pretty cute. You should also take some care when crocheting your feet. Now let’s crochet step by step.
Designerr: stefis
LIST OF MATERIALS REQUIRED:
1. Yarn of a suitable color (white) I used YarnArt Jeans yarn, crochet hook # 2.5. Red yarn (for shorts). I used Semenovskaya “Souffle”, hook number 4. Some black yarn (for eyebrows and mouth). Some gray yarn (for the heels).
2. Hook of a suitable size (I have # 2.5 and # 4).
3. A piece of a wide red ribbon (for a bow). And a small piece of a red thin ribbon (around the neck).
4. Filler
5. Black half-beads (8 mm), small plastic nose (you can embroider)
Auxiliary tools: scissors, needle, yarn, eye glue.
Abbreviations
MR – Amigurumi Magic ring
sc : Single Crochet
inc : Increase
dec : Decrease
st: Stitch
ch : Chain

Ears (2 parts)
We start with the ears, because we will crochet them later so as not to sew them separately.
1 Rnd: 6 sc in MR (6)
2 Rnd: inc into each loop (12)
3-11 Rnd: 12 sc (12)
We crochet the second ear in the same way. We do not leave the yarn for sewing, because we will crochet the ears later)
Head
1 Rnd: 6 sc in MR (6)
2 Rnd: inc. into each loop (12)
3 Rnd: (3 sc, inc) * 3 times (15)
4 Rnd: 15 sc (15)
5 Rnd: 3 sc, 9 inc, 3 sc (24)
6 Rnd: 24 sc (24)
7 Rnd: 5 sc, (inc, 1 sc) * 3 times, 2 sc, (1 sc, inc) * 3 times, 5 sc (30)
8 Rnd: (4 sc, inc) * 6 times (36)
9-11 Rnd: 36 sc (36)
12 Rnd: 14 sc, then attach the ears and crochet 6 sc, grabbing the loops of one side of the ear, 1 sc, 6 sc, attach the second ear and sew together with one side of the ear 6 sc, 9 sc (36)
13 Rnd: 14 sc, now crochet 6 sc, grabbing the loops of the second side of the ears, 1 sc, 6 sc together with the second side of the ears, 9 sc (36)
14 Rnd: (4 sc, dec) * 6 times (30)
15 Rnd: (sc, dec) * 10 times (20)
16 Rnd: (sc, dec) * 7 times (14)
Add some filler to the head.
17 Rnd: (sc, dec) * 4 times, dec, sc (9)
Pull off the hole. Fasten the ears together (in the middle of the ears approximately) with one stitch. To be put together. This can be done later.
Body
1 Rnd: 6 sc in MR (6)
2 Rnd: inc.in each loop (12)
3 Rnd: (sc, inc) * 6 times (18)
4 Rnd: (2 sc, inc) * 6 times (24)
5 Rnd: (3 sc, inc) * 6 times (30)
6 Rnd: (4 sc, inc) * 6 times (36)
7-11 Rnd: 36 sc (36)
12 Rnd: (4 sc, dec) * 6 times (30)
13-16 Rnd: 30 sc (30)
17 Rnd: (3 sc, dec) * 6 times (24)
18 Rnd: 24 sc (24)
19 Rnd: (2 sc, dec) * 6 times (18)
20 Rnd: 18 sc (18)
21 Rnd: (sc, dec) * 6 times (12)
Add filler. We leave the yarn for sewing on the head. Sew on the head.
Arms (2 parts)
1 Rnd: 6 sc in MR (6)
2 Rnd: inc in each loop (12)
3-14 Rnd: 12 sc. Add filler, fold the arm in half and sew both side with single crochet. We crochet the second arm in the same way.
Legs (2 parts)
In gray:
1 Rnd: 7 ch, from the 2nd loop from the hook, crochet 5 sc along the chain, 3 sc in the last loop, then crochet along the other side of the chain: 4 sc, increase (14)
2 Rnd: inc., 4 sc, 3 inc, 4 sc, 2 inc (20)
Change the yarn to white:
3 Rnd: inc, 5 sc, (1 sc, inc) * 4 times, 5 sc, inc(26 sc)
4-5 Rnd: 26 sc (26)
6 Rnd: 7 sc, (1 sc, dec) * 4 times, 7 sc (22)
7 Rnd: 7 sc, 4 dec, 7 sc (18)
8 Rnd: 3 sc, 6 dec, 3 sc (12)
9-17 Rnd: 12 sc (12)
Add filler.
18 Rnd: dec. in each loop (6)
Pull off the hole. We crochet the second leg in the same way. The description of the legs themselves was written out from the Internet (a description of some bunny from free access) with my minor changes. Unfortunately, I cannot indicate the author, since I was simply writing out a description of the bunny, the author has not survived. Sew on the legs and handles (I made them on a yarn mount so that they were movable).
Tail
1 Rnd: 6 sc in MR (6)
2 Rnd: inc. in each loop (12)
3 Rnd: (sc, inc) * 6 times (18)
4-5 Rnd: 18 sc (18)
6 Rnd: 3 sc, 6 dec, 3 sc (12).
Add filler.
7 Rnd: we crochet 6 decreases, we sew the tail to the bunny.
Pants
We will crochet with red yarn. I will not give a detailed description of the pants, since they need to be adjusted to fit your bunny (depends on the crocheting density, on the hook number and on the thickness of the yarn used).
I used hook # 4, Souffle yarn.
1 Rnd: Make a chain of 30 ch + 7 button holes
2 Rnd: 30 sc, ch, turn (while we crochet in turning rows)
3 Rnd: 30 sc, ch, turn
4 Rnd: 30 sc, ch, turn
5 Rnd: inc, 28 sc, inc (32), turn
6 Rnd: 32 sc, here we close the shorts and then we will crochet in a circle (you need to try on according to your bunny, I crocheted according to my bunny)
7 Rnd: We make 2 inc in a row (34)
8 Rnd: 10 sc, inc, 10, inc, 8 sc, here I typed a chain of 8 ch, skip 7 st and continued to crochet in the 8 st (this is the hole for the tail).
9 Rnd: further we will crochet in a circle to the desired length, along a chain of ch we crochet sc (under the chain). You can make 2-3 inc in rows, to the desired width. Try on a bunny. Having reached the required length of the pants, fold them in half and tie 4 sc in the middle (or sew with a needle). I tied on the seamy side sc. Turn it out again on the front side, sew on the button. We glue the eyes, embroider the eyebrows, mouth, nose.
We cling a red bow around the neck. Our bunny is ready!


