


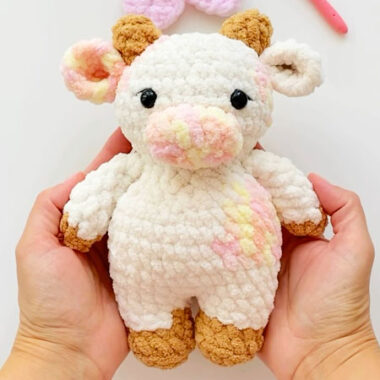
I would like to introduce you to a wonderful crochet pattern from Evgenia Gorbacheva, who is also known for her plush toy designs. I will share with you a crochet pattern of a plush bull named Little Moo. The height of the crochet bull toy is about 10 cm. To make such a small bull, the designer used Himalaya Dolphin Fine plush yarn and a 3 mm hook.
Moo the Plush Bull Crochet PDF Pattern
Although a very thin crochet is used compared to the plush yarn, I think the biggest result is that the toy is small in size. The legs, body and head of our bull are crocheted in one piece. During the crochet process, the arms and other parts are crocheted and then the sewing process is applied.
Designer: @igrushka_hm
MATERIALS:
1) yarn. Choose the color at your discretion.
For example, here is the yarn from which I knitted such a toy.
Himalaya Dolphin Fine (30-40 but for the whole toy)
horns, hooves – 80518 (dark chocolate)
body and head – 80506 (milk)
face -19 (pink)
2) Safety eyes.
I use on a safety mount, size 6mm.
3) a little filler (you can keep within 20-25 grams)
4) a hook that matches the size of the selected yarn
5) needle for eyebrow and nose embroidery
6) for embroidery I can use floss, jeans or iris
Abbreviations
MR – Amigurumi Magic ring
sc : Single Crochet
inc : Increase
dec : Decrease
st: Stitch
dc : Double Crochet
hdc: Half Double Crochet
ch : Chain

ARMS
We crochet in a spiral. No filler is required. We will sew the arms into the body.
Round 1) 6 sc in MR (6) caramel color
Round 2) – 6) 6 sc (5 rows along 6) – milky
Cut the yarn, fasten off. We crochet both arms according to the same pattern.

LEGS
Start with yarn of the main color. We crochet both legs according to the same pattern.
Round 1) 5 sc in MR (5) caramel
Round 2) 5 inc (10) caramel further milky
Round 3) 10 sc behind the back loop (10)
Round 4-5) 10 sc (2 rows along 10)
Cut the yarn and fasten it on the left leg. We do not cut the yarn on the right leg, go to the body.

BODY
We connect the legs and continue to crochet the body. We follow the marker, it should go in the center of the back (if necessary, make offset loops). We add the filler as we go.
Round 6) Attach the left leg and together 10 sc along it, then 10 sc along the right leg (20)
Round 7) 7 sc, inc, sc, 2 inc, sc, inc, 7 sc (24)
Round 8-9) 24 sc (2 rows along 24)
Round 10) 7 sc, dec, sc, 2 dec, sc, dec, 7 sc (20)
Next, we sew the arms. Align the marker to the center of the back.
Round 11) 4 sc, 3 sc together arm + body, 6 sc, 3 sc together arm + body, 4 sc (20)
Round 12) (3 sc, dec)*4 times (16)
Round 13) (2 sc, dec)*4 times (12)

Do not cut the yarn, proceed to crocheting the head.
HEAD
We continue to crochet in a spiral, then you can not follow the marker.
Round 14) 12 inc (24)
Round 15) (3 sc, пр)*6 time (30)
Round 16) -19) 30 sc (4 rows along 30)
Round 20) (3 sc, dec)* 6 time (24)
Round 21-22) 24 sc (2 rows along 24)
Insert eyes between 20 and 21 rounds. Distance the eyes 4 sc. We fill the head as we crochet.

Round 23) (2 sc, dec)* 6 time (18)
Round 24) (sc, dec)* 6 time (12)
Round 25) 6 dec (6)
Cut the yarn, pull off the loops.

Muzzle
Crochet in a spiral, pink yarn.
Round 1) 5 ch in second loop from hook: 3 sc, 3 sc in 1 st, 2 sc, inc (10)
Round 2) inc, 2 sc, 3 inc, 2 sc, 2 inc (16)
Round 3) sc, inc, 2 sc, (sc, inc)*3times, 2 sc, (sc, inc)*2 times (22)
Round 4) 22 sc (22)
Round 5) sc, dec, 2 sc, (sc, dec)*3times, 2 sc, (sc, dec)*2 times (16)
Cut and fasten the yarn.

EARS
Start with yarn of the main color.
5 ch further in the second loop from the hook: hdc, dc, hdc, 3 sc in 1 loop, hdc, dc, hdc

Cut and fasten the yarn.
HORNS
Crochet in a spiral, caramel color.
Round 1) 5 sc in MR(5)
Round 2) 5 sc (5)
Round 3) 2 sc, inc, 2 sc (6)
Round 4) 6 sc (6)
Cut and fasten the yarn.

Assembly
We sew the face, horns, ears and sew it on. You can add a little filler under the face, so that the form is not lost.
Then we embroider the eyebrows, mouth and nostrils.

Your Little MUU is ready. I hope you are happy with the result.

