


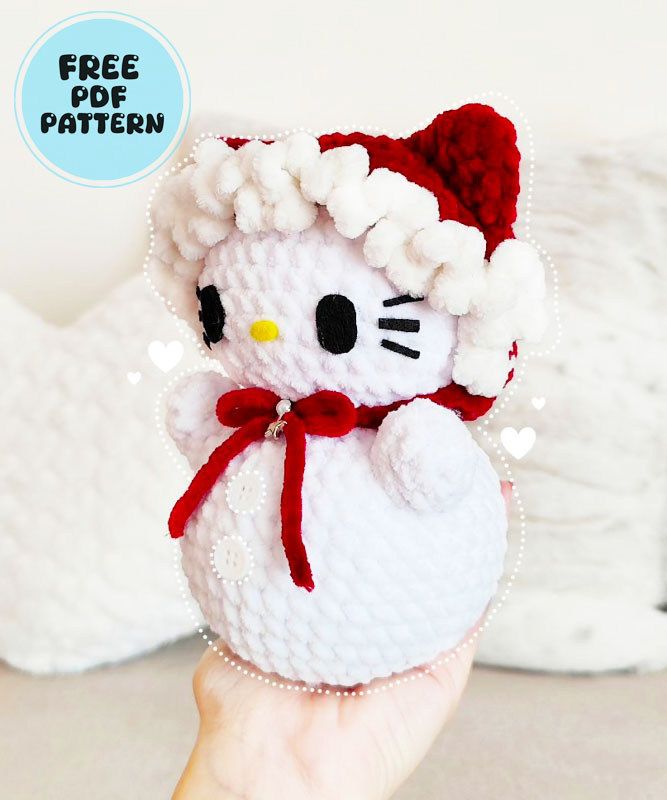
In order to turn a snowman into Hello Kitty, it will actually be enough to make a few small touches. However, we see that a few accessories accompany the toy in this toy and the snowman changes a little. First of all, the most obvious features of Hello Kitty toys are the whiskers on the part where the eyes and cheeks are. If your toy has a round head, you can easily turn your toy into a Hello Kitty toy by making these touches.
Hello Kitty Snowman with Bonnet and Scarf Amigurumi
I think the most interesting part of the toy is that it has a nice head. Thanks to this accessory, which we can call a red Christmas hat, the toy looks more pleasant.
Designer: em1crochets
Materials:
– Bernat Blanket Yarn
– White
– Vanilla
– Cranberry (red)
– 5.25mm Hook
– Felt
– Black
– Yellow
– Safety Eyes
– Hot Glue (for felt)
– Sewing Needle
– Stuffing
Abbreviations:
Sc: Single Crochet
Inc: Increase
Dec: Decrease
slst: Slip Stitch
Mr. Magic Ring
Ch: Chain
FO: Fasten Off
BLO: Back Loop Only

Head
(Start with White)
R1: MR 7 (7)
R2: Inc 7 (14)
R3: (sc, inc)x7 (21)
R4: (2 sc, inc)x7 (28)
R5: (3 sc, inc)x7 (35)
R6-11: sc all around (35) *6 rows*
R12: (3 sc, dec)x7 (28)
R13: (2 sc, dec)x7 (21)
R14: (sc, dec)x5 (16)
FO & leave long tail
Body
(Start with White)
R1: Mr 8 (8)
R2: Inc 8 (16)
R3; (sc, inc)x8 (24)
R4: (2 sc, inc)x8 (32)
R5: (3 sc, inc)x8 (40)
R6-13: sc all around (40) *8 rows*
R14: (3 sc, dec)x8 (32)
R15: (2 sc, inc)x8 (24)
R16: (sc, dec)x8 (16)
FO and leave a short tail
Ears
Bonnet Variation Start with Cranberry (red) Scarf Variation: Start with White
*Make 2 ears*
R1: Mr 6 (6)
R2: (2 sc, inc)x2 (8)
R3: (3 sc, inc)x2 (10)
R4: (4 sc, inc)x2 (12)
FO & leave a long tail
Arms (Start with White)
*Make 2 arms*
R1: Mr 6 (6)
R2: (2 sc, inc)x2 (8)
R3-4: sc all around (8) *2 rows*
FO & leave a long tail
Bonnet
Start with Cranberry (red) Indicates Color Change to Vanilla (Only make for Bonnet Variation)
R1: Mr 6 (6)
R2: Inc 6 (12)
R3: (sc, inc)x6 (18)
R4: (2 sc, inc)x6 (24)
R5: (3 sc, inc)x6 (30)
R6: (4 sc, inc)x6 (36)
R7-11: sc all around (36) “5 rows*
R12: 7 sc,BLO 22 inc, 7 sc (58)
R13: 7 sc, (slst, ch 3)x44, 7 sc (58)
R14: 7 sc, Turn your Work
R15: Ch 1, 14 sc, ch 6, FO leaving long tail
On opposite side, ch 6, FO leaving long tail
Bow
Start with Cranberry (Red) (Only make for Scarf Variation)
Mr, ch 2
2 dc, ch 2
slst in Mr
2 ch, 2 dc, 2 ch
slst in Mr
Leave long tail and wrap it around the middle
Scarf
Start with Cranberry (Red) (Only make for Scarf Variation)
Ch 35
FO leaving no tail
Scarf Variation Assembly
•Sew head on body, then sew arms in-between both
• Place ears in-between rows 4-8 and sew (ears should be about 8-10 stitches apart)
• Hot glue bow on the right ear
• Tie scarf around the neck
• Hot Glue the face to your liking, I like to glue it towards the bottom of the head
• Place safety eyes as buttons on body in-between rows 10-11 and rows 13-14
Bonnet Variation Assembly
• Sew head on body, then sew arms in-between both
• Place Bonnet on head and tie the tails into a bow
• Sew ears on the bonnet near the front of the head
• Hot Glue the face to your liking, I like to glue it towards the bottom of the head
• Place safety eyes as buttons on body in-between rows 10-11 and rows 18-14

