


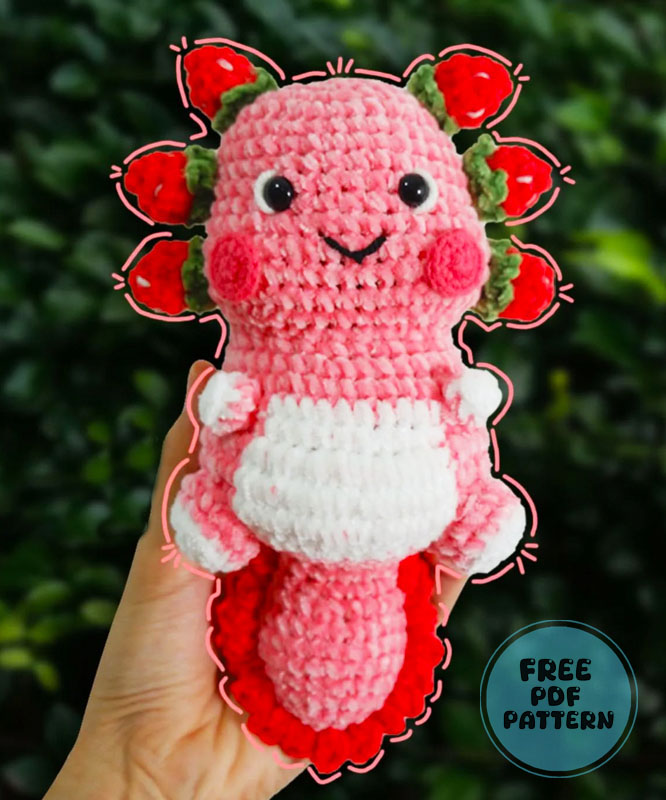
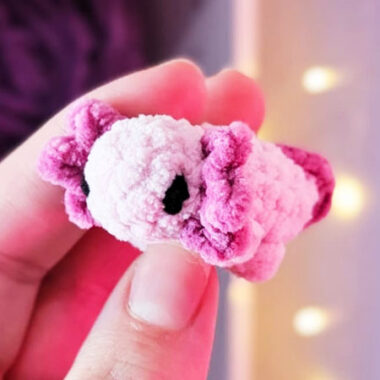
As far as I know, Axolotl is an aquatic creature and has a very strange appearance. Today, we will make an amigurumi toy of Axolotl together. The designer of the crochet toy is mo.kot.mo. The toy is made using shades of pink and I think it looks a lot like strawberries. The toy is also decorated with a lot of strawberries. Although the toy has a standard design, its tiny legs make it different from other Axolotl toys.
Axolotl Strawberry Amigurumi Pattern
It is recommended to use velvet yarn when making the toy, but no details are given about the brand of the yarn. It is recommended to use 10mm safety eyes and a 3mm crochet hook.
Designer: mo.kot.mo
MATERIALS
• Pink, Red, Green, White velvet yarn
• Small amount of black yarn for mouth
• 3mm crochet hook
• 2 black safety eyes (10 mm size) or you can crochet the eyes
• Polyester stuffing
• Yarn needle (for weaving in ends)
• Scissors
• Stitch markers (optional)
• Glue (optional)
ABBREVIATIONS (US TERMS)
• mr – magic ring
• ch – chain
• sc – single crochet
• dc– double crochet
• inc – increase (2 sc in the same stitch)
• dec – decrease (sc two stitches together)
• sl st – slip stitch
• st(s) – stitch(es)
• Rep or * – Repeat
• Rnd – Round
• BLO – back loop
• FO-fasten off
NOTE
• This Pattern follow US crochet terms
• Number of stitches indicated between “<>”. Ex. “<23 sts total>”.
• Use a stitch marker to mark the beginning of your rounds.
HEAD
• Rnd1: with pink yarn, make a mr, ch1, 8sc into the ring. Pull the ring tight, slst. <8>
• Rnd2: Ch1, inc*8, slst. <16>
• Rnd3: Ch1, [1sc, inc]*8, slst. <24>
• Rnd4: Ch1, [3sc, inc]*6, slst. <30
• Rnd5: Ch1, [2sc, inc, 2sc]*6, slst. <36>
• Rnd 6-10: Ch1, 1sc into each st around, slst. <36>
• Rnd 11: Ch1, 10sc, inc*5, 6sc, inc*5, 10sc, slst. <46>
• Rnd 12-14: Ch1, 1sc into each st around, slst. <46>
• Rnd 15: Ch1, 10sc, dec*5, 6sc, dec*5, 10sc, slst. <36>
• Rnd 16: Ch1, dec, 8sc, dec*3, 4sc, dec*3, 8sc, dec, slst. <28>

BODY
• Rnd 17: Ch1, 1sc, inc, 6sc, [1sc, inc]*6, 6sc, inc, 1sc , slst. <36>
• Rnd 18: Ch1, [5sc, inc]*6, slst. <42>
• Rnd 19: Ch1, [3sc, inc, 3sc]*6, slst. <48>
*Note: Place the eyes securely in the correct position on the head (between Rnd9-10, 6sts apart). Use white yarn for the eyes to add a bright. Use black yarn to embroider the mouth to create an expressive look. Then insert stuffing into the head to give it a full shape.

• Rnd20-21: (with pink yarn, Ch1, 19sc), (with white yarn, 10sc), (with pink yarn, 19sc) slst. <48>
• Rnd22: (with pink yarn, Ch1, 15sc, inc*4), (with white yarn, inc*10), (with pink yarn, inc*4, 15sc) slst. <66>
• Rnd23-24: (with pink yarn, Ch1, 23sc), (with white yarn, 20sc), (with pink yarn, 23sc) slst. <66>
• Rnd25: (with pink yarn, Ch1, 15sc, dec*4), (with white yarn, dec 10), (with pink yarn, dec*4, 15sc) slst. <48>
• Rnd26: Ch1, [4sc, dec]*8, slst. <40> Rnd27: Ch1, [3sc, dec]*8, slst. <32>
• Rnd28: Ch1, [2sc, dec]*8, slst. <24>
• Rnd29: Ch1, [1sc, dec]*8, sl st. <16>
*Note: Before moving forward, insert stuffing into the body for a full shape.

TAIL
• Rnd30-32: Ch1, 1sc into each st around, slst. <16>
• Rnd33: Ch1, [1sc, inc]*8, slst. <24>
• Rnd 34-36: Ch1, 1sc into each st around, slst. <24>
• Rnd37: Ch1, [2sc, dec]*6, slst. <18>
• Rnd38: Ch1, 1sc into each st around, slst. <18>
• Rnd39: Ch1, [1sc, dec]*6, slst. <12>
• Rnd40: Ch1, dec*6, slst, FO. <6>

FRILLS AN AXOLOTL’S TAIL
1. Start: Ch1 at the tail edge.
2. Frill Stitch: Work 1dc, ch2, and another 1dc in the same spot. Slip stitch to secure, then slip stitch to the next stitch along the edge.

3. Repeat Step 2: Continue this pattern around the tail edge for a wavy frill effect.
*Note: Total of 19 frill stitches around the tail edge (start between rnd 31-32). This will give the axolotl’s tail a lovely, wavy frilled effect!

LEGS
Big Part*2
• Rnd1: With white yarn, make a mr, ch1, 6sc into the ring. Pull the ring tight, slst. <6>
• Rnd2: Ch1, inc*6, slst. <12>
• Rnd3: With pink yarn, Ch 1, 1sc in the BLO of each stitch around, slst. <12>
• Rnd4: Ch1, 1sc into each st around, slst. <12>
Small Part*2
• Rnd 1: With white yarn, make a mr, ch1, 6sc into the ring. Pull the ring tight, slst. <6>
• Rnd 2: With pink yarn, Ch 1, 1sc in the BLO of each stitch around, slst. <12>
*Note: Leave a long tail for sewing.

STRAWBERRY FRILLS ON AN AXOLOTL’S HEAD *6
• Rnd1: With red yarn, make a mr, ch1, 6sc into the ring. Pull the ring tight, slst. <6>
• Rnd2: Ch1, [1 sc, inc]*3, slst. <9>
• Rnd3: Ch1, [1 sc, inc, 1 sc]*3, slst. <12>
• Rnd4: Ch1, dec*6, sl st, FO. <6>
*Note: Insert stuffing for a full shape. Use white yarn to embroider small seeds on the strawberry skin to make it resemble a realistic strawberry appearance. This simple detail adds texture and charm!.
Leaf
• Rnd1: With green yarn, make a mr, ch1, 5sc into the ring. Pull the ring tight, slst. <5>
• Rnd2: [Ch3, slst]*5, FO.
To complete the look, glue the strawberry leaves together securely before attaching them to the head of the axolotl. This will help create a polished, cohesive appearance.

CHEEK BLUSH (OPTIONAL)
• Rnd1: make a mr, ch1, 6sc into the ring. Pull the ring tight, slst. <6>
• Rnd2: Ch1, inc*6, slst. <12>
*Note: with pink milk cotton yarn- 2ply, 2mm crochet hook.

ASSEMBLY:
• Attach the six strawberry-shaped frills to the axolotl’s head by either gluing or sewing them in place.
• Sew both large and small legs onto the body.
• Embroider a mouth at the center of the face.
• Glue two small pink blush pieces onto the cheeks to add an expressive look.
• Weave in all loose ends for a clean finish.
