


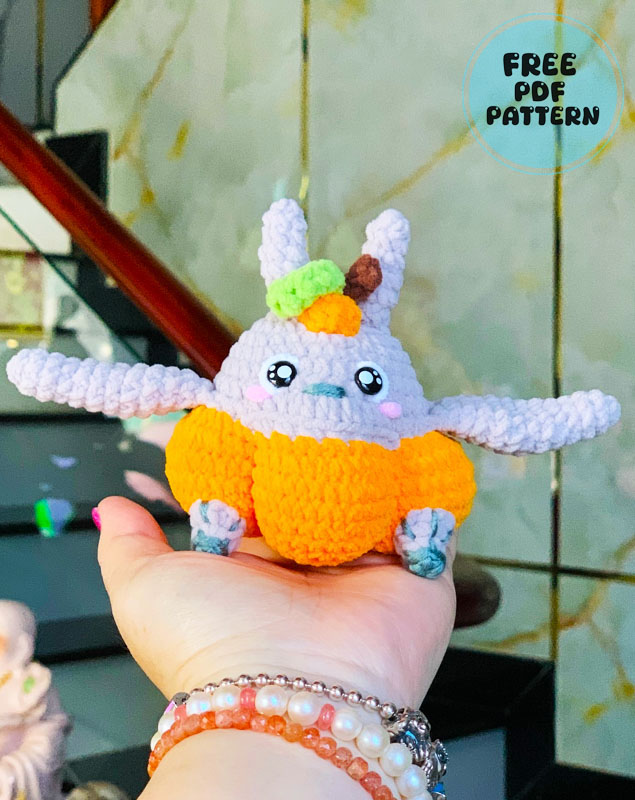
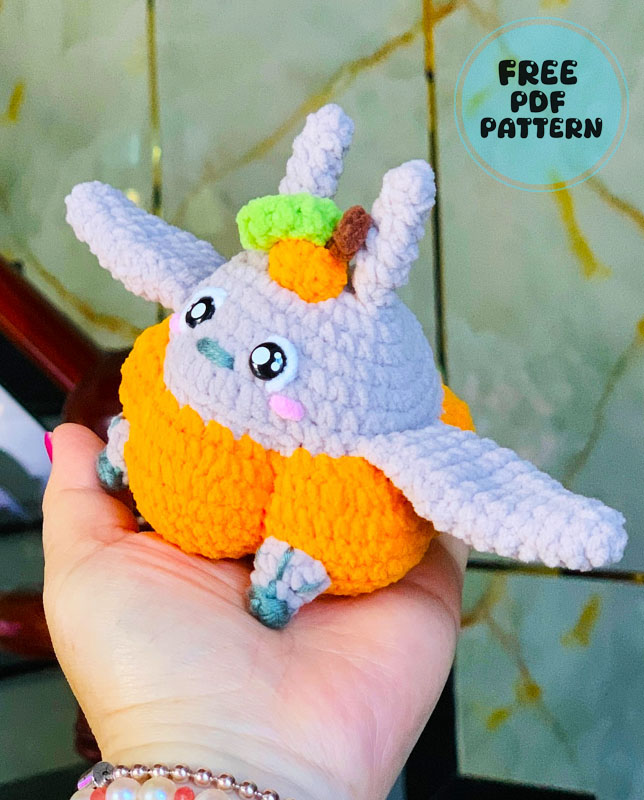
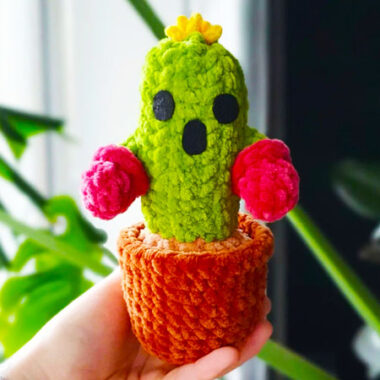
Friends, today I want to share with you a design of the totoro amigurumi toy adapted for Halloween. Although Totoro is usually made using purple, the lower part of his body is made using orange yarn. You can see that the lower part of the toy is made in the shape of a pumpkin. The ears of the Totoro toy with large arms are also designed in a pointed way. The toy with an interesting hat has pink cheeks and the toy is usually made using velvet yarn.
Crochet Pumpkin Totoro Pattern
Actually, you can also make this toy using Chunky or chenille yarn. The choice is completely up to you, but since these materials are the kind you can find everywhere, I recommend that you stick to the amigurumi pattern.
Designer: crochetsandloops
Abbreviations
MR – Magic Ring
CH – Chain
SC – Single crochet
INC – Increase
BLO – Back loop only
FLO – Front loop only
DEC – Decrease
ST – Stitch
SL ST – Slip stitch
FO – Fasten off
CC – Color change
HDCINC– 2 hdc in same stitch
Materials
Main Color- Grey yarn (Size 6 super chunky)
Orange yarn (Size 6 super chunky)
Green yarn (Size 6 super chunky)
Brown yarn (Size 6 super chunky)
Contrasting color – Dark
Grey yarn (Size 6 super chunky)
Optional: White felt for eyes, black for whiskers
Crochet hook (5 mm)
Sewing needle
Stuffing
Stitch markers
Safety eyes – 12mm
Notes
This pattern is low-sew so it’s best to make the pieces in order to be able to crochet them in later.
Make sure to read the side notes in bubbles on the page before starting so you don’t miss anything.
Use a stitch marker to mark the first stitch of each round.
I use a MR to start the rounds but another option is to do a ch2 and work into the 2nd chain from hook.
Arms
Make two. Use Main Color. Don’t stuff.
R1: 4sc in MR (4)
R2: Inc in every st (8)
R3-4: Sc all around (8) x2 Rounds
R5: [1sc, inc] x4 (12)
R6-7: Sc all around (12) x2 Rounds
R8: [3sc, inc] x3 (15)
R9: Sc all around (15)
R10: [3sc, dec] x3 (12)
R11-12: Sc all around (12) x2 Rounds
Fold in half and 6sc across to close. FO. No need to leave a yarn tail as they will be crocheted in.pic.1

Make two. Use Main Color. Don’t stuff.
R1: 4sc in MR (4)
R2: Sc all around (4)
R3: [1sc, inc] x2 (6)
R4: Sc all around (6)
R5: [2sc, inc] x2 (8)
R6: Dec x4 (4)
R7: BLO sc all around (4)
F.O and leave a short tail for sewing any gaps later. DO NOT FASTEN OFF THE SECOND EAR. pic.2. Continue to next page.

Ears to head
Continue using Main color from 2nd ear.
Ch3, join to 1st ear by doing 1sc into the last stitch. This will count as your first stitch of R1. pic.3
R1: Inc, [1sc, inc] x6 working into the 4sc on both ears and two sides of ch3. (21)
R2: [2sc, inc] x7 (28)
R3: Sc all around (28)
R4: [3sc, inc] x7 (35)
R5: Sc all around (35)
R6: 3sc, inc, 18sc, inc, 12sc (37)

On the next round we will be joining in the arms by doing sc through both the arm and head stitches. pic.5. The 4hdcinc on R7 are to create the nose. Make sure it’s centered on the head. You may need to adjust according to your tension.

R7: 2sc, join 1st arm with 6sc, 5sc, 4hdcinc, 5sc, join 2nd arm with 6sc, 9sc (41)
R8: BLO [3sc, dec] x2, 1sc , 6dec, 1sc, dec, [3sc, dec] x3 (29)

You can use a stitch marker to mark the front loops of this round as we will be working into them on the pumpkin.
Use white felt to cut out two oval shapes and place your safety eyes on them.

Insert eyes between R5-6 about 4 stitches apart.
Embroider a nose using contrasting color yarn between the eyes.
CC to Orange and continue working to create the pumpkin body.

Pumpkin
To create the pumpkin body, we will be increasing to create a flowy shape and doing spaced out decreases to create the ridges.
There should be 14 front loop stitches left on the front of your Totoro.
R1 is worked into the FLO Of R7 of the head and partially in both loops of R8 to define the nose.
R1: FLO inc x11, skip 1st, working through both loops incx7, FLO skip 1st, incx14, 2sc (66)
R2: [2sc, inc] x22 (88)
R3: 4sc, dec, [16sc, dec] x4, 10sc (83)

The decreases will be where the pumpkin ridges are more prominent so you can change the spacing to be where you want them.
R4: Sc all around (83)
R5: [2sc, dec] x20, 3sc (63)
R6: 6sc, dec, [10sc, dec] x4, 7sc (58)
R7: dec, [4sc, dec]x9, 2sc (48)
R8: Sc all around (48)
R9: [4sc, dec] x8 (40)
R10: [3sc, dec] x8 (32)
R11: [2sc, dec] x8 (24)
R12: [1sc, dec] x8 (16)

Start stuffing. While stuffing, push out the nose a little and on the pumpkin body, add more stuffing to the parts you want to be more prominent and leave the ridges pushed inward.
R13: dec x8 (8)
F.O. Finish stuffing, Close hole and hide remaining tail. pic.1
Legs
Make two. Use Contrasting Color. Don’t stuff.
R1: 4sc in MR (4)
CC to main color yarn.
R2: BLO 1sc, 2inc, 1sc (6)
R3: 2sc, 3sc in same st x2, 2sc (10)
F.O. Leave a long tail for sewing. pic.13

Use Contrasting color yarn to embroider three toes on.

Tail
Use Main Color.
R1: 6sc in MR (6)
R2: Inc in every stitch x6 (12)
R3-5: Sc all around (12) x3 Rounds
R6: [1sc, dec] x4 (8)
R7: Sc all around (8)
R8: Dec x4 (4)
F.O. Stuff lightly. Leave a long tail for sewing. pic.15

Pumpkin Hat
Use Orange. Optional stuffing
R1: 4sc in MR (4)
R2: Inc in every st (8)
R3-4: Sc all around (8) x2 Rounds
F.O. Leave long tail for sewing. pic.16

To create the stem, Use Brown yarn and insert your hook on any of the stitches on R1 of the pumpkin hat pic.17, Ch3, from 2nd ch from hook, 2sc.
F.O. pic.18

To make the vine, Use green yarn and insert your hook in a stitch next to the stem, ch8, turn, 7 hdc. F.O. pic.16

Assembly
Sew the legs between R3-6 of the body about 8 visible stitches apart. They should be around where the front two pumpkin ridges are.

Sew the tail to the back of the body aligned in the center on R7/8 and secure with a stitch on R5 to pull it up.

Sew the hat to the top of the head between the ears.

This is how the tail should look from the side.

Optional Whiskers
Use black/ dark grey yarn to embroider Totoro’s whiskers or cut out some felt strips and glue them on.

You have completed your Pumpkin Totoro plushie!
