


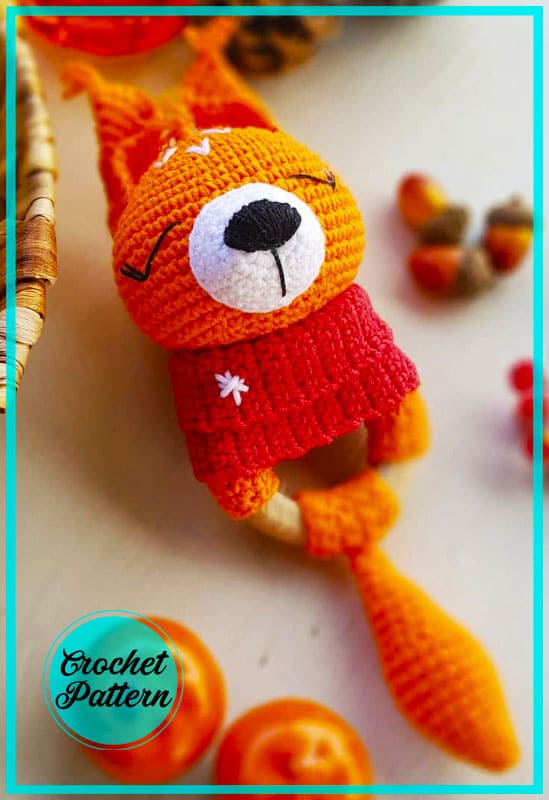
Today I want to introduce you to the free amigurumi pattern for crocheting a rattle in the shape of a squirrel from Yana Rogozina. The size of the crocheted squirrel rattle is about 15 cm. The designer used YarnArt Jeans yarn and a 2 mm crochet hook to make this squirrel. You will also need a wooden ring with a diameter of 65 mm and a rattle. From the pattern description you will also learn how to crochet a collar to decorate our squirrel.
Squirrel Rattle Crochet Free Pattern
Also, please note that the toy has a long tail. If you are ready, let’s start and crochet the squirrel rattle step by step.
Designer: yar.yarn
Materials
– Yarn (semi-cotton) orange, red and white
colors (I have VarnAgean5)
– Threads (Iris) black
– Crochet Hook 2.0 mm
– Wooden ring (outer diameter b5 mm)
– Rounded tip needle.
– Holofiber
Abbreviations
LL: Lifting loop Click for mean!
MR – Amigurumi Magic ring
sc : Single Crochet
inc : Increase
dec : Decrease
st: Stitch
ch : Chain
Head
Orange yarn dial:
Rnd 1) 6sc in MR (6)
Rnd 2) 6inc (12)
Rnd 3) (1 sc, inc)*6 (18)
Rnd 4) (2sc, inc)*6 (24)
Rnd 5) (3sc, inc)*6 (30)
Rnd 6) 30 sc
Rnd 7) (4 sc,inc)*6 (36)
Rnd 8) 36 sc
Rnd 9) (5 sc, inc)*6 (42)
Rnd 10) 42 sc
Rnd 11) (6sc, inc)*6 (48)
Rnd 12)-19) 48 sc
Rnd 20) (6sc, dec)*6 (42)
Rnd 21) (5sc, dec)*6 (36)
Rnd 22) (4sc, dec)*6 (30
Fill the head with silicone fiber and insert the wooden ring.
Rnd 1) (3sc, dec)*6 (24)
Rnd 2) (2sc, dec)*6 (18)
Rnd 3) (1 sc, dec)*6 (12)
Do not close completely, leaving a hole. Cut the yarn with about 20-30 cm of excess for sewing. Reinforce the stuffing if necessary.
Muzzle
With a white thread:
Rnd 1) 6sc in MR (6)
Rnd 2) 6 inc (12)
Rnd 3) 12sc (12)
Rnd 4) 1 sc, 1inc (18)
Rnd 5) 18sc
Rnd 6) 2sc, 1inc (24)
Rnd 7) 24sc
Fasten and cut the thread, leaving a 20 cm end for sewing
Ears
With an orange thread, dial:
Rnd 1) 6sc in MR (6)
Rnd 2) 6 inc (12)
Rnd 3) 1 sc, 1 inc (18)
Rnd 4) 2sc, 1 inc (24)
Rnd 5) Зsc, 1 inc (30)
Rnd 6) 4sc, 1 dec (36)
Fold the part in half and join the edges sc.
Fasten and cut the thread, leaving a sewing end 15-20 cm long.
Twist the ear along the long side and secure with a thread.
The second ear is the same, but in a mirror image.
Make brushes at the tips
Tail
With an orange thread, dial:
Rnd 1) 6 sc in MR
Rnd 2) 6sc
Rnd 3) 6inc (12)
Rnd 4)-5) 12sc
Rnd 6) 1 sc, 1 inc (18)
Rnd 7)-10) 18sc
Rnd 11) 1 sc, 1 dec (12)
Rnd 12)-13) 12sc
Fill the tail with holofiber
Rnd 14) 2sc, 1 dec (9)
Rnd 15) 9sc
Rnd 16) 1 sc, 1 dec (6)
Rnd 17) 6sc
Fasten and cut the thread, leaving the end for sewing with a length of 15-20 cm
Collar and snood
Make 16 ch with red thread.
Next, we knit in turning rows of 15 sc to the length you need (I have 36 rows). We fasten the thread and leave the end for sewing with a length of 15-20 cm
The finished part can be steamed a little with an iron. Next, we sew the snood right on the rattle, so it will sit tightly on the ring.
At the end, bend the collar and embroider the snowflake with white thread
Ring clamp N1
– Make 10 ch with an orange thread – Turn the work and, starting from the 2nd loop, crochet 9 sc – 1 LL and crochet back 9sc so we continue to crochet to the length you need. I have 32 rows
Ring clamp N2
– Make 10 ch with an orange thread – Turn the work and, starting from the 2nd loop, crochet 9 sc – 1 LL and crochet back 9sc so we continue to crochet to the length you need. I have 8 rows
Assembly
Sew the snout to the front of the head.
Embroider the nose and eyes with black thread.
Attach the ears to the top of the head, between rows 6 and 11.
At the top of the head, create a crest with orange thread and embroider decorative details with white thread.
Sew the stand around the ring and tighten.
Pin the head to the first stand and sew tightly around it.
Sew the net and tail to the second stand.
Sew the head to the clamp N1. To do this, find the middle of the clamp and secure the head with pins. Then we sew in a circle so that the head is firmly held and not dangled on the ring Next, sew on the collar-snood. Sew the tail to the clamp N2. The squirrel is ready!
Enjoy your creativity!
