


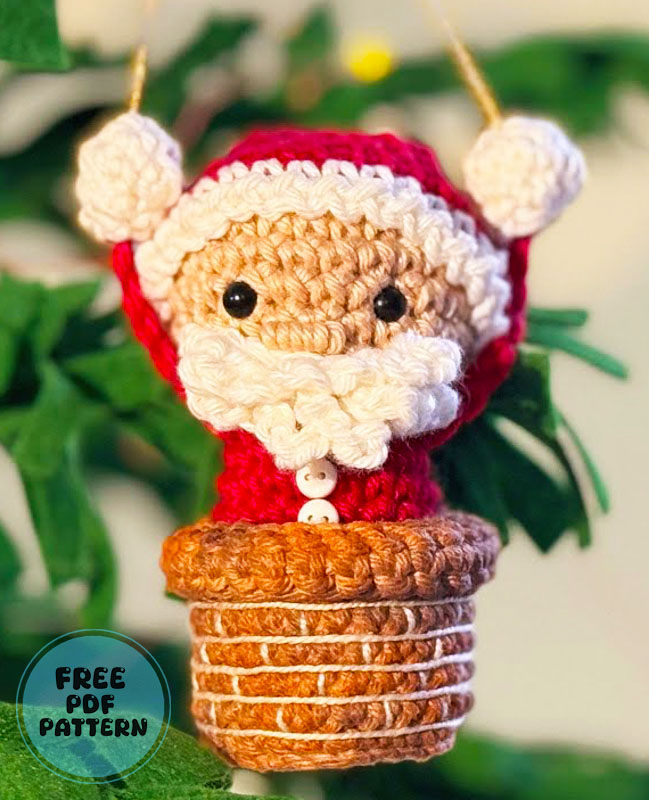
As always, we continue to share creative and original designs this Christmas. Now I want to introduce you to an unusual Santa Claus amigurumi pattern. Crochet Santa Claus is standing inside a chimney. This toy can be very helpful especially when it comes to decorating a Christmas tree. If you look carefully, you can see that the toy is hung on a tree with a rope.
Santa Claus in the Chimney Amigurumi Doll
It is up to you to make the body of the crochet Santa Claus long or short. You can find information about this detail in the following parts of the pattern.
Designer: com_a_mo
MATERIALS
FOR THE CHIMNEY:
The chimney was made with light-colored yarn and painted. So, depending on your choice, the materials may vary.
• If you are not going to paint it:
– Choose a brown/brick-colored yarn;
• If you are going to paint the chimney:
– Light beige yarn;
– Red, yellow and black fabric paint;
– Paintbrush.
FOR SANTA CLAUS:
– Off-white, red and skin-colored yarn;
– 1 mini white pompom for the hat;
– 2 mini white buttons;
– 5mm safety eyes;
– Stuffing;
– Universal craft glue;
OTHER MATERIALS:
– Yarn (gold) for hanging;
– Thinner ecru yarn for embroidering the bricks;
– 2.75mm crochet hook;
– Tapestry needle, scissors and pins.
FINAL SIZE
The piece will be approximately 7 cm long and will reach 9 cm when Santa Claus is pulled up.
Abbreviations
MR = Magic Ring
ch = chain
sc = single crochet
sl st = slip stitch
dec = decrease
hdc = half double crochet
FLO = Front loop only
inc = increase
HEAD AND BODY
Start with skin color.
Round 1. 6 sc in magic ring
Round 2. 6 inc {12}
Round 3. [1 sc, 1 inc] x6 {18}
Round 4. [2 sc, 1 inc] x6 {24}
Rounds 5-9. 24 sc (5 rounds)
Round 10. [2 sc, 1 dec] x6 {18}
Place eyes between rounds 7 and 8, 4 sc apart.
Round 11. [1 sc, 1 dec] x6 {12}
Insert stuffing and finish stuffing on the next rounds.
Switch to red.
Row 12. in FLO [1 sc, 1 inc] x6 {18}
Row 13 – 17. 18 sc (5 rounds)
Row 18. [1 sc, 1 dec] x6 {12}
Row 19. 6 dec {6}
Finish with the inverted MR.
HEAD AND BODY
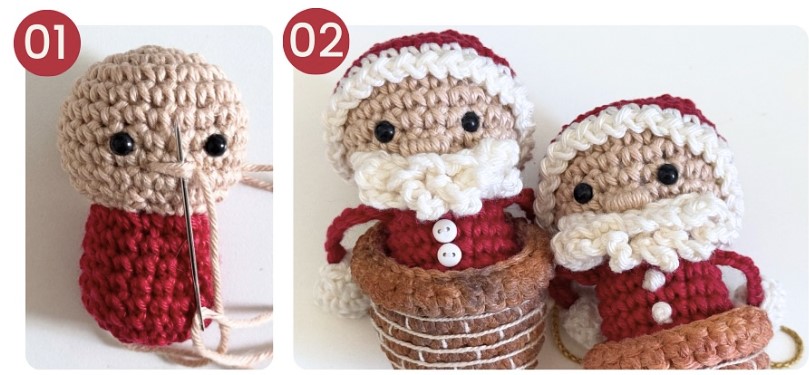
Embroider the nose between rows 8 and 9, with 2 sc wide and centered with the eyes.
Pass the yarn horizontally and then pass it several times vertically around the base yarn (Figure 01), until the space is filled (Figure 02).
Sew the two mini buttons on the body in the center or embroider with a French knot (Figure 02).
HAT
Make it with red color.
Row 1. 4 sc in magic ring
Row 2. [1 sc, 1 inc] x2 {6}
Row 3. 6 sc
Row 4. [2 sc, 1 inc] x2 {8}
Row 5. [3 sc, 1 inc] x2 {10}
Row 6. [4 sc, 1 inc] x2 {12}
Row 7. [2 sc, 1 inc] x4 {16}
Row 8. [3 sc, 1 inc] x4 {20}
Row 9. 20 sc
Row 10. [4 sc, 1 inc] x4 {24}
Row 11. 24 sc
Row 12. [3 sc, 1 inc] x6 {30}
Row 13. 30 sc
Change to off-white yarn.
Row 14. 30 sc
Row 15. [1 sl st, 1 ch] x30
Fasten off, leaving a tail for sewing.
Glue the pompom to the tip. Fold the tip of the hat and sew to secure it in place (Figures 03 and 04).
Sew with a few stitches to the head.

BEARD
Make with off-white color.
Make 10 ch and start on the fourth from the hook.
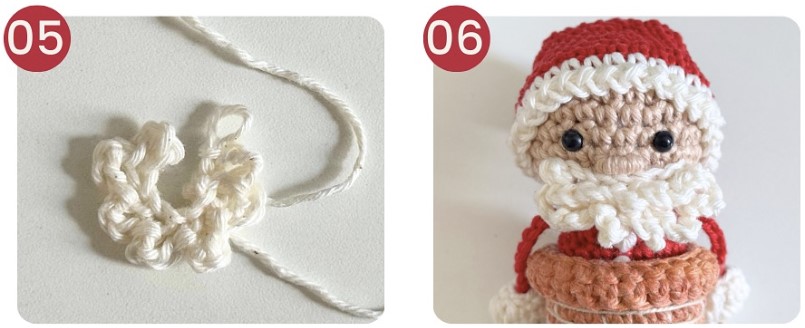
Row 1. [1 sl st, 3 ch] x7, 1 sl st (Figure 05)
Turn the work.
Row 2. Make 5 ch and fasten with 1 sl st in a loop of the sl st from the previous row.
Repeat until the end (Figure 06).
Between two chain spaces from row 1.
Cut the yarn, leaving a few centimeters to sew in the center of Santa Claus’s face. In the center, the beard is just below the nose, but on the sides it goes up a little (Figure 06).
HANDS
Make two pieces with the off-white yarn.
Row 1. 5 sc in the magic ring – do not close the MR too much.
Row 2. 5 inc {10}
Row 3. 2 sc, 3 closed hdc together, 7 sc {10}
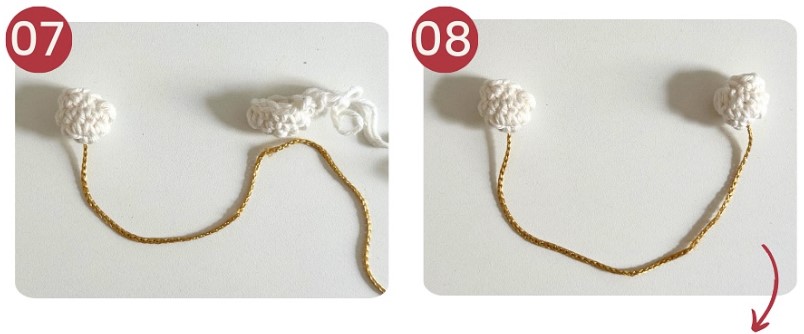
Tie a knot in the end of the yarn that you will use to hang it and place the knot inside the first hand, leaving the rest of the yarn outside. Now you can close the MR more (Figure 07)
Row 4. 5 dec {5}
Finish with an invisible tie-off.
When finishing row 3 of the second hand, insert the end of the yarn, which is attached to the other hand, through the MR.
Tie a knot in the yarn at a distance of 15 cm from the first hand. Close the MR well and continue to Row 4 as normal (Figure 08).
The thumbs are facing inwards. 😉
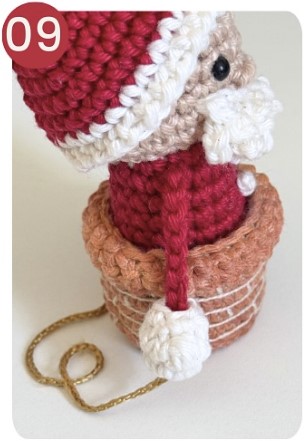
ARMS
Make 2 pieces with the color red. Make 10 ch and cut the yarn.
Place a drop of glue onto your hand and insert approx. 2 ch of the arm to secure (Figure 09).
Sew the other end of the ch between rows 12 and 13, on the side of the body (Figure 09).
CHIMNEY
Work with light beige.
Row 1. 6 sc in magic ring
Row 2. 6 inc {12}
Row 3. [1 sc, 1 inc] x6 {18}
Row 4. [2 sc, 1 inc] x6 {24}
Row 5. 24 sc in third loop
Row 6 – 12. 24 sc (7 rows)
Row 13. in FLO 24 sc
Row 14. 24 sc
Finish with invisible stitch and fasten off.
Fold the last two rows to the outside.
• If you chose not to paint, proceed to embroidery.
PAINTING
To paint, use fabric paint and dilute it in water.
I mixed red and yellow to make orange, and added a little bit of black to make it darker.
I also mixed red and black to make darker spots.
CHIMNEY
I simply mixed the colors on the piece until it was completely painted.
It is normal for the color to become lighter as the paint dries. So I touched it up after a few hours.
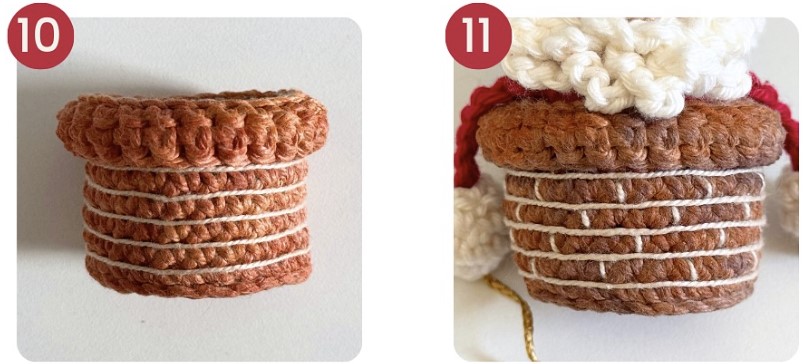
When the paint is dry, start embroidering to imitate bricks (Figure 10).
I used 3 sc wide as a base for dividing the bricks (vertical stripes). Always alternating between rows.
And the result is as shown in Figure 11.

ASSEMBLY
Sew Santa Claus to the bottom of the chimney, leaving approximately 2 cm of loose yarn on the inside.
This way, it will be possible to pull Santa Claus without him coming out completely (Figures 12 and 13).

