


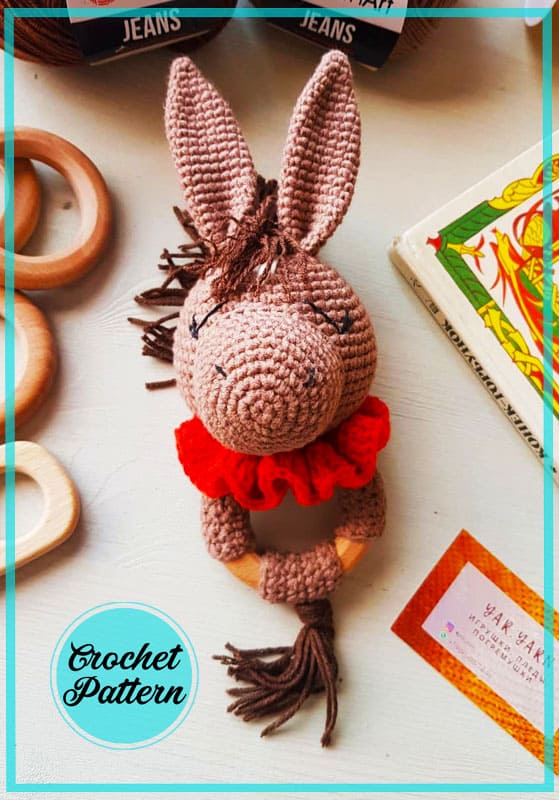
Dear friends, today we will examine the crochet rattle horse amigurumi pattern together. First of all, I have to say this. Crochet rattle amigurumis may seem easy, but it can be a little difficult to combine with the wooden part. You have to get this part right. I tried to explain how to crochet the pattern step by step. I hope you will like it. Horse patterns haven’t been around much lately.
Rattle Horse Crochet Pattern
It is among the very rare amigurumi patterns. The most challenging part of this cute horse amigurumi is the collar. Other than that, the other parts are pretty easy. We will crochet together step by step. The pattern is free. Don’t forget to tag the designer!
Designer: yar.yarn
For work we need:
– Yarn (semi-cotton, cotton) coffee, dark brown, milky and red (I have YarnArt Jeans)
– yarn (Iris) black
– Hook 2.0 mm
– Wooden ring (outer diameter 65 mm)
– Zvenelka
– Crochet hook with blunt tip
– Holofiber
Abbreviations
MR – Amigurumi Magic ring
sc : Single Crochet
inc : Increase
dec : Decrease
st: Stitch
dc : Double Crochet
hdc: Half Double Crochet
ch : Chain

Head
With a coffee colored yarn:
1) 6sc in MR (6)
2) 6inc (12)
3) (1sc, inc)*6 (18)
4) (2sc, inc)*6 (24)
5) (Зsc, inc)*6 (30)
6) 30 sc
7) (4sc,inc)*6 (36)
8) 36 sc
9) (5sc, inc)*6 (42)
10) 42 sc
11) (6sc, inc)*6 (48)
12)-19) 48 sc
20) (6sc, dec)*6 (42)
21) (5sc, dec)*6 (36)
22) (4sc, dec)*6 (30)
Fill with holofiber and insert a ring
23) (Зsc, dec)*6 (24)
24) (2sc, dec)*6 (18)
25) (1sc, dec)*6 (12)
Without closing the loop to the end, leave a hole and the end of the yarn 20-30 cm long for sewing. Add holofiber
Muzzle
With a coffee colored yarn:
1) 6sc in MR (6)
2) 6inc (12)
3) (1sc, inc)*6 (18)
4) (2sc, inc)*6 (24)
5) 24sc (24)
6) (3sc, inc)*6(30)
7)-9) 30sc (30)
10) (4sc, inc)*6 (36)
Fasten off and cut the yarn, leaving a 20 cm end for sewing.
Ears (2 pcs)
With a coffee-colored yarn:
1) 6sc in MR (6)
2) 6sc (6)
3) (1sc, inc)*3 (9)
4) 9sc (9)
5) (2sc, inc)*4 (12)
6) 12sc (12)
7) (6sc, inc) *2 (14)
8) 14sc (14)
9) (7sc, inc)*2 (16)
10)-22) 16sc
Fasten and cut the yarn, leaving a sewing end 15 cm long.
Do not fill with holofiber !!!
Ring clamp N1
– Make 10 ch with a coffee-colored yarn (The number of loops depends on the thickness of the ring and the yarn, therefore, having crochet 3-4 rows, you need to try on the clamp on the ring. It should sit very tightly!)
– Turn the work and starting from the 2nd loop, crochet 9 sc
– 1ch and crochet turn 9sc
So we continue to crochet to the length you need. I have 32 rows. Fasten and cut the yarn, leaving the end for sewing.
Ring clamp N2
– Make 10 ch with a coffee-colored yarn (The number of loops depends on the thickness of the ring and the yarn, therefore, having crochet 3-4 rows, you need to try on the clamp on the ring. It should sit very tightly!)
– Turn the work and starting from the 2nd loop, crochet 9 sc
– LL and crochet turn 9sc
So we continue to crochet 8 rows Fasten and cut the yarn, leaving the end for sewing.
Collar
1) With a red yarn, make 15 ch + 2ch (17)
2) Turn the work and starting with 3 loops, crochet 2 sc in each loop (30)
3) Turn the work and, starting from the first loop, crochet 3dc in each loop (90)
4) Turn the work and starting from the first loop, crochet 90dc (90).
Leave the end of the yarn for sewing
Assembly
Sew the muzzle, filling it with holofiber, to the head between 8 and 2 rows from the middle.
Fold the ears at the base and even in half, sew to the head on the sides between 2 and 5 rows from the middle. Black yarn Embroider eyes and nostrils. Embroider a spot on the forehead with a milky yarn.
Mane
Cut off dark brown yarn 8 cm long in the amount of 30 pieces.
Using a crochet hook, fasten 2 yarn along the course of the mane from the crown of the head to the back of the head. At the top of the head, you can cut the length a little and fluff it up. Then sew the clamps to the ringlet and turn the seam inside the ringlet.
Sew the head to the clamp N1. Milking this with the help of pins, mark the middle of the clamp and secure the head so that it is in the center. Further, passing several times in a circle, we firmly sew the head to the clamp so that it does not dangle.
