


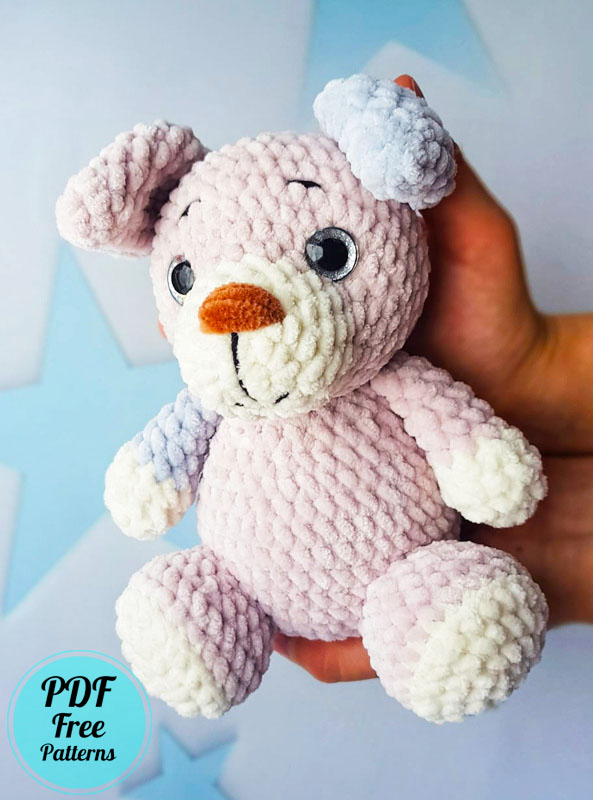
I want to share a plush dog amigurumi pattern. First of all, I would like to thank chirka_toys for this amazing amigurumi pattern. Although it is a very easy amigurumi dog pattern, I can easily say that it looks very stylish. In addition, the amigurumi dog toy has a very durable structure. I think that the back legs of the amigurumi will help you a lot in this regard. The short legs of the amigurumi toy will allow it to sit comfortably.
Plush Puppy Martin Crochet Pattern
When you first see Martin crochet dog, you may have thought it looked like a teddy bear, but our plush dog will prove that he is different from a teddy bear, especially with his muzzle design and big ears.
Designer: chirka_toys
MATERIALS:
1. Super Bulky/Super chunky velvet yarn Himalaya Dolphin baby 100g/120m or analogue;
2. Hook 3.5 mm;
3. Safety eyes 16 mm;
4. Sport weight/4ply yarn Yarnart Jeans 50g/160m for face decoration;
5. Scissors, plastic needle with a wide eye for sewing pieces;
6. Polyester toy stuffing (fiberfill);
7. Needle and strong thread for tightening.
ABBREVIATIONS:
MR – magic ring
CH – chain
SL ST – slip stitch
SC – single crochet
INC – increse (2 sc in one stitch)
DEC – decrease (2 sc together)
(____) repeat 6 times – repeat instruction in brackets 6 times
HEAD
Begin crocheting with additional color.
1. 6sc in MR (if you can not make MR, then ch2 and crochet 6sc in the second chain from the hook)
2. 6inc (12)
3. (1sc, inc) repeat 6 times (18)
4-6. 18sc (18)
7. Change color to the main: (1sc, inc) repeat 9 times (27)
8. (inc, 2sc) repeat 9 times (36)
9. 36sc (36)
10. (5sc, inc) repeat 6 times (42)
11-13. 42sc (42)
Insert safety eyes between rounds 8 and 9 at a distance of 10-11 sc.
14. (5sc, dec) repeat 6 times (36)
15. 36sc (36)
16. (4sc, dec) repeat 6 times (30)
17. (3sc, dec) repeat 6 times (24)
18. (2sc, dec) repeat 6 times (18)
19. (1sc, dec) repeat 6 times (12)
20. 6dec (6)
Fasten off with sl st, cut the yarn, tighten the hole with a needle.

EARS (2 pieces)
1. 4sc in MR
2. 4inc (8)
3. 8sc (8)
4. (1sc, inc) repeat 4 times (12)
5. 12sc (12)
6. (2sc, inc) repeat 4 times (16)
7-8. 16sc (16)
9. 8dec (8)
Fold the ear in half and crochet 4 sc through both sides.
Cut the yarn, leaving a long tail for sewing.

TAIL
1. 4sc in MR
2. 4sc (4)
3. 4inc (8)
4-6. 8sc (8)
Fold the tail in half and crochet 4 sc through both sides.

FORELEGS (2 pieces)
Begin crocheting with additional color.
1. 6sc in MR
2. 6inc (12)
3. 12sc (12)
4. (2sc, dec) repeat 3 times (9)
5. Change color to the main: 9 sc (9)
6-7. 9sc (9) Stuff only the lower part of the leg.
8. (2sc, dec) repeat 2 times, 1sc (7)
9. 7sc (7)
Fold the leg in half and crochet 3 sc through both sides.

HIND LEGS (2 pieces)
Begin crocheting with additional color.
1. 6sc in MR
2. 6inc (12)
3. (1sc, inc) repeat 6 times (18)
4. (inc, 2sc) repeat 6 times (24)
5. Change color to the main: BLO 24sc (24)
6. 24sc (24)
7. (2sc, dec) repeat 6 times (18)
8. 18sc (18)
9. (1sc, dec) repeat 6 times (12)
Fasten off with sl st, cut the yarn, leaving a long tail for sewing.

BODY
Crochet with the main color.
1. 6sc in MR
2. 6inc (12)
3. (1sc, inc) repeat 6 times (18)
4. (2sc, inc) repeat 6 times (24)
5. (3sc, inc) repeat 6 times (30)
6. (4sc, inc) repeat 6 times (36)
7. (5sc, inc) repeat 6 times (42)
8. 1sc, 4sc with the tail, 37sc (42)
9-12. 42sc (42)
13. (5sc, dec) repeat 6 times (36)
14. 36sc (36)
15. (4sc, dec) repeat 6 times (30)
16. (3sc, dec) repeat 6 times (24)
17. 24sc (24)
18. (2sc, dec) repeat 6 times (18)
19. 7sc, 3sc with the foreleg, 5sc, 3sc with the foreleg (18)
Pay attention that the legs are located symmetrical to the ponytail.
Fasten off with sl st, cut the yarn, leaving a long tail for sewing pieces. Stuff the body with fiberfill.

ASSEMBLY
1. Make a face tightening. See video: https://youtube.com/shorts/n15VqlE38Tg
2. Embroider a nose, mouth and eyebrows.
3. Sew the ears in Rnd 16 of the head at a distance of 5 sc.
4. Sew on the head. First fix it with two knitting needles to the body, and then sew it using the remaining yarn tail on the body. Strengthen the neck with fiberfill.

5. Sew the hind legs between rounds 4 and 10 of the body.
(For convenience, I fixed them with three long needles on the body, and then I sewed them on).

