


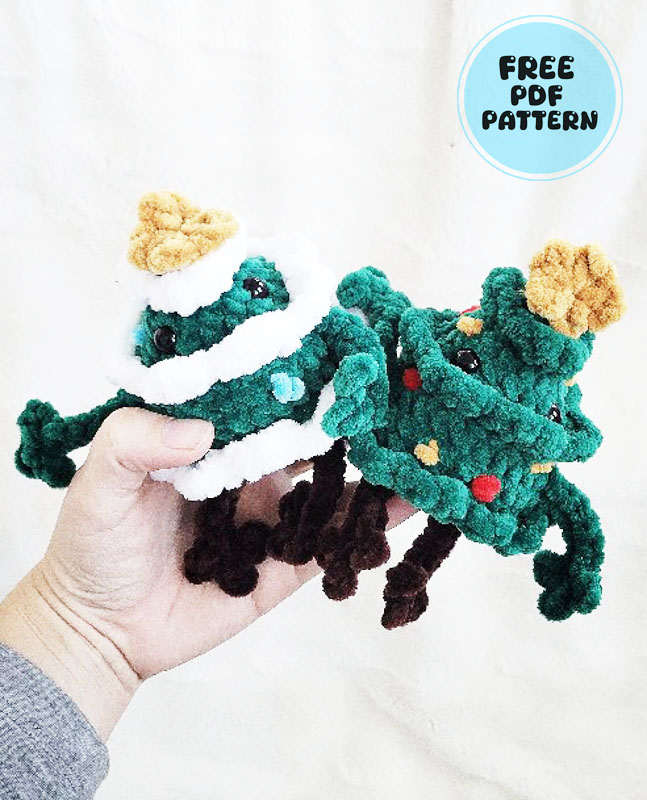
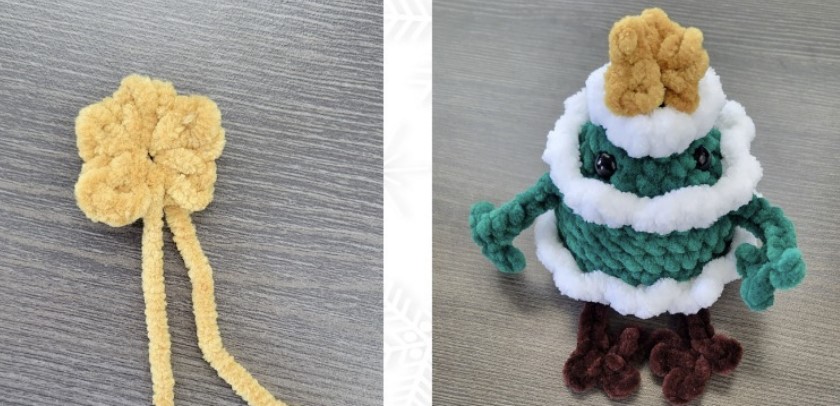
I can say that we had a much more productive Christmas season this year compared to previous years. Coming across so many original designs made me very happy this year. Now I will introduce you to a doll pattern with arms and legs designed in the shape of a tree. The toy is made using Chunky yarn and we see that there are small ornaments on it.
Leggy Christmas Tree Ornament Amigurumi Toy
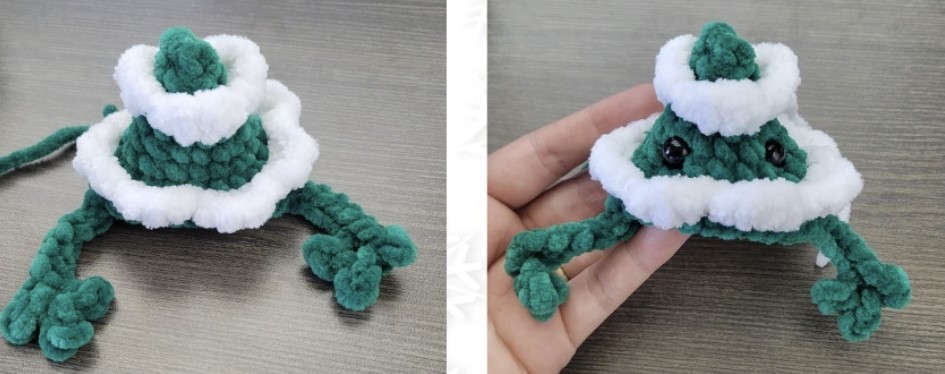
We can see that there is a very large star on the top of the crochet tree. It is recommended to use a 4mm crochet hook when making the toy and you will need to use 12mm safety eyes for the eyes of the toy.
Designer: dolls.and.stuffies
Materials:
Yarn (Green–I Used Premier Parfait Chunky, any accent colors you’d like)
Crochet Hook (I used 4 mm)
Safety Eyes (I used 12 mm)
Stitch Marker
Yarn Needle
Stuffing
Notes:
This is a beginner/intermediate pattern. Pattern is written in US terminology.
It is worked in the round.
If you have any questions, please feel free to message me! I’m happy to answer any and all questions.
Stitches to know:
MR (Magic Ring)
SC (Single Crochet
INC (Increase)
DEC (Decrease)
CH (Chain)
SLST (Slip Stitch)
HDC (Half-Double Crochet)
DC (Double Crochet)
R–Round
FLO–Front Loop Only
BL–Back Loop
FO–Finish Off
CC–Color Change
Christmas Tree
Starting at the top in green:
R1: 4SC in MR (4)
R2: (SC, INC) repeat 2 times (6)
R3: (SC, INC) repeat 3 times (9)
**For the ruffles, you can either continue in the same color as the tree, or color change to an accent color.
Ruffle R1: FLO entire round (mark the BL with stitch marker) (SLST, [HDC, DC in same stitch], [DC, HDC in same stitch]) repeat 3 times, SLST in 1st SLST in round (15)
R4: BLO entire round (2SC, INC) repeat 3 times (12)
R5: (3SC, INC) repeat 3 times (15)
R6: (4SC, INC) repeat 3 times (18)
R7: (5SC, INC) repeat 3 times (21)
Ruffle R2: FLO entire round (mark the BL with stitch marker) (SLST, [HDC, DC in same stitch], [DC, HDC in same stitch]) repeat 7 times, SLST in 1st SLST in round (35)
R8: BLO entire round 6sc, *limb*, inc, 6sc, inc, *limb*, 6sc, inc (24)
Insert eyes between rounds 5 & 6, about 6 stitches apart, centered between the arms
R9: (7SC, INC) repeat 3 times (27)
R10: (8SC, INC) repeat 3 times (30)
R11: (9sc, INC) repeat 3 times (33)
Ruffle R3: FLO entire round (mark the BL with stitch marker) (SLST, [HDC, DC in same stitch], [DC, HDC in same stitch]) repeat 11 times, SLST in 1st SLST in ST in round (55)
R12: BLO entire round (SC, DEC) repeat 11 times (22)
R13: (SC, DEC) repeat 2 times, SC, CC brown, *limb*, CC green, (DEC, SC) repeat 2 times CC brown, *limb*, CC green, (DEC, SC) repeat 3 times (15)
Stuff.
R14. 7DEC, SC (8)
FO, close hole Weave in yarn tail
*Limb*–9CH, 2SLST down CH, 2CH, 2SLST down CH, 2 CH, 8SLST down CH, SLST back into ST that 1st CH started (this will be skipped in the next round)

Star
In Yellow.
Make a MR. (2CH, SL ST into MR) repeat 5 times
Sew onto the top of the tree, facing the same wway as the eyes.
Ornaments
Add ornaments where ever you’d like using your choice of color. (See next page for photos)
To make the ornaments, we will be doing french knots.
Bring your yarn (whatever color you prefer) through to where ever you’d like an ornament. (Picture A)
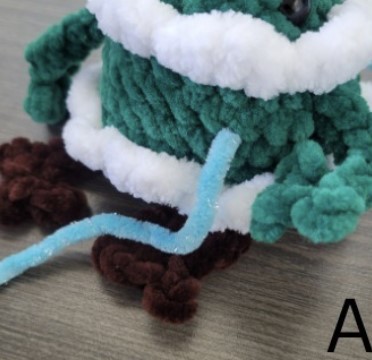
In a loop directly next to where you pulled up your yarn, insert your hook, but do not pull it all the way through. (Picture B)
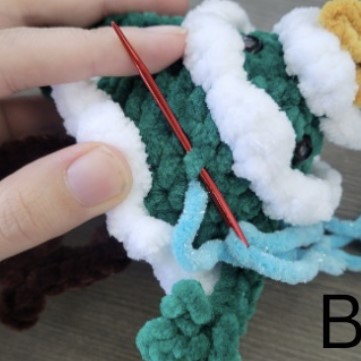
Wrap the yarn between your hook and where you initially pulled through around the hook where it had already gone through the loop 2 times. (Picture C)

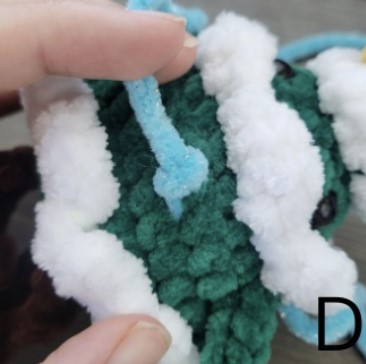
While holding the yarn you wrapped around the hook, pull the hook and the remaining yarn through the loop and the wrapped yarn. (Picture D)
Bring yarn back through a nearby stitch to complete the knot. Repeat for all ornaments. (Picture E)

That’s it!

