


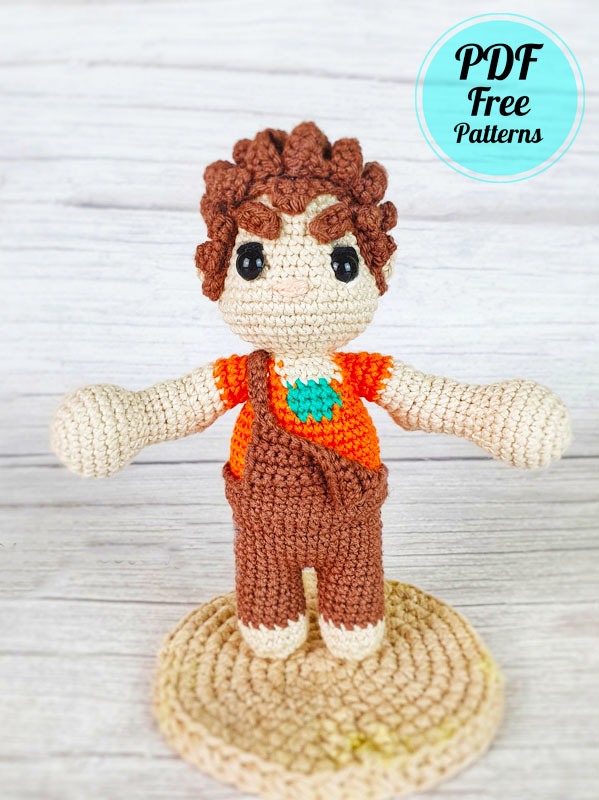
Hello my dears. After a long time, I had the chance to share a doll. Today we’re going to do more than just share dolls. Today we are going to make a very cute and very well designed “Wreck it Ralph” disney character amigurumi toy. The crochet doll pattern, which has very vivid colors and a very good design, has a very detailed expression. In this way, I think you can make an crochet amigurumi toy much more easily. Now if you’re ready, let’s get started.
Wreck it Ralph Doll Amigurumi
The doll was a cartoon character, but I was very impressed by how realistic the design was. Some of the doll’s overalls look baggy. Although this design is not very nice, we can say that it added a different atmosphere to the toy. You will need to crochet carefully when giving this shape to the toy with its colorful body structure.
Designer: francuccicrochet

ARMS x2
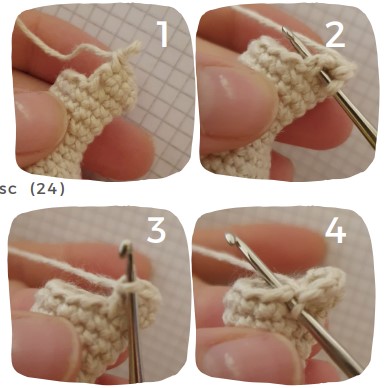
R1. 6sc in MR (6)
R2. 6inc (12)
R3. 1sc, 3inc, 3sc, 3inc, 2sc (18)
R4. 1sc, (1sc, 1inc)x3, 3sc, (1inc, 1sc)x3, 2sc (24)
R5-7 (3R). 24sc (24)
R8. (1sc, 1dec, 1sc) x6 (18)
R9. (1sc, 1dec) x6 (12)
Stuff as you go
R10-12 (3R). 12sc (12)
R13. (3sc, 1inc) x3 (15)
R14. 15sc (15)
R15. 9sc, 2dec, 2sc (13)
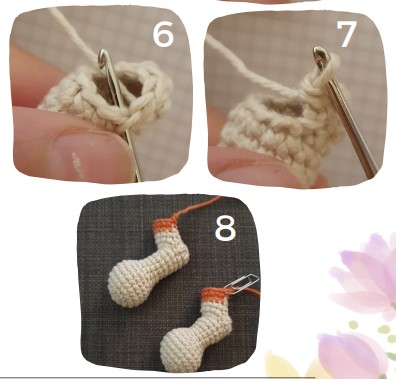
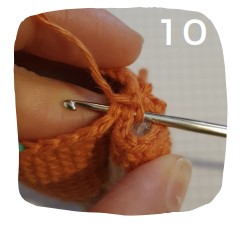
R16. 6sc, ch1 turn
Start working the ELBOW
4sc, sl st, turn without making the ch
sk1, 4sc, sc on the side (pic2), sl st (pic4), turn without ch
sk1, 2sc, dec, sc, sl st on the next st of R16, turn without ch
sk1, 4sc, sl st in the next st of R16
R17. 1sc, 3inc, 5sc (12)
R18-19 (2R). 12sc (12)
Change color to orange
R20-21 (2R). 12sc (12)
sl st and FO
LEGS x2
SKIN COLOR
R1. 5sc in MR (5)
R2. 5inc (10)
R3. 3inc, 1inc of 3, 1sc, 1inc of 3, 3inc, 1sc (20)
R4. 7sc, 3dec, 7sc (17)
R5. 7sc, 2dec, 6sc (15)
Start stuffing and keep on as you go
Change color to brown
R6-10 (5R). 15sc (15)
Cut yarn for the first leg, make a second one but this time don’t cut the yarn and keep on working
BODY
R11. 5sc, ch2, join the first leg with a sc in the 13th st (this may vary depending on the way you work and the yarn and hook you use, just make sure the feet are in the same direction), 14sc, 2sc on the ch, 10sc (34)
R12. 34sc (34)
R13. 14sc, 1inc, 16sc, 1inc, 2sc (36)
R14-15. 36sc (36)
R16. 15sc, 1inc, 17sc, 1inc, 2sc (38)
R17-18. 38sc (38)
Change color to orange
R19. 38sc BLO (38)
R20. 16sc, 1inc, 18sc, 1inc, 2sc (40)
R21-28 (8R). 40sc (40)
In the next R we’re adding the green color for
the shirt, it has to be in the center, so make sure
to change it’s position in the pattern if you need
to.
R29. (2sc, 1dec) x6, change color to green, 2sc, 1dec, change color to orange, (2sc, 1dec)x3 (30)
In the next R we’re joining the arms. Depending on the way you work and yarn and hook you use you might have to fix the number of sc in order to join the arms on the side.
R30. 11sc, taking both sts of the arm and of the body join one arm with 3sc, 3sc, change color to green, 5sc, change color to orange, 5sc, join the other arm with 3sc taking both the sc of the arm and of the body as you did before (30)
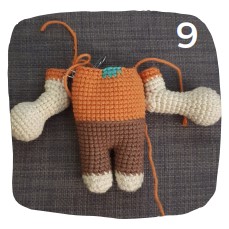
R31. (4sc, 1dec) x4, change color to green, 4sc, change color to orange, 1dec, (4sc, 1dec) x2 (35)
R32. (3sc, 1dec) x3, 3sc, change color to skin, 1dec, 3sc, 1dec, 1sc, change color to orange, 2sc, 1dec, 3sc, 1dec (28)
Stuff body and finish stuffing the arms.
R33. (2sc, 1dec) x3, 2sc, change color to skin, (1dec, 2sc) x2, change color to orange, 1dec, 2sc, 1dec (21)
R34. change color to skin, (1sc, 1dec) x7 (14)
R35. 14sc (14)
HEAD
R36. 14inc (28)
In the next rounds we’re going to increase only in the front, so make sure to fix the number of sc if you need to. Dividing the head in two, you have 14sc in the front and 14 in the back, You can use st markers to mark those points at the sides of the head.
R37. 13sc, (1sc, 1inc) x7, 1sc (35)
R38. 35sc (35)
R39. 13sc, (1sc, 1inc, 1sc) x7, 1sc (42)
R40-42 (3R). 42sc (42)
R43. 13sc, (1dec, 2sc) x6, 1dec, 1sc, 1dec (34)
R44. 14sc, 1dec, 13sc, 1dec, 1sc (30)
R45-51 (7R). 30sc (30)
Stop to place safety eyes between R45-46, 8 sts apart.
Embroider eyes as shown in pictures

EYEBROWS PATTERN, BROWN X2
R1, ch5 (4)
R2. 4sc (4)
FO, leave a long end for sewing later
Embroider the nose between the eyes back and forth many times, it’s 2sts wide.

Keep working on the head
R52. (3sc, 1dec) x6 (24)
Start stuffing
R53. (1sc, 1dec, 1sc) x6 (18)
R54. (1sc, 1dec) x6 (12)
R55. 6dec (6)
FO and close the little hole Weave in ends.
Sew the eyebrows on


DUNGAREES
Join brown yarn on the back in the FLO
left from R18
R1-4. 38sc (38)
Start stuffing
R5. 13sc, ch 1 and turn your work
R6. 12sc, ch 1 and turn (12)
The twelve sc must end up in the center of the back, so change the number of sc if you need to
R7-10. 12sc, ch 1 turn (12)
R11. 12 sc (12)
FO
Repeat from R5 to R11 in the front side to make another one.
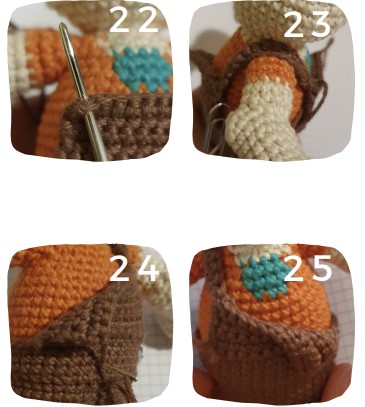
SUSPENDER
To make the suspender join yarn in the right corner of the front side, ch12, 1sl st to the left corner of the back side, 12sc on the ch.
Fold the other side of the dungarees and secure it, in the front and the back
EARS x2
SKIN COLOR
Crochet in the MR
3hdc, 2sc, 3hdc (8)
Leave a long end for sewing them 3sts away from the eyes

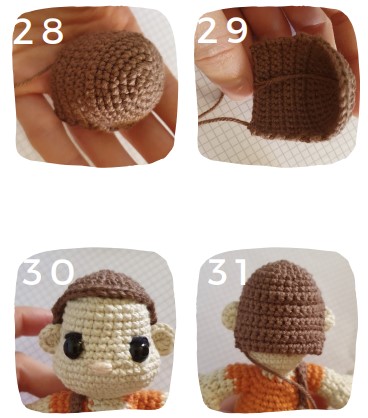
HAIR
BROWN
BASE
R1. 6sc in MR (6)
R2. 6inc (12)
R3. (1inc, 1sc) x6 (18)
R4. (1sc, 1inc, 1sc) x6 (24)
R5. (3sc, 1inc) x6 (30)
R6. 30sc (30)
From now on we start working in rows, so ch1 and turn at the end of each row
R7-8. 18sc (18)
R9. 16sc, 1dec (17)
R10. 15sc, 1dec (16)
R11. 14sc, 1dec (15)
R12-15 (4R). 15sc (15)
R16. 1dec, 11sc, 1dec (13)
FO
To make the central hair we’re joining brown yarn in the center of the base and work:
3sc, ch1, turn
sk1, 1dec
FO and leave a long end for sewing if you’re not using glue
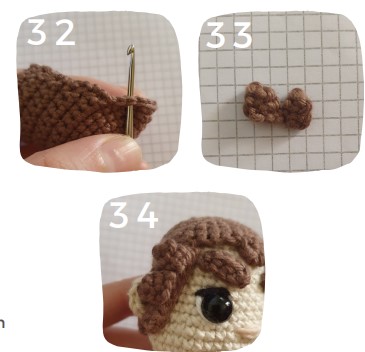
BROWN
SIDE STRANDS
Ch10, 9sc on the ch
FO and leave a long end for sewing
Sew or glue the base on the head
You can now sew the eyebrows
SPIKY HAIR SIDES x2
(ch4, 3sc on the ch) x2
FO and leave a long end for sewing on the side strands
SPIKY HAIR FIRST LINE
Strand1. ch5, 4sc (4)
Strand2. ch6, 3sc, 2hdc (5)
Strand3. ch7, 2sc, 2hdc, 2dc (6)
FO, leave a long end for sewing
SPIKY HAIR SECOND LINE
Strand1-8. ch6, 3sc 2hdc (5)
FO and leave a long end for sewing

SPIKY HAIR THIRD LINE
Strand1-5. ch5, 1sc, 2hdc, 1dc (4)
FO and leave a long end for sewing
Congratulations!

