


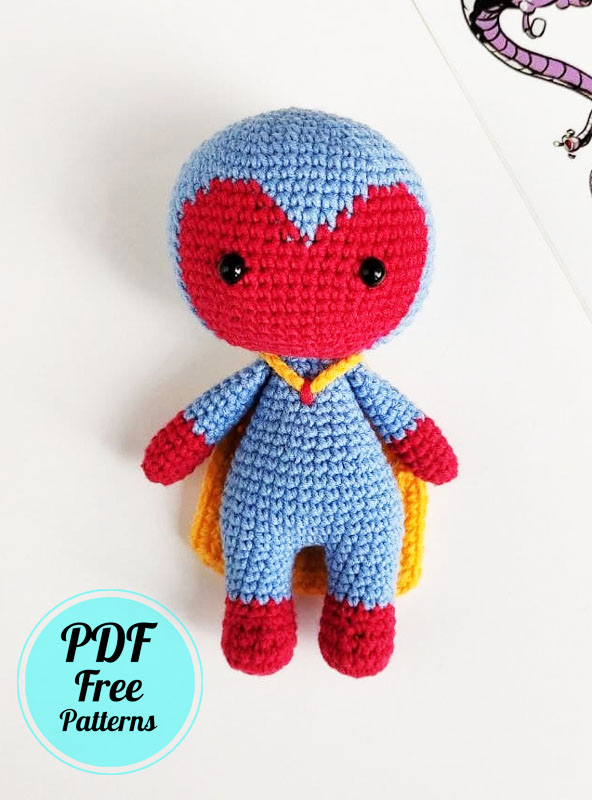
Hello my dears, today I will share the vision amigurumi free pattern from marvel characters. As you know, I’ve shared quite a few crochet doll patterns lately. Today I am adding another one to these. As you know, Vision is a robot that is a mixture of jarvis and infinity stone. However, it has a different structure. So we can say that it has its own soul. He’s actually a very charismatic character.
Crochet Marvel Vision Doll Pattern
You can see it in 2 different movies in Avengers movies. Now if you are ready, let’s make this cute doll amigurumi. As far as I remember, we said goodbye to the Vision character with the last Marvel movie. However, for those who will never forget Vision, this toy can be a nice gift.
Designer: tanyaasmile
Skill level – intermediate. Pattern does not contain crochet tutorials!
You should have basic crochet skills.
Approx. 15 cm (about 5.9 inches) tall using the materials stated in the pattern.
Materials:
– The hook suitable under your yarn. I have Clover Soft Touch 2.00 mm.
– Yarn: yellow (35), red (51) and light blue (15) colors. I used «YarnArt Jeans» yarn (160m in 50g, 55% cotton/45% polyacryl).
– 7 mm black safety eyes.
– Toys filler.
– Scissors.
– Tapestry needle.
– Pins.
– Stitch marker.
Terms used:
MR – magic ring
sc – single crochet
ch – chain stitch
sl st – slip stitch
blo – through back loops only
inc – increase (stitch 2 times into the next stitch)
dec – invisible decrease (crochet 2 sc together using invisible method)
dc – double crochet
hdc – half double crochet
(…)х n – repeat instructions in brackets n times
R – round.
Change colors in crochet. Loop your new yarn color over your hook.
Crochet your new yarn color back through the two loops on your hook.
Stuff legs and body stuffing as you go.
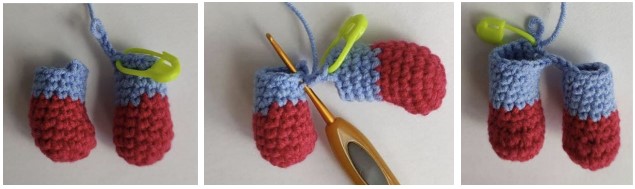
Leg 1:
Start working with red yarn.
R1. 6 sc MR (6)
R2. 6 inc (12)
R3. (1 sc, inc)x6 (18)
R4. 18 sc (18)
R5. 6 sc, 4 dec, 4 sc (14)
R6. 6 sc, 2 dec, 4 sc (12)
R7. 12 sc (12)
Continue on with light blue.
R8. – R10. 12 sc (12)
R11. Only 11 sc (12)
Close and break the yarn.
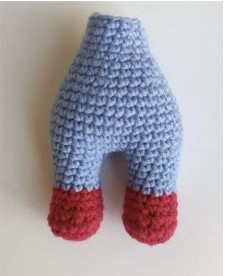
Leg 2 + body:
Start working with red yarn.
R1. 6 sc MR (6)
R2. 6 inc (12)
R3. (1 sc, inc)x6 (18)
R4. 18 sc (18)
R5. 6 sc, 4 dec, 4 sc (14)
R6. 6 sc, 2 dec, 4 sc (12)
R7. 12 sc (12)
Continue on with light blue.
R8. – R10. 12 sc (12)
R11. 12 sc (12) Don’t cut the yarn. Crochet 5 sc.
Move the marker to the last loop. Stuff the legs.
Now we will start with the body.
R12. 3 ch, 12 sc, 3 sc, 12 sc (30) *it means that we sew 3 ch and attach sc to the second leg (first loop of the new row), then crochet 11 sc in a circle, 3 sc into the loops of those 3 air loops and 12 sc along the circle of the second leg.
Total 30 sc. Legs should be “face” you.
R13. 9 sc, inc, 14 sc, inc, 5 sc (32) *inc should be on the sides.
R14. – R18. 32 sc (32)
R19. 9 sc, dec, 14 sc, dec, 5 sc (30)
R20. 30 sc (30)
R21. (3 sc, dec)x6 (24)
R22. – R23. 24 sc (24)
Start to stuff the body.
R24. (2 sc, dec)x6 (18)
R25. – R26. 18 sc (18)
R27. (4 sc, dec)x3 (15)
R28. 15 sc (15) Cut the yarn.
Stuff the body firmly.
Arm x2:
Crochet with red.
R1. 6 sc MR (6)
R2. (2 sc, inc)x2 (8)
R3. – R6. 8 sc (8)
Stuff only half of the arms.
Continue on with light blue.
R7. – R14. 8 sc (8)
Do not stuff of the arms.
This way the arm doesn’t stick out too much after sewing it to the body.
Press the opening with your fingers, aligning 3 stitches side by side.
Break the yarn and leave a long tail to sew arms to body.
Head:
Crochet with light blue yarn.
R1. 6 sc MR (6)
R2. 6 inc (12)
R3. (1 sc, inc)x6 (18)
R4. (2 sc, inc)x6 (24)
R5. (3 sc, inc)x6 (30)
R6. (4 sc, inc)x6 (36)
R7. (5 sc, inc)x6 (42)
R8. (6 sc, inc)x6 (48)
R9. (7 sc, inc)x6 (54)
R10. 54 (54 sc)
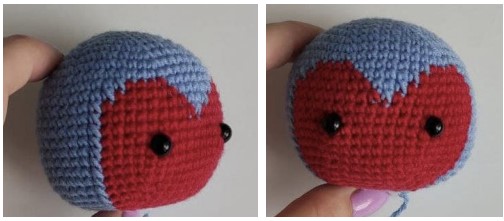
Now we are going into the color change portion of the head.
Below is the written instructions as well as the graph for reference.
R11. light blue 13 sc, red 4 sc, light blue 7 sc, red 4 sc, light blue 26 sc (54)
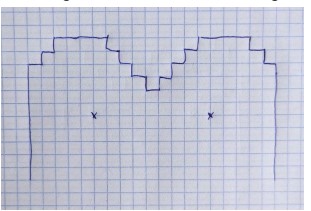
R12. light blue 12 sc, red 6 sc, light blue 5 sc, red 6 sc, light blue 25 sc (54)
R13. light blue 11 sc, red 8 sc, light blue 3 sc, red 8 sc, light blue 24 sc (54)
R14. light blue 11 sc, red 9 sc, light blue 1 sc, red 9 sc, light blue 24 sc (54)
R15. – R20. light blue 11 sc, red 19 sc, 24 sc (6 rounds) (54)
R21. light blue 7 sc, dec, 2 sc, red 5 sc, dec, 7 sc, dec, 3 sc, light blue 4 sc, dec, (7 sc, dec)x2 (48)
R22. light blue 6 sc, dec, 2 sc, red 4 sc, dec, 6 sc, dec, 3 sc, light blue 3 sc, dec, (6 sc, dec)x2 (42)
R23. light blue 5 sc, dec, 2 sc, red 3 sc, dec, 5 sc, dec, 3 sc, light blue 2 sc, dec, (5 sc, dec)x2 (36)
R24. light blue 4 sc, dec, 2 sc, red 2 sc, dec, 4 sc, dec, 3 sc, light blue 1 sc, dec, (4 sc, dec)x2 (30)
Place safety eyes between rounds 16 and 17, 9 st apart.
R25. light blue 3 sc, dec, 2 sc, red 1 sc, dec, 3 sc, dec, 3 sc light blue dec, (3 sc, dec)x2 (24)
Stuff the head.
R26. light blue 2 sc, dec, 2 sc, red dec, 2 sc, dec, 2 sc, light blue dec, (2 sc, dec)x2 (18)
Continue on with light blue.
R27. (4 sc, dec)x3 (15)
Leave long tail for sewing.
Crystal:
With white yellow.
R1. 5 sc MR, sl st (5) Break the yarn and leave a tail.

Raincoat:
Start working with yellow yarn.
R1. 18 ch, starting from second ch from hook, 17 hdc (17)
R2. – R7. ch, turn, 17 hdc (17)
R8. ch, turn, dec, 13 hdc, dec (15)
R9. ch, turn, 15 hdc (15)
R10. ch, turn, dec, 11 hdc, dec (13)
R11. ch, turn, 13 hdc (13)
R12. ch, turn, dec, 9 hdc, dec (11)
R13. ch, turn, dec, 7 hdc, dec (9)
R14. ch, turn, dec, 5 hdc, dec (7)
R15. ch, turn, dec, 3 hdc, dec (5)
R16. ch, turn, dec, 1 hdc, dec (3)
For a neater finish sc around the outside of the raincoat.
Put 2 sc in each corner to help turn and to keep the corners from rounding.
Crochet 17 ch to fix a raincoat on a neck.
Break the yarn and leave a long tail.

Finishing:
1. Sew the head to a body. For stability, I stitch around two times. Do not forget to add a little fiberfill to make sure there are no gaps.
2. Sew the arms to the body symmetrically.
3. Sew the crystal between rows 13 and 15 of the head. This should be where the lowest point of the blue meets the red between the eyes.
4. Attach the cape around the neck. Fasten the chained portion with two stitches if red yarn below the head.

