


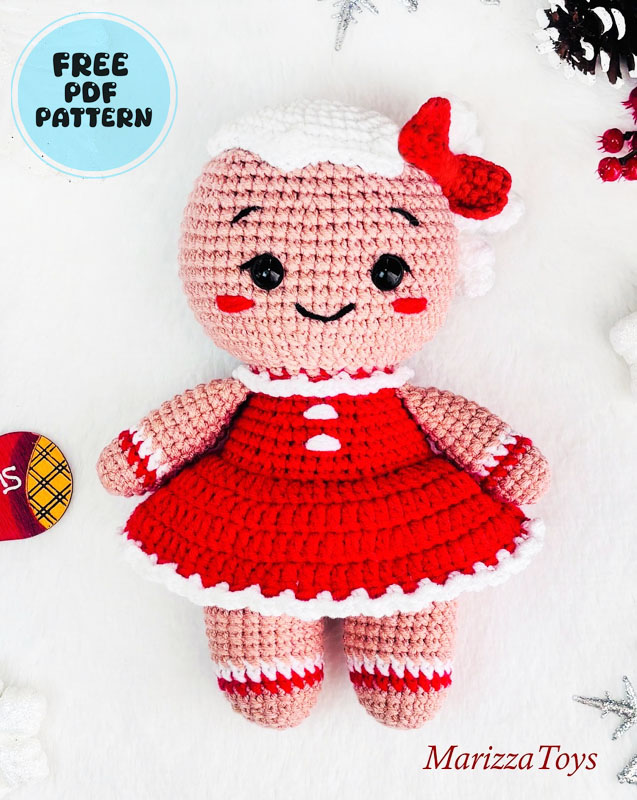
Hello friends, I have been following MarizzaToys for many years and almost every Christmas they release an amazing crochet design for free. I think she has designed this amazing doll for this year as well. The design inspired by the gingerbread man has been transformed into a girl. For this transformation process, we see that the toy has a dress and a hair clip. Since the toy is made with the same colors as the gingerbread man, it is already clear what it is at first glance.
Gingerbread Girl Amigurumi Pattern
The white part on the toy’s head has been transformed into hair and decorated with a red bow tie-shaped hair clip. Now if you are ready, let’s start.
Designer: marizzatoys
MATERIALS AND TOOLS:
1. Sport yarn:
• Beige (I use Alize Cotton Gold 446)
• Red (I use Alize Cotton Gold 56)
• White (I use Alize Cotton Gold 55)
2. Black thread to embroider the eyebrows and the mouth
3. Safety eyes 7-8 mm
4. Crochet hook 2 mm
5. Stuffing (Polyester fiber fill)
If you use these materials, the finished toy is around 15-16 cm (6″) tall.
The difficulty level of the pattern is easy to medium. In this pattern I use US terminology.
ABBREVIATIONS
MR – magic ring
Sc – single crochet
inc – increase
dec – invisible decrease
ch – chain stitch
slst – slip stitch
hdc – half double crochet
dc – double crochet
ARMS:
Start crocheting with the beige yarn.
Stuff only lower half of the arms.
1. 6 sc into a magic ring (6)
2. 6 inc (12)
3-4. 12 sc (2 rounds)
Change the yarn to red color.
5. 12 sc
Change the yarn to white color.
6. 12 sc
Change the yarn to beige color.
7-13. 12 sc (7 rounds)
14. (4 sc, dec)*2 (10)
15. Crochet only 4 sc, adjusting if necessary, to align the color changes from rounds 5 and 6 at the center of the arm. Flatten the arm and work 5 sc through both layers to close.
Fasten off and cut the yarn, leaving a tail for sewing. Sew the arms to the sides of the body in round 17.
LEGS:
Start crocheting with the beige yarn.
Stuff as you go.
1. 6 sc into a magic ring (6)
2. 6 inc (12)
3. (sc, inc)*6 (18)
4. (5 sc, inc)*3 (21)
5. 21 sc
Change the yarn to red color.
6. 21 sc
Change the yarn to white color.
7. 21 sc
Change the yarn to beige color.
8-12. 21 sc (5 rounds)
For the left leg: Fasten off and cut the yarn.
For the right leg: Do not fasten off, as we will continue crocheting the body from this point.
BODY:
Continue crocheting with the beige color. Stuff as you go.
1. Crochet 6 sc more on the right leg, join the left leg and crochet 21 sc on it. Crochet 21 sc on the right leg and place the marker here (42) (The marker is in the back)
2. (6 sc, inc)*6 (48)
3-8. 48 sc (6 rounds)
9. (6 sc, dec)*6 (42)
Change the yarn to red color:
10. 42 sc
11. Back loops only: 42 sc
12. (5 sc, dec)*6 (36)
13-14. 36 sc (2 rounds)
15. (4 sc, dec)*6 (30)
16-17.30 sc (2 rounds)
18. (3 sc, dec)*6 (24)
Change the yarn to beige color:
19. Back loops only: 24 sc
Stuff the body firmly, especially in the neck.
Don’t cut the beige yarn, we will continue with the head, but we need to finish the dress first.
DRESS:
To make the collar take the white yarn and attach it to the front loops left in round 24. Crochet with the body turned upside down:
(chain 3, skip 1 st, sc in the second stitch)*12
Make a sl st, fasten off and cut the white yarn. Hide the thread inside.
Now we will make the skirt.
Take the red yarn and attach it to the front loops left in round 11. Crochet with the body turned upside down:
1. chain 2, (2 dc, inc dc)*14, sl st (56)
2. chain 2, 56 dc, sl st (56)
3. chain 2, (3 dc, inc dc)*14, sl st (70)
4. chain 2, 70 dc, sl st (70)
Change the yarn to white color.
5. (chain 3, skip 1 st, sc in the second stitch)*35
Make a sl st, fasten off and cut the yarn. Hide it inside. You can embroider two white buttons under the collar.
HEAD:
Continue crocheting with the beige color.
Stuff as you go.
1. Front loops only: (2 sc, inc)*8 (32)
2. (3 sc, inc)*8 (40)
3. 2 sc, inc, (4 sc, inc)*7, 2 sc (48)
4. (5 sc, inc)*8 (56)
5-12. 56 sc (8 rounds)
13. (5 sc, dec)*8 (48)
14-15. 48 sc (2 rounds)
Insert the safety eyes between rounds 8 and 9 with 8 sc apart them. There must be 6 sc visible.
16. 3 sc, dec, (6 sc, dec)*5, 3 sc (42)
17. (5 sc, dec)*6 (36)
18. 2 sc, dec, (4 sc, dec)*5, 2 sc (30)
19. (3 sc, dec)*6 (24)
20. sc, dec, (2 sc, dec)*5, sc (18)
21. (sc, dec)*6 (12)
22. 6 dec (6)
Make sure that the head is stuffed firmly. Close the opening and hide the yarn inside.
Using a black thread, embroider the eyebrows in round 12. They are 2 st long and with 9 st between them.
Embroider the mouth in round 6. It’s 4 st long. You can embroider black lashes, if you want. Using the red yarn, embroider the cheeks between rounds 6 and 7. They are 3 st long.
HAIR:
Crochet the wig with the white yarn:
1. 8 sc into a magic ring (8)
2. 8 inc (16)
3. (sc, inc)*8 (24)
4. (3 sc, inc)*6 (30)
5. (4 sc, inc)*6 (36)
6. 36 sc
7. (5 sc, 4 hdc in one stitch)*6 (54)
Make a sl st, fasten off and cut the yarn, leaving a long tail for sewing. Sew the wig to the top of the head.
Now we will make the curls:
Make chain 22 and crochet 20 inc dc on it, starting in the third chain from the hook. Repeat this process by making another chain of 22 stitches and working 20 inc dc into it. Do this one more time. Fasten off and cut the yarn, leaving a long tail for sewing.
Now, you have a set of three curls. Sew them to one side of the wig to form a ponytail.
RIBBON:
Crochet with the red yarn.
1. Make chain 11 and crochet 10 sc on it, starting in the second chain from the hook
2-5. chain 1, turn, 10 sc (4 rounds)
Fasten off and cut the yarn. Hide the thread inside.
Thread a needle through the ribbon. Wrap the yarn around the ribbon a few times and secure with a knot.
Sew the ribbon in front of the ponytail.

