


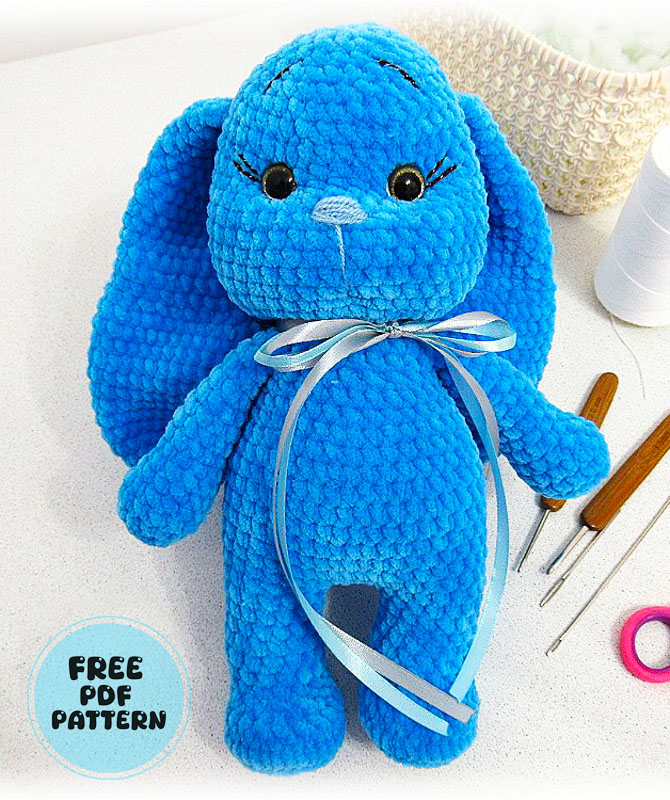
Dark blue in particular seems to be one of the most depressing colors. Because it symbolizes the color of night. However, the amigurumi here is truly magnificent. As you can see in the picture, the most important detail in bunny amigurumi patterns is the tightening of the face. In this way, the face of the amigurumi rabbit looks layered. In fact, it does not appear, it has a layered structure :).
Blue Plush Bunny Crochet Pattern
Doesn’t making the ears backwards create a somewhat tired bunny image? I like this bunny very much, I hope you will have a great pleasure and work with crochet. Do you want to knit a very cute blue bunny? You have come to the right address. Dear friends. Today I will share a very cute bunny pattern. It is quite cute and has a beautiful flawless look. I especially liked the color. Of course, you can knit an amigurumi your child likes using a different yarn.
Designer: my_knitted_toys
Tools and materials:
Himalaya Dolphin Baby yarn – approx. 160 gr.
Acrylic / semi-cotton yarn – approx. 3 gr.
Hooks: 2mm and 3.5mm.
Eyes 16-18 mm.
Needles, scissors.
Thread for sewing and tightening.
Filler.
Decorating ribbons.
Abbreviations
MR – Amigurumi Magic ring
sc : Single Crochet
inc : Increase
dec : Decrease
ch : Chain
Leg
Children’s novelty yarn, hook 2 mm
Round 1. 2 ch 6 sc.
Round 2. 6 inc = 12 sc.
Round 3. (1 + inc)*6 = 18 sc.
Round 4. (2 + inc)*6 = 24 sc.
Round 5. (3 + inc)*6 = 30 sc.
Himalaya, hook 2 mm
Round 6. 30 sc.
Himalaya, hook 3,5 mm
Round 7. 30 sc.
Round 8. 7 sc + 8 dec + 7 sc = 22 sc.
Round 9. 5 sc + 6 dec + 5 sc = 16 sc.
Round 10-15. 16 sc (6 rows)
Body
Finish the legs so that the loops look at each other, both inward (or both outward): in one leg we will tie a row, in the other – we will not finish the row.
16. 3 ch, connect the legs, in a circle crochet 40 sc: 16 sc on one leg, 3 sc on ch + 1 sc there, so that there are no holes between the legs, 16 sc on the second leg, 3 sc on ch + 1 sc there, so that there are no holes between the legs.
Round 17-24. 40 sc. (8 rows)
Round 25. (6 + dec)*5 = 35 sc.
Round 26. 35 sc.
Round 27. (5 + dec)*5 = 30 sc.
Round 28. 30 sc.
Round 29. (4 + dec)*5 = 25 sc.
Round 30-32. 25 sc.
Round 33. (3 + dec)*5 = 20 sc.
Round 34. 20 sc.
Head
Round 35. 20 inc = 40 sc.
Round 36. (9 + inc)*4 = 44 sc.
Round 37-49. 44 sc. (13 rows)
we go down two rows, from the front side of the toy we insert the eyes (between the 47th and 48th rows at a distance of 5-6 visible st)
Round 50. (9 + dec)*4 = 40 sc.
Round 51. (6 + dec)*5 = 35 sc.
Round 52. (5 + dec)*5 = 30 sc.
Round 53. (4 + dec)*5 = 25 sc.
Round 54. (3 + dec)*5 = 20 sc.
Round 55. (2 + dec)*5 = 15 sc.
Round 56. (1 + dec)*5 = 10 sc.
Round 57. 5 dec = 5 sc.
pull off with a needle
Arms
Round 1. 2 ch 5 sc.
Round 2. 5 inc = 10 sc.
Round 3. (1 + inc)*5 = 15 sc.
Round 4-5. 15 sc.
Round 6. 5 sc + 3dec + 4 sc = 12 sc.
Round 7-15. 12 sc.
fold, tie together
Long Ears
Round 1. 2 ch 8 sc.
Round 2. 8 inc = 16 sc.
Round 3. (1 + inc)*8 = 24 sc.
Round 4. (2 + inc)*8 = 32 sc.
Round 5-15. 32 sc. (11 rows)
Round 16. (2 + dec)*8 = 24 sc.
Round 17-23. 24 sc. (7 rows)
Round 24. (1 + dec)*8 = 16 sc.
Round 25-29. 16 sc. (5 rows)
fold, tie together
Short Ears
Round 1. 2 ch 8 sc.
Round 2. 8 inc = 16 sc.
Round 3. (1 + inc)*8 = 24 sc.
Round 4. (2 + inc)*8 = 32 sc.
Round 5-10. 32 sc. (6 rows)
Round 11. (2 + dec)*8 = 24 sc.
Round 12-16. 24 sc. (5 rows)
Round 17. (1 + dec)*8 = 16 sc.
Round 18. 16 sc.
fold, tie together
Tail
Round 1. 2 ch 6 sc.
Round 2. 6 inc = 12 sc.
Round 3-4. 12 sc.
Assembly
Tighten the cheeks (see video from 38:19), embroider the nose, eyebrows, eyelashes, squirrels (optional); decorate with ribbon.


