


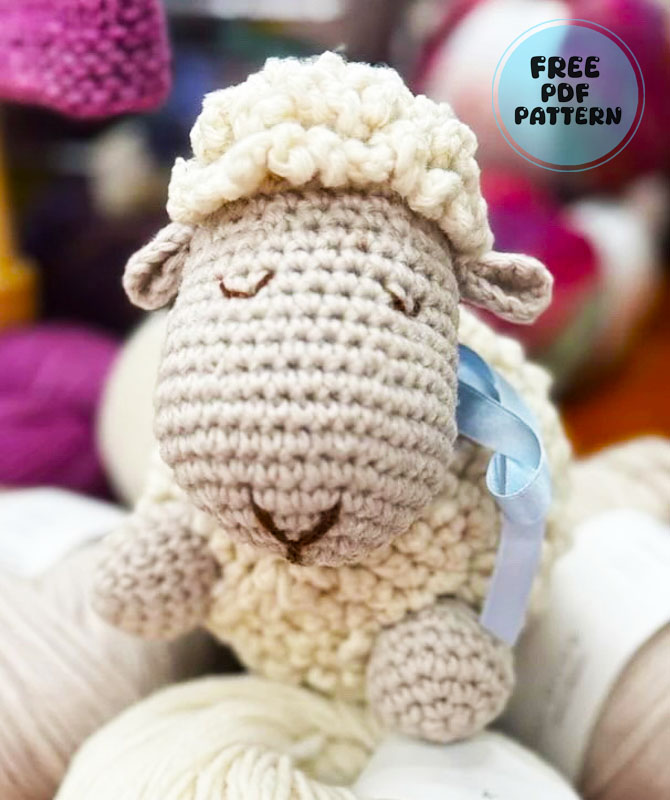
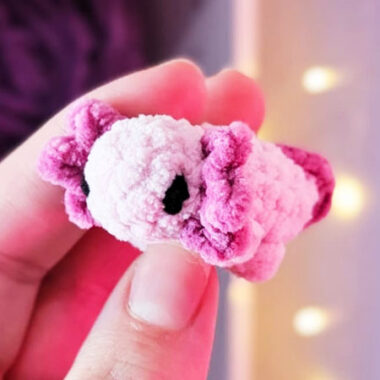
I would like to introduce you to a plush sheep amigurumi toy pattern designed by lukoshkina.o. Although the style of the pattern is quite simple, do not forget that this crochet pattern is quite old. Unfortunately, you cannot find many details in such old designs. In particular, you may be deprived of photos of the stages of making the pieces. 2 different types of yarn were used in making the toy.
Amigurumi Plush Puffy Sheep Free Pattern
These yarn brands are YarnArt Jeans and Himalaya Dolphin Baby. The main reason for using two different yarns is that the toy has plush and cotton parts. If you have prepared your materials, let’s start making a sheep amigurumi toy.
Designer: Kaleigh Smoak
Terms
st – stitch
sc – single crochet
Inc – increase, two single crochet in the same stitch
Dec – decrease, single crochet 2 together
blo-sc- back loop only single crochet, single crochet into the back loop of the stictch
Blo-inc – back loop only increase, 2 single crochets in the back loop only
Leg make 4
Row 1: 6 sc in magic ring
Row 2: inc in each st (12)
Row 3 : [sc, inc] rep 6 times (18)
Row 4 and 5 : sc in each (18)
Row 6: [Dec, sc] rep 6 times (12)
Stuff each leg before sewing.
finish of leave tail long for sewing
Head
Row 1: 6 sc in magic ring
Row 2: inc 6 times (12)
Row 3: [sc,inc] 6 times (18)
Row 4: [inc, sc in 2 sts] 6 times (24)
Row 5: [sc in next 3 sts, inc] 6 times (30)
Row 6: [ inc, sc in next 4 sts] 6 times (36)
Row 7:[sc in next 5 sts, inc ] 6 times (42)
Row 8-9: Sc in each stich(42)
Row 10: [Dec, sc in next 5 sts] 6 times (36)
Row 11-12: sc in each st around (36)
Row 13: [Dec, sc in next 4] 6 times (30)
Row 14-15: sc in each st around (30)
Row 16: [Dec, sc in next 3 sts] (24)
Row 17: sc in each st around (24)
change to white yarn
If using safety eyes place them now.
From this point on you will be doing Back loop only single crochets leaving the front loop free to create the fur latter.
Row 18-19: Blo-sc in each stitch (24)
Row 20: [Dec, Blo-sc in next 2 sts) 6 times (18)
Stuff and continue stuffing as you go.
Row 21: [Dec, Blo-sc in next st) 6 times (12)
Row 22: Dec in each stitch around (6) DO NOT FASEN OFF
making woolie texter
chain 4, sc in loop from last Blo_sc.
This should make a small loop of chain 4 again and sc into next left over loop from blo-sc if you want a looser wooly texter only sc in every other blo-sc loop.
Body
Row 1: sc in magic ring
Row 2: inc in each st around (12)
Row 3: [Blo-sc in next st, Blo-inc] (18)
Row 4: [Blo-inc, Blo sc in next 2 stitches] repeat 6 times (24)
Row 5: [Blo-sc in next 3 sts, blo-inc] 6 times (30)
Row 6: [Blo-inc, Blo-sc in next 4 sts] 6 times (36)
Row 7: [Blo-sc in nest 5 sts, Blo-inc] 6 times (42)
Row 8: [Blo-inc, Blo-sc in next 6 sts] 6 times (48)
Row 9-16: Blo-SC in each st around (48)
Row 17: [Dec, Blo-sc 6 sts] 6 times (42)
Row 18: [Blo-sc in next 5 sts, Dec] 6 times (36)
Row 19: [Dec, Blo-sc in next 4 sts] 6 times (30)
Row 20: [Blo-sc in next 3 sts, Dec] 6 times (24)
Stuff and continue stuffing as you go.
Row 21: [Dec, Blo-sc in next 2 sts] 6 times (18)
Row 22: [Blo-sc in next st, Dec] 6 times (12)
Row 23: Dec in each (6) Do not fasten off
Now use stich markers to mark where you would like to attach head and legs mark off 3 sts in 3 rows for each leg and them mark off 3 stitches in the 5 rows up from your last row of 6 sts. See below images for reference.
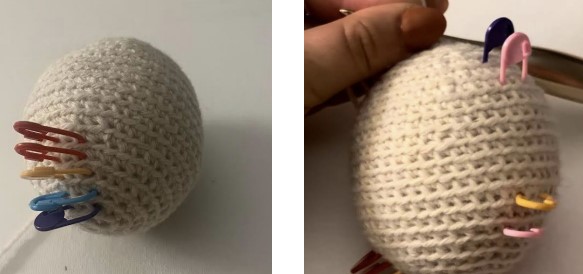
Make the fuzzy texture as you did on head till you get to the stitch markers. sc in each of the stitches where you intend to saw on head and legs. This will give you a flat spot to sew onto latter.
Ears make 2
Row 1: 6 sc in magic ring
Row 2: inc in each st (12)
Row 4: fold in half, sc in one though next stitches so that the front and back are crocheted together, so that it folds the ear in half. Fasten off leaving tail long for sewing.
Sew ears in last row of single crochets
Sew head and legs on in the gaps of the wooly texter, you can sew through the stich and blo-st or just though the sc.
Sew on eyes and nose with brown or black yarn or thread.