


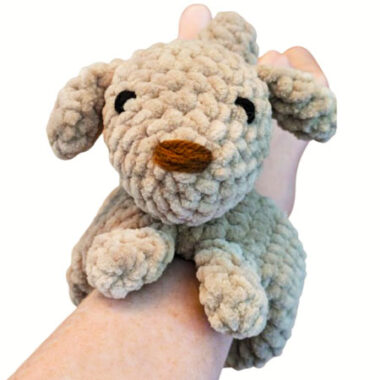
To make this amigurumi dog, you will need basic materials such as medium-weight yarn in beige, black and red, a 2.75 mm crochet hook, stuffing material, scissors and a needle. We start making the amigurumi toy with the body. After completing the body, we crochet the nose and chin pieces, lightly stuff them and prepare them for the mouth. Then, a small tongue piece is made with red yarn and prepared to be added under the nose.
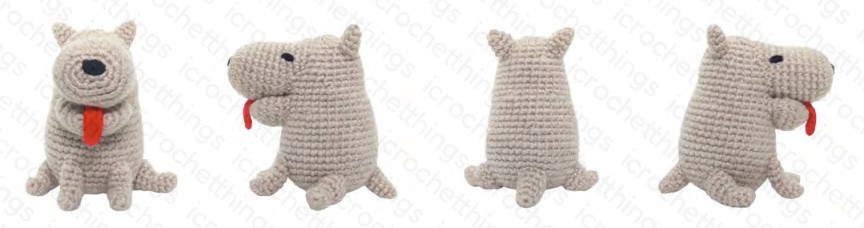
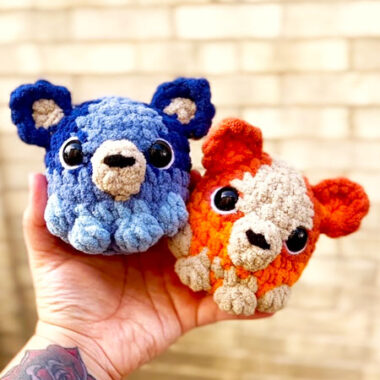
Derpy the Dog Amigurumi PDF Pattern
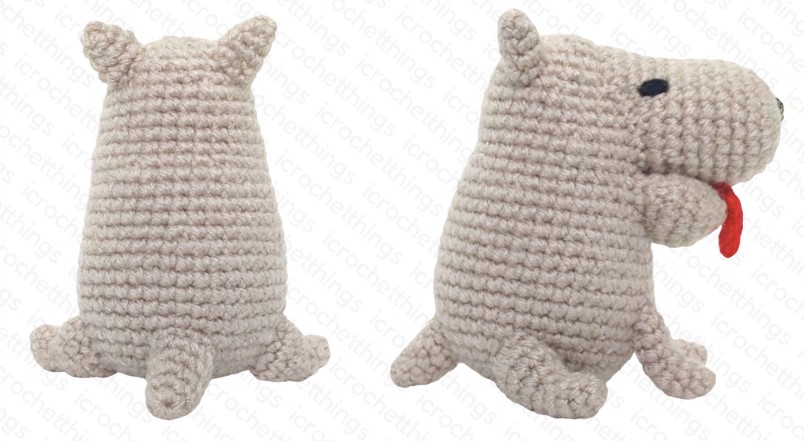
After the main parts are completed, we move on to the assembly phase. First, the nose and chin pieces are carefully sewn to the body, then the nose and eye details are embroidered with black yarn to complete the face. While the ears are added to both sides of the head, the front and hind legs are sewn to the body in a balanced manner and lightly stuffed. Finally, the tail is fixed to the back and the dog is given its final shape. After making sure that all the pieces are sewn tightly, your soft and cute amigurumi dog is ready!
Designer: icrochetthings
Materials
• DK weight yarn in beige, black, red
• 2 75 . mm C crochet hook ( )
• Stuffing
• Scissors
• Yarn needle
Abbreviations
• ch Chain
• sc Single crochet
• inc Increase
• dec Decrease
• ss Slip stitch
• sk Skip
• BLO Back loop only
• FLO Front loop only
• FO Finish off
• [ ] = x Repeat
• ( ) = x Total number of stitches
Body
– Begin with beige
– Some rounds have their instructions spaced out for easier readability
– Stuff as you go
1. Work 6 sc in a magic ring (6)
2. [inc] around (12)
3. [sc, inc] around (18)
4. [sc, inc, sc] around (24)
5. [3 sc, inc] around (30)
6. 2 sc, inc, 2 sc, 10 sc, [2 sc, inc, 2 sc] three times (34)
7. 6 sc, [2 sc, inc, 2 sc] two times, 18 sc (36)
8. 5 sc, inc, 12 sc, [5 sc, inc] three times (40)
9. [sc] around (40)
10. 7 sc, [5 sc, inc] two times, 21 sc (42)
11 – 13. [sc] around (42)
14. 7 sc, [5 sc, dec] two times, 21 sc (40)
15. 26 sc, [5 sc, dec] two times (38)
16 – 18. [sc] around (38)
19. 5 sc, dec, [2 sc, dec, 2 sc] two times, 5 sc, dec, 12 sc (34)
20. 22 sc, [2 sc, dec, 2 sc] two times (32)
21 – 22. [sc] around (32)
– Mark the 11th stitch of round 21 – this will be used later during assembly
23. [2 sc, dec, 12 sc] around (30)
24 – 25. [sc] around (30)
26. [3 sc, dec] around (24)
27 – 28. [sc] around (24)
29. [sc, dec, sc] around (18)
30. [sc, dec] around (12)
31. [dec] around (6)
– F/O, sew shut
Ears x( 2 )
– Begin with beige
1. Work 4 sc in a magic ring (4)
2. [sc, inc] around (6)
3. [2 sc, inc] around (8)
4. [sc] around (8)
– F/O, leave long tail for sewing
Snout
– Begin with beige
1. ch 4, sk 1st ch, 2 sc, inc,
Working into the opposite side of the chains (see pic): 2 sc, inc (8)
– sc into the next stitch
2. [sc, 3 inc] around (14)
3. sc, [sc, inc] three times – repeat once more from beginning (20)
4. sc, [sc, inc, sc] three times – repeat once more from beginning (26)
5 – 11. [sc] around (26)
– sc into the next 7 stitches
12. 14 BLO-ss, 3 sc, inc, sc, 2 inc, sc, inc, 2 sc, BLO-ss (30)
– Mark the 23rd stitch of round 12 – this will be used later during assembly
13. 15 BLO-ss, 13 sc, stop (28) (30 total)
– Note that you are ending round 13 with two stitches remaining
– F/O, leave long tail for sewing

Chin
– Begin with beige
1. ch 5, sk 1st ch, 3 sc, inc,
Working into the opposite side of the chains: 3 sc, inc (10)
– sc into the next stitch
2. [2 sc, 3 inc] around (16)
3. 2 sc, [sc, inc] three times – repeat once more from beginning (22)
4. [4 sc, inc, 5 sc, inc] around (26)
5. [sc] around (26)
6. [4 sc, dec, 5 sc, dec] around (22)
– F/O, leave long tail for sewing
Tongue
– Begin with red
1. ch 6, sk 1st ch, [sc] across (5)
– F/O, leave long tail for sewing
Front Legs x( 2 )
– Begin with beige
1. Work 6 sc in a magic ring (6)
2 – 3. [sc] around (6)
4. 2 BLO-ss, 4 sc (6)
– For round 5, stitches marked *FLO should be worked into the unused front loops from round 3
5. 2 *FLO-sc, 4 sc (6)
6 – 7. [sc] around (6)
– sc into the next 3 stitches
– F/O, leave long tail for sewing
Back Legs x( 2 )
– Begin with beige
1. Work 6 sc in a magic ring (6)
2 – 3. [sc] around (6)
4. 2 BLO-ss, 4 sc (6)
– For round 5, stitches marked *FLO should be worked into the unused front loops from round 3
5. 2 *FLO-sc, 4 sc (6)
6. 3 inc, 2 sc, inc (10)
7 – 8. [sc] around (10)
– F/O, leave long tail for sewing
Tail
– Begin with beige
1. Work 6 sc in a magic ring (6)
2. 5 sc, inc (7)
3. 6 sc, inc (8)
4. 7 sc, inc (9)
5. 8 sc, inc (10)
– F/O, leave long tail for sewing
Assembly
More pictures are included on the next page
• Use the marked stitch of the body as a guide this stitch indicates the front side of – the piece
• Sew the snout onto the front of the body, stuffing as you go
– The marked stitch of the snout indicates the top of the piece
– The bottom of the snout should reach the marked stitch of the body
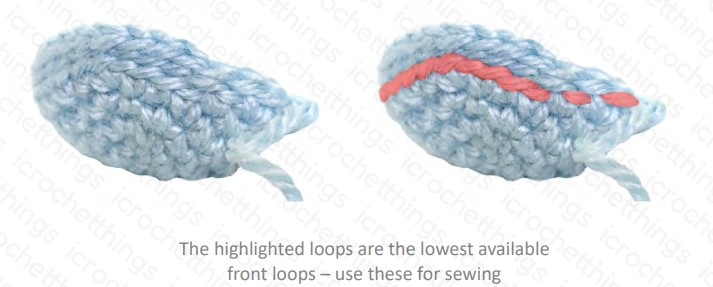
– Be sure to sew into the lowest front loop when available see pic below for example ( )

• Sew the tongue onto the bottom of the snout
• Sew the chin onto the front of the body, stuffing as you go
– Be sure to sew into the lowest front loop when available see pic below for example ( )
• Use black yarn to embroider a nose onto the front of the snout
• Use black yarn to embroider eyes on either side of the snout
• Sew the ears onto the top of the body
• Sew the front legs onto the front of the body
• Sew the back legs onto either side of the body, stuffing as you go
• Sew the tail onto the back of the body, stuffing as you go

