


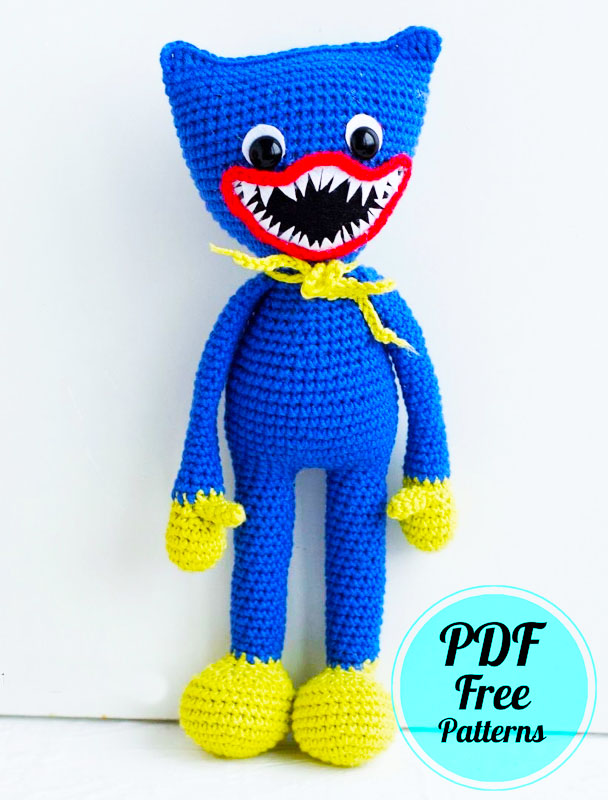
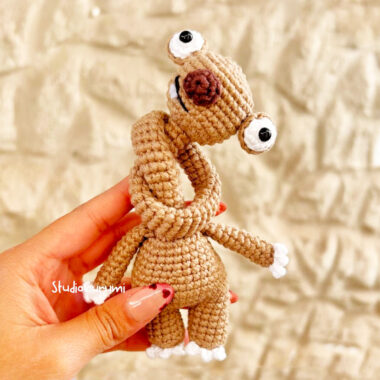
Hello my dears. Today I am going to share an awesome cartoon character amigurumi pattern. This gorgeous doll amigurumi is called Huggy Wuggy. As you know, I shared the kissy missy amigurumi pattern before. However, plush rope was used in its construction. Normal yarn is preferred in huggy wuggy amigurumi. I think it looks very beautiful. It was also very effective in small decorative touches.
Blue Huggy Wuggy Doll Amigurumi Toy
As the years pass, everything gets old, just like Huggy Wuggy is forgotten. However, I think there are still people who remember and I want to introduce you to the pattern of this cute blue toy. Now if you’re ready, let’s get start.
Designer: violettas_friends
Materials
DK weight yarn, I used Gazzal Baby Cotton (50 g/ 165/ 180 yds), 60 % cotton, 40 % acrylic; colors – blue (3421), green (3457) and small amount red yarn (3444).
Hook size – 1.5 mm
Scissors
Eye beads D=12 cm
Marker
Glue
Felt – black and white
A needle for handmade sewing
Fiberfill or stuffing of your choice
A stitch marker to count the rounds (you can use a piece of contrast yarn)
The size of the finished toy using the suggested materials: frog – approx 10″/26 cm.
Abbreviations
MR – Amigurumi Magic ring
sc : Single Crochet
inc : Increase
dec : Decrease
st: Stitch
dc : Double Crochet
hdc: Half Double Crochet
sl-st or Slst: Slip Stitch
ch : Chain
Legs
Lets start with green yarn
1 leg- fasten off, cut the yarn.
2 leg + 3 sc (up to the middle of the leg), slst 3ch, join to the 1 leg slst.
Rnd 1. 6 sc in MR
Rnd 2. 6 inc (12)
Rnd 3. (1sc, inc) repeat 6 times (18)
Rnd 4. (2sc, inc) repeat 6 times (24)
Rnd 5. (3sc, inc) repeat 6 times (30)
Rnd 6-10. (5 rows) 30 sc
Rnd 11. 10 dec, 10sc (20)
Rnd 12. 5 dec, 10sc (15)
Rnd 13. 3 dec, 9sc (12)
Change color to blue
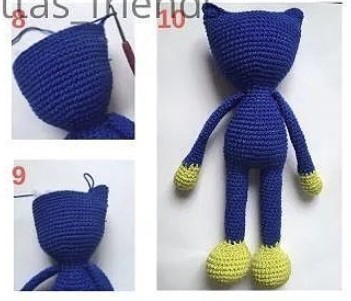
Rnd 14-33. (20 rows) 12 sc
Stuff the legs.

Body
Start with Blue yarn
Rnd 1. 12sc on the leg, 3sc on the chain, 12sc on the other leg, 3sc on the chain (30)
Rnd 2. 30sc
Rnd 3. (4sc, inc) repeat 6 times (36)
Rnd 4. (5sc, inc) repeat 6 times (42)
Rnd 5-9. (6 rows) 42sc
Rnd 10. (5sc, dec) repeat 6 times (36)
Rnd 11. 36sc
Rnd 12. (4sc, dec) repeat 6 times (30)
Rnd 13. 30sc
Rnd 14. (3sc, dec) repeat 6 times (26)
Rnd 15. 26sc
Rnd 16. (2sc, dec) repeat 6 times (18)
Rnd 17. 18sc

Arms
Start with green yarn
Rnd 1. 6 sc in MR
Rnd 2. 6 inc (12)
Rnd 3. (1sc, inc) repeat 6 times (18)
Rnd 4-5. (2 rows) 18sc
Rnd 6. (1sc, dec) repeat 6 times (12)
Rnd 7-8. (2 rows) 12sc
Fasten off, cut the yarn. Stuff.
Change color to blue
Rnd 9-10. (2 rows) 12sc
Rnd 11. (2sc, dec) repeat 3 times (9)
Rnd 12-31. (19 rows) 9sc
Rnd 32. 7sc, 1 dec
Stuff slightly. Close detail in a half, crochet 4sc, grabbing the both edges.
Fasten off, cut the yarn. Attaching the arms to the body
Rnd 33. 4sc together with the left arm and body, 5sc, 4sc together with the right arm and body, 5sc (18).
Rnd 34. 18sc

Head
Do not cut the yarn and continue crocheting the head:
Rnd 1. (2sc, inc) repeat 6 times (24)
Rnd 2. (3sc, inc) repeat 6 times (30)
Rnd 3. (4sc, inc) repeat 6 times (36)
Rnd 4. (5sc, inc) repeat 6 times (42)
Rnd 5. (6sc, inc) repeat 6 times (48)
Rnd 6. (7sc, inc) repeat 6 times (54)
Rnd 7-20. (14 rows) 54sc
Stuff the head.
Close the loops- crochet ears:
Rnd 1. Chain 2, 3dc, 1 hdc, 18sc, 1 hdc, 3dc, chain 3, slst.
Fasten off, cut the yarn.
Acessory
Start with Green yarn.
Chain 70. Fasten off and cut the yarn.
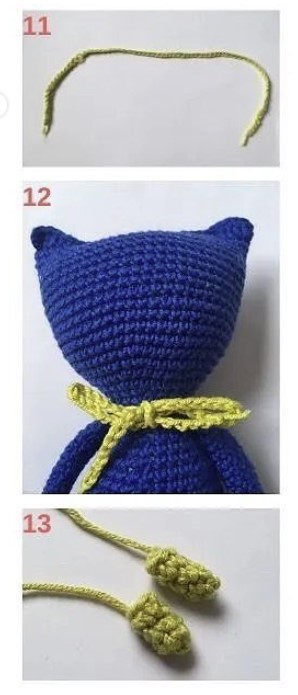
Fingers
Rnd 1. 5sc in MR
Rnd 2-3. 5sc
Fasten off and leave a long for sewing.
Assembly
1. Sew the fingers to the hands to the 7th row.
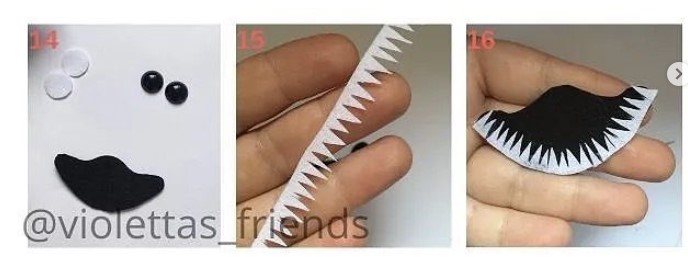
2. Cut out the mouth from black felt and cut out 2 circles from white slightly larger than the eyesbeads.
3. Cut the teeth out of their white felt and gluethem on the black mouth from above andbelow.
4. Then make lips from red yarn. Make chain the number of loops depends on the size of themouth. Glue the chain along the contour of themouth.
5. Glue 2 white circles between 12 and 15 rowswith a distance of 5 loops between them. Thenglue the black eyes over the white circles.
6. Glue the mouth to the head.
