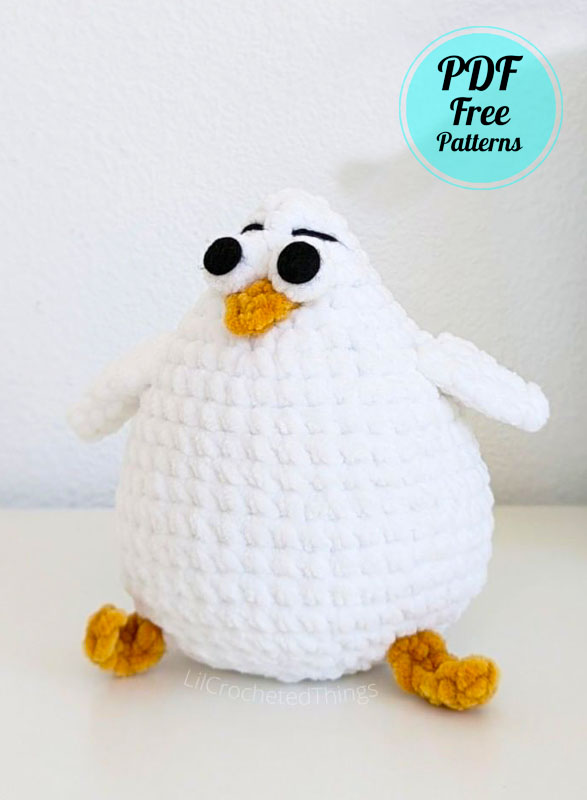
Hello my dears, today I want to share a chubby and simple free amigurumi pattern. I have shared a few of the seagull amigurumi patterns before. However, as you know, I have to say that it is among the very rare amigurumi patterns. The chubby seagull amigurumi pattern that I will share today is very easy and has a very different design. First of all, I have to say that the amigurumi toy has a very large body.
Amigurumi Chubby Oddy Seagull Pattern
The most impressive part of the amigurumi toy is its eyes and beak. Although it has a simple structure, it looks extremely impressive. Still, the idea of such a chubby seagull seems strange to me for some reason. The part you need to be careful about when making the toy is the seagull’s eyes.
Designer: lilcrochetedthings
Materials
• 6mm crochet hook
• Super bulky (6) yarn
White
Orange
• Black yarn/thread
• Black felt
• Fiber fill
• Tapestry needle
• Scissors
Abb.
MR: magic ring
ch: chain
st(s): stitch(es)
sc: single crochet
hdc: half double crochet
inc: increase
dec: decrease
BLO: back loop only
Notes
This pattern is based on the Oddy Seagull plushie (as pictured) and not my original design.
Body
In white yarn
Rnd 1. 6 sc in MR (6)
Rnd 2. [sc, inc] x 3 (9)
Rnd 3. [sc, inc, sc] x 3 (12)
Rnd 4. [3 sc, inc] x 3 (15)
Rnd 5. [2 sc, inc, 2 sc] x 3 (18)
Rnd 6. [5 sc, inc] x 3 (21)
Rnd 7. [3 sc, inc, 3 sc] x 3 (24)
Rnd 8. [3 sc, inc] x 6 (30)
Rnd 9. [2 sc, inc, 2 sc] x 6 (36)
Rnds 10-13. sc all around, for 4 rounds (36)
Rnd 14. [5 sc, inc] x 6 (42)
Rnds 15-18. sc all around, for 4 rounds (42)
Rnd 19. [5 sc, dec] x 6 (36)
Rnd 20. [2 sc, dec, 2 sc] x 6 (30)
Rnd 21. [3 sc, dec] x 6 (24) Stuff the body as you go.
Eye Balls x2
In white yarn
Step 1. 6 sc in MR (6)
Step 2. Cut the yarn and leave a long yarn tail. Use a tapestry needle to take the yarn tail through the BLO of the MR. Pull close to make the MR into a 3D ball shape. Leave the rest of the yarn tail for sewing.
Beak
In orange yarn
1. ch 2
2. hdc in the 2nd st from the hook.
Fasten off and cut the yarn. Leave long yarn tail for sewing.
Body (continued)
Rnd 22. [sc, dec, sc] x 6 (18)
Rnd 23. [sc, dec] x 6 (12)
Rnd 24. dec x 6 (6) Add a bit more stuffing to make the bottom extra chonky before closing.
Fasten off and cut the yarn. To close the remaining gap, use a tapestry needle to take the yarn tail through the front loops of the last 6 sts and then pull tight to close.
Legs x2
In orange yarn
1. ch 6
2. Start with 2nd st from the hook: 5 sc
Fasten off and cut the yarn. Leave long yarn tail for sewing.
Wings x2
In white yarn
Rnd 1. 3 sc in MR (3)
Rnd 2. inc x 3 (6)
Rnd 3. [sc, inc] x 3 (9)
Rnd 4. [sc, inc, sc] x 3 (12)
No need to stuff the piece. Fold it in half and sc across both rows to close the opening. Leave long yarn tail for sewing.
Assembly
Eyes
• Sew the eyes next to each other on rnds 4 to 6.
• Cut two circles (H cm wide) from black felt and glue them on top of the eye balls.
• Using black worsted yarn or thick black thread,
embroider two lines one row above the eyes.
Beak
• Sew the beak below the eyes in the middle, tucking it under the eyeballs. Hide the remaining yarn tails.
Wings
• Sew the wings on the sides of the body on rnd 9.
Legs
• Sew the legs on the bottom of the body, between rnds 19 and 20, about 10 sts apart.


