


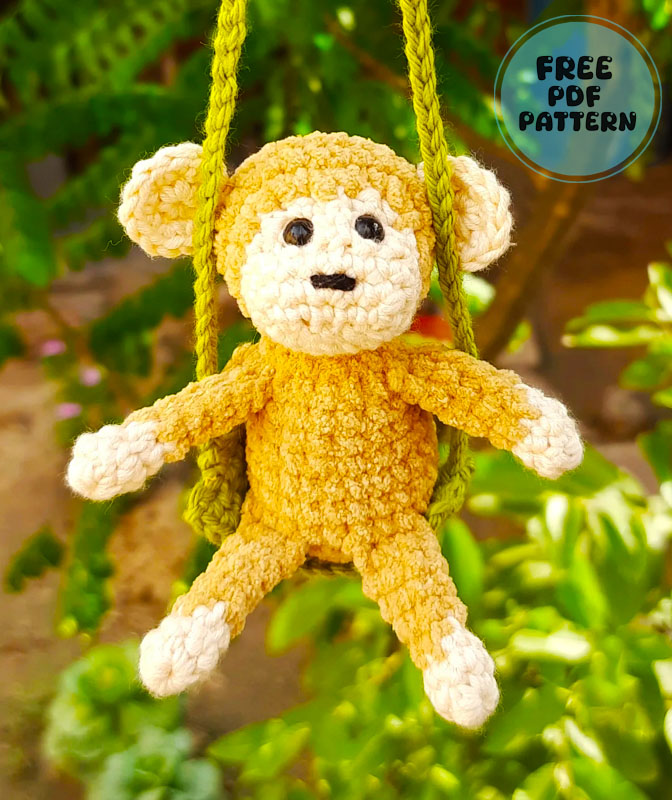
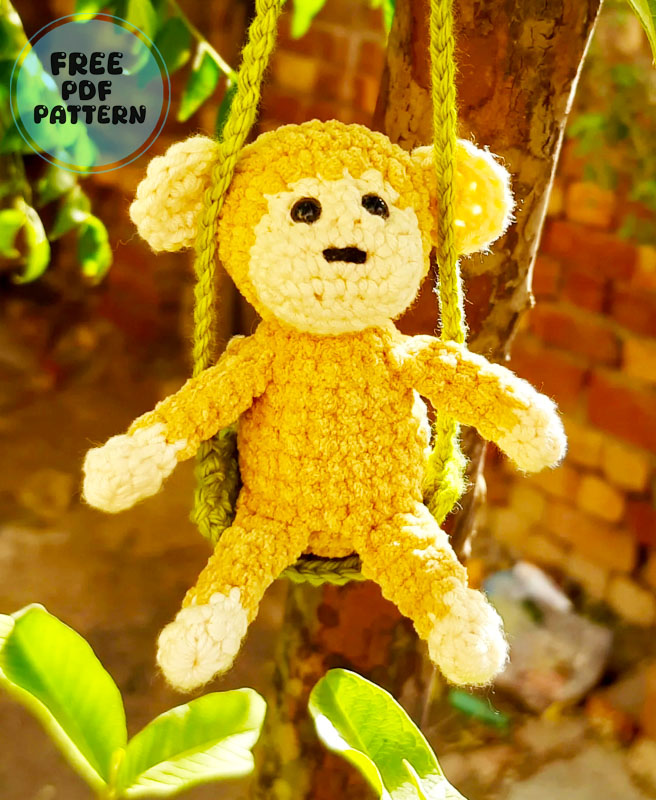
Today we will crochet a very stylish monkey amigurumi toy together. Many parts of this monkey are made without sewing, and it also has a tiny swing. In fact, you could also call it a hammock. You can name this piece however you like; I will call it a swing. In the final section of the pattern, you will learn how to make the monkey’s swing. First, you should take a look at the recommended materials list. It clearly specifies what type of yarn and crochet hook to use.
Little Monkey Crochet Free Pattern
The designer makes the toy using a 4.5 mm crochet hook and chunky yarn. Please keep in mind that if you change these sizes, the size of the monkey you make will change proportionally with your materials. Let’s take a look at the other details together.
Designer: sweetlyhannahmade
Materials Needed
Yarn: You can use whatever yarn you want but I’m using Parfait Chunky in the colors Mushroom, Toffee and Bubblegum. You will only need less than one skein of each color
Optional: Acrylic or any kind of yarn for embroidering a nose
Crochet Hook: You can use whatever size hook your yarn requires, but I’m using a 4.5 mm hook
Scissors
Polyfil Stuffing
Safety Eyes: I’m using 12 mm but the eyes you use shoud be small enough so that they don’t go onto the Toffee color when making the head.
Stitch Markers
Darning needle
Abbreviations
Mr– magic ring
Sc– single crochet
Dec– decrease
Dc– double crochet
Hdc– half double crochet
Ch– chain
Flo– work in the front loops only
St– stitch
(#)– number of stitches at the End of the round
Cc– change color
Fo– fasten off (cut yarn)
R– round
()x6- repeat this x amount of times
Notes
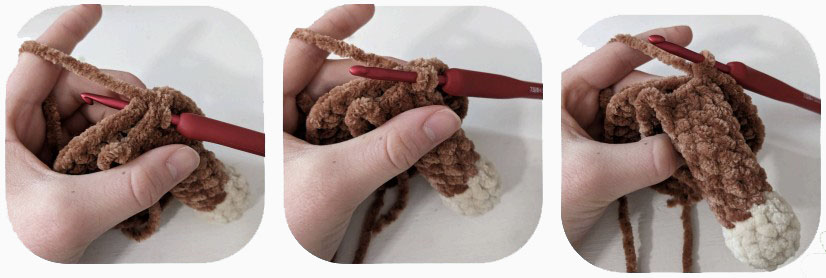
This pattern uses the no-sew method to crochet on the limbs and ears. See the photos below:
For the muzzle part of the face, we will be crocheting around a chain instead of crocheting in the magic ring
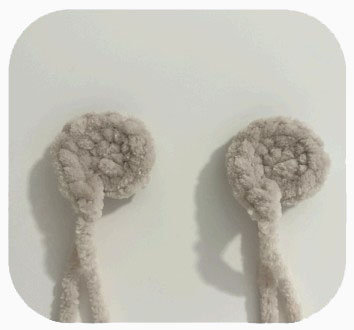
Ears
(make 2)
Make sure you make the ears before the head
Starting in Mushroom
Make sure your MR tail is at least 2 inches long
Round 1: sc 6 in MR (6)
Round 2: inc x6 (12)
Ch 1 and FO, leaving a short tail
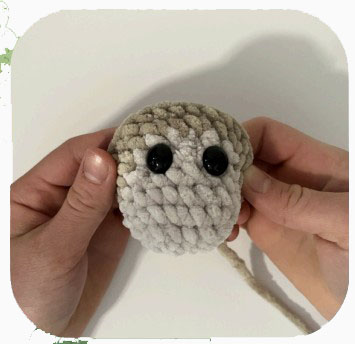
Head
Starting in Mushroom
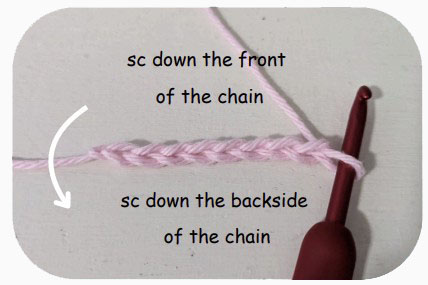
Round 1: ch 7 and starting from the second ch from hook, sc 6, turn and sc 6 on the other side of the chain (see page 4) (12)
Round 2: (sc, inc) repeat 6 times (18)
Round 3: sc around (18)
For this next round, we will be making the eye part of the head and I would recommend watching my video tutorial
Round 4: sc 2, in the FLO, sc 6, turn and sc 6, turn and HDC, DC, slst 2, DC, HDC, sc 1 down the side, sc 10 (20)
CC to Toffee
Round 5: (sc, inc) repeat 6 times, sc 8 (26)
Round 6: sc around (26)
Place safety eyes between rounds 5 & 6 counting up from the front of the face
Make sure you are using small enough eyes so that the eyes don’t go onto the toffee color
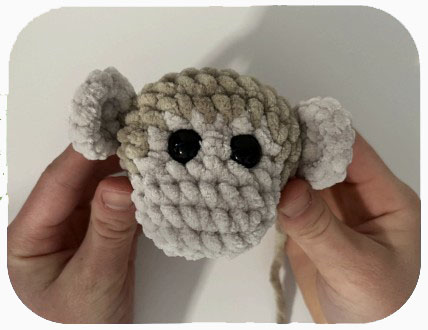
In this next round we will attach the ears using the no-sew method. Watch this video tutorial
You may need to adjust placement of the ears due to tension
Round 7: sc 3, place 2 sc into the first ear and the body, sc 9, place 2 sc into the second ear and the body, sc 10 (26)
In this round, we will be doing one decrease behind the ears so adjust your decreases if you changed the placement of your ears in the previous round
Round 8: sc 3, dec, sc 9, dec, sc 10 (24)
Stop here and stuff the head.
Continue stuffing as you go, making sure the muzzle part gets firmly stuffed
Round 9: (sc 2, dec) repeat 6 times (18)
Round 10: (sc, dec) repeat 6 times (12)
Round 11: dec x6 (6)
FO and weave in tail
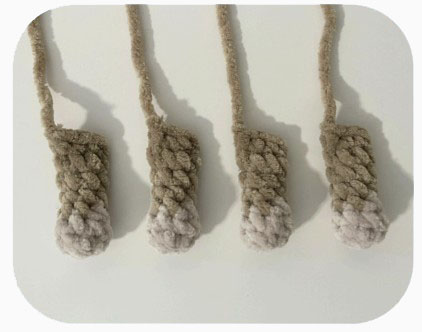
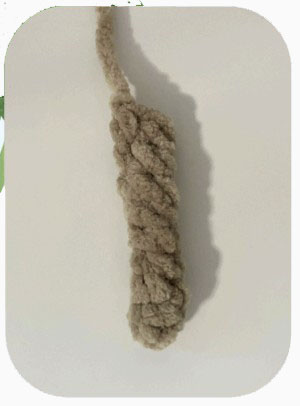
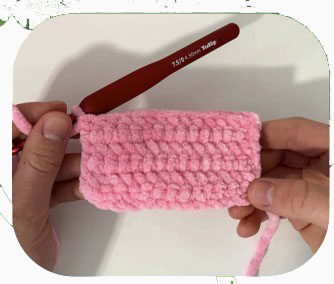
Arms and legs (make 4)
Make sure you make the arms and legs before the body
Starting in Mushroom
Round 1: sc 8 in MR (8)
Round 2: sc around (8)
Round 3: (sc 2, dec) repeat 2 times (6)
CC to Toffee
Lightly stuff the hand, but leave the rest of the arm/leg unstuffed
Round 4-7: sc around (4 rounds) (6)
Place 3 sc into both sides of the arm/leg
Ch 1 and FO, leaving a short tail
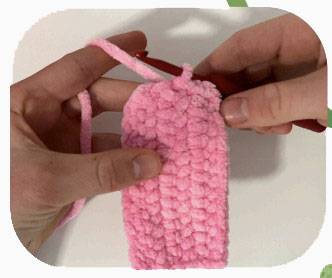
Tail
Make sure you make the tail before the body
Starting in Toffee
Round 1: sc 4 in MR (4)
Round 2-9: sc around (8 rounds) (4)
Do not stuff
Place 2 sc into both sides of the tail
Ch 1 and FO, leaving a short tail
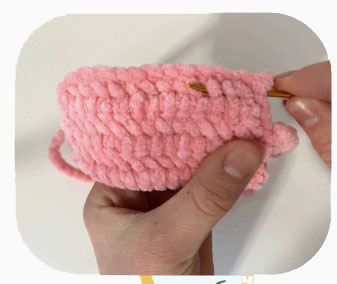
Body
Starting in Toffee
Round 1: sc 6 in MR (6)
Round 2: inc x6 (12)
Round 3: (sc, inc) repeat 6 times (18)
Round 4: (sc 2, inc) repeat 6 times (24)
In this next round we will attach the legs using the no-sew method
Round 5: sc 3, place 3 sc into the first leg and the body, sc 2, place 3 sc into the second leg and the body, sc 13 (24)
In this next round we will attach the tail using the no-sew method
Round 6: sc 18, place 2 sc into the tail and the body, sc 4 (24)
Round 7: sc around (24)
Round 8: (sc 2, dec) repeat 6 times (18)
Round 9-10: sc around (2 rounds) (18)
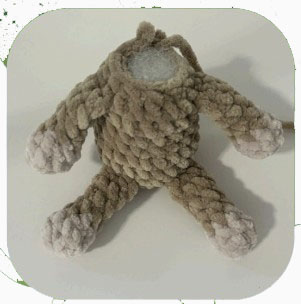
In this next round we will attach the arms using the no-sew method
You may need to adjust placement due to tension
Round 11: place 3 sc into the first arm and the body, sc 5, place 3 sc into the second arm and the body, sc 7 (18)
Round 12: (sc, dec) repeat 6 times (12)
Stuff the body
FO and leave a tail for sewing
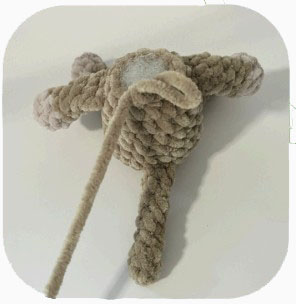
Assembly
Sew the head onto the body, making sure it’s straight and even
Optional: If you want to embroider a nose, grab your yarn that you’re going to embroider with and embroider a nose across 3 stitches on round 2

Watch this video tutorial for my other monkey pattern to learn how to do the face shaping: this ensures that the monkey’s head keeps its shape and does not get deformed
Swing
Starting in Bubblegum
Round 1: Ch 15 and starting in the second ch from hook, sc 14 (14)
Round 2-6: Ch 1 and turn, sc 14 (repeat for 5 rows) (14)
slst 3 down the side of the swing
Ch 70 and slst into the other side of the middle of the swing

FO and weave in tails
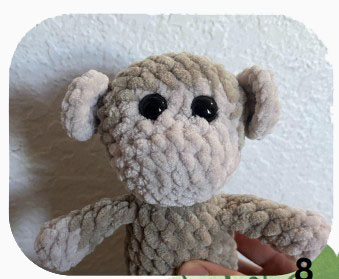
Congratulations!
You’ve finished!
