


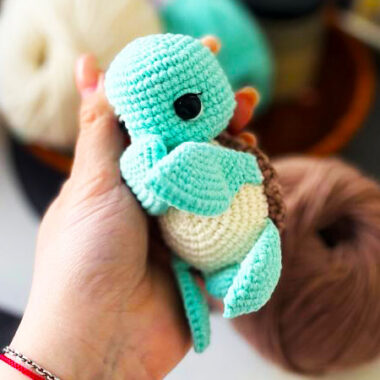
Friends, today I will introduce you to a magnificent crochet shark amigurumi pattern with a swimsuit. This toy, designed by mundo.dedora, has had its Portuguese and English crochet patterns shared for free by the designer. Since the crochet amigurumi toy is a very detailed design, it is explained in detail with almost 40 visuals. I know you like these kinds of patterns very much, and I hope you like this one too.
Shark with Swimming Costume Amigurumi Pattern
I especially liked that the toy has these kinds of swimming clothes. Another detail of the shark is that it has legs. This is an interesting detail, but I think it’s the right design for those who want to use the toy for decorative purposes. However, please don’t underestimate the legs, because even the legs are made with great detail. Let’s get started!
Designer: mundo.dedora
MATERIALS
2.00mm crochet hook
Tapestry needle
Marker
Scissors
Craft glue
Silicone fiber
Ghost pen
Felt (white)
8mm snap eyes OR 8mm cabochon eyes
Black fabric paint
ABREVIATIONS
MR: Magic ring
IMR: Inverted magic ring
ch: Chain
sc: Single crochet
slst: Slip stitch
hdc: Half double crochet
dc: Double crochet
tr: Treble crochet
inc: Increase
3-sc inc: 3 single crochet increase
dec: Decrease
BLO: Back loop only
FLO: Front loop only
2-ch picot: 2 chain picot
R: Rounds
pop: Popcorn stitch
BODY – BASE
We will work with circular crochet. With
the color White, make:
1) 6 sc in MR [6]
2) 6 inc [12]
3) 2 sc, 1 inc, 1 sc, 4 inc, 1 sc, 1 inc, 2 sc[18]
Now we’ll work with 2 colors: White (W) and silver (S)
4) W: 3 sc, 1 inc; BLO S: 1 inc, 1 hdc dec, 2 dc dec, 1 hdc dec, 1 inc; W: 3 sc, 1 inc [18]
5) W: 4 sc, 1 inc; S: 8 sc; W: 4 sc, 1 inc [20]
6) W: 5 sc, 1 inc; FLO S: (1 SC, 1 inc) x4; W: 5 sc, 1 inc [26]
7) W: 6 sc, 1 inc; S: 12 sc; W: 6 sc, 1 inc [28]
8) W: 7 sc; S: 1 sc (BLO), (2 sc, 1 inc) x4, 1 sc (BLO); W: 7 sc [32]
9) W: 6 sc; S: 1 sc (BLO), 18 sc, 1 sc (BLO); W: 6 sc [32]
10) W: 6 sc; S: 2 sc, (3 sc, 1 inc) x4, 2 sc; W: 6 sc [36]
11) W: 6 sc; S: 24 sc; W: 6 sC [36]
12) W: 5 sc; S: 1 sc (BLO), 2 sc, (4 sc, 1 inc) x4, 2 sc, 1 sc (BLO); W: 5 sc [40]
13) W: 4 sc; S: 1 sc (BLO), 30 sc, 1 sc (BLO); W: 4 sc [40]
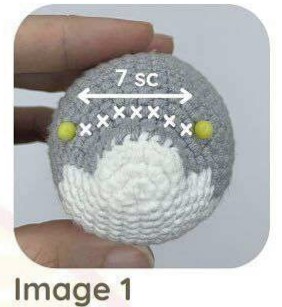
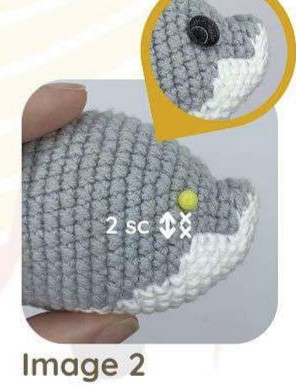
Note: If using security eyes, place them between rounds 8 and 9, 2 stitches above the white part, 7 stitches apart (images 1 and 2)
14-19) W: 4 sc; S: 32 sc; W: 4 sc [40] – 6R
Note: start adding fiber gradually from round 19.
20) W: 4 sc; S: (6 sc, 1 dec) x4; W: 4 sc [36]
21) W: 4 sc; S: 28 sc; W: 4 sc [36]
22) W: 4 sc; S: (5 sc, 1 dec) x4; W: 4 sc [32]
23) W: 4 sc; S: 24 sc; W: 4 sc [32]
24) W: 4 sc; S: (4 sc, 1 dec) x4; W: 4 sc [28]
25) W: 4 sc; S: 20 sc; W: 4 sc [28]
26) W: 4 sc; S: (3 sc, 1 dec) x4; W: 4 sc [24]
27) W: 4 sc; S: 16 sc; W: 4 sc [24]
28) W: 2 sc, 1 dec; S: (2 sc, 1 dec) x4; W: 2 sc, 1 dec [18]
29) W: 3 sc; S: 12 sc; W: 3 sc [18]
30) W: 1 sc, 1 dec; S: (1 sc, 1 dec) x4; W: 1 sc, 1 dec [12]
30) W: 1 sc, 1 dec; S: (1 sc, 1 dec) x4; W: 1 sc, 1 dec [12]
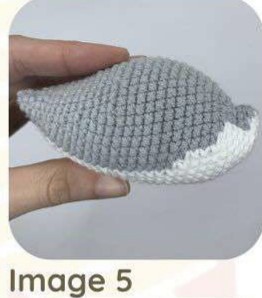
From now on we will only work with the color silver.
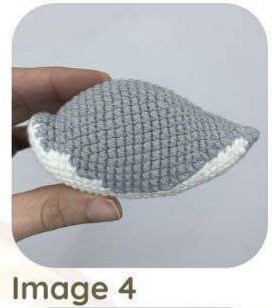
31) 12 sc [12]
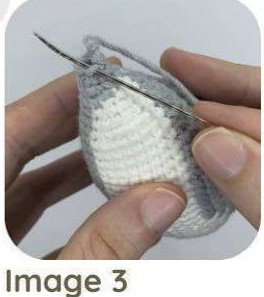
32) 6 dec [6]
Close with IMR (images 3, 4 and 5).
1ST DORSAL FIN
We will work with 2D crochet. With the color Silver, make:
1) 8 ch, turn; skip 1 ch, 7 sc [7]
2) 1 ch, turn; 4 sc, 1 dec [5]
3) Turn and skip 1 stitch; 4 sc [4]
4) 1 ch, turn; 2 sc, 1 dec [3]
5) Turn and skip 1 stitch; 2 sC [2]
Cut the yarn and fasten off, leaving no thread for sewing (image 6). Make a new piece, following what is shown in rows 1-5, but DO NOT cut the yarn.
Take the previous piece and position them in a mirrored manner to join them (image 7).
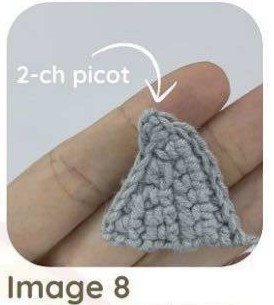
Pass the needle through both pieces as follows: 1 ch, turn; 1 inc, 4 sc, 12-ch picot, 6 sc, 1 inc. Cut the yarn, leaving thread for sewing (image 8).
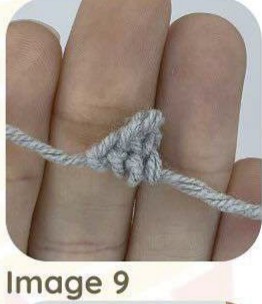
2ST DORSAL FIN
We will work with 2D crochet. With the color Silver. make:
1) 3 ch, turn; skip 1 ch, 1 sc, 1 hdc [2]
Cut the yarn, leaving thread for sewing (image 9).
TAIL
We will work with 2D crochet. At the end of each row, make 1 ch and turn. With the color Silver, make:
1) 6 ch, turn; skip 1 ch, 2 sc, 1 hdc, 1 dc, 1 tr [5]
We have finished the 1st part of the tail. Now, without cutting the thread, we will make the 2nd part:
1) 6 ch, turn; 2 sc, 1 hdc inc, 1 dc inc, 1 tr [7]
We finished the 2nd part (image 10).

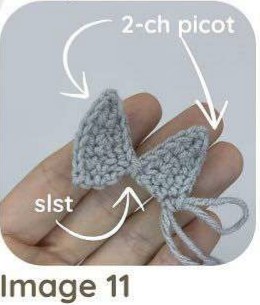
Without cutting the thread yet, we will finish both parts by doing: 1 ch, turn; 6 SC, 12-ch picot, 5 sc, skip 1 stitch, 1 slst in the middle of the two parts; in the next part: 4 sc, 12-ch picot, 5 sc.
Cut the thread, leaving thread for sewing (image 11)
LEFT FRONT LEG
We will work with circular crochet. With the color Silver make:
1) 6 sc in MR [6]
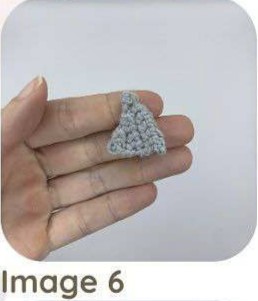
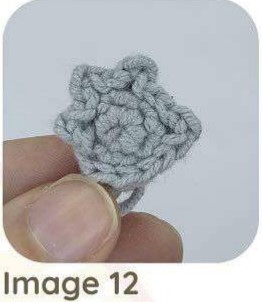
2) (1 sc, 1 inc) x3 [9]
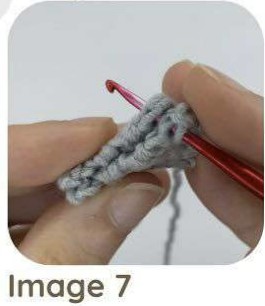
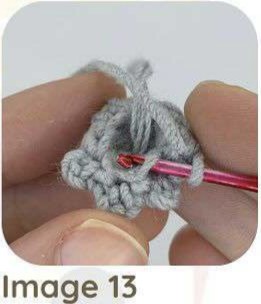
3) FLO: (1 slst, 2 ch, 1 slst) in the same stitch x3, 1 slst, (1 slst, 2 ch, 1 slst) in the same stitch, 4 slst [21] (image 12)
4) BLO: 1 slst in the 1st BLO loop (image 13), go up 1 ch, 1 sc in the same stitch as the chain, 8 sc [9]
Now we’ll work with 2 colors: Silver (S) and White (W)
5) S: 3 sc; W: 4 sc; S: 2 sc [9]
6) S: 2 sc, 1 inc; W: 1 inc, 2 sc, 1 inc; S: 2 sc [12]
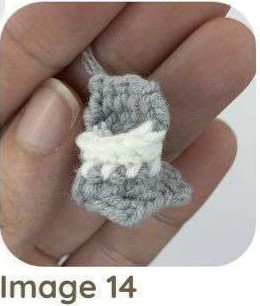
From round 8 onwards we will work only with the color Silver and with 2D crochet: Note: leave some white thread for sewing later.
8) 4 sc, turn [5]
9) skip 1 stitch, 4 sc [4]
Cut the thread, leaving thread for sewing (image 14).
RIGHT FRONT LEG
We will work with circular crochet. With the color Silver, make:
1) 6 sc in MR [6]
2) (1 sc, 1 inc) x3 [9[
3) FLO: 2 slst, (1 slst, 2 ch, 1 slst) in the same stitch, 1 slst, (1 slst, 2 ch, 1 slst) x3 in the same stitch, 2 slst [21]
4) BLO: 1 slst in the 1st BLO loop, go up 1 ch, 1 sc in the same stitch as the ch, 8 sc [9]
In this part we will work with 2 colors: Silver (S) e White (W)
5) W: 4 sc; S: 5 sc [9]
6) W: 1 inc, 2 sc, 1 inc; S: 4 sc, 1 inc [12]
From round 8 onwards we will work only with the color Silver and with 2D crochet:
Note: leave some white thread for sewing later.
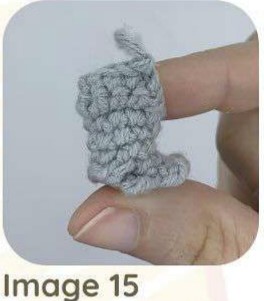
8) Turn; skip 1 stitch, 5 sc, turn [5]
9) Skip 1 stitch, 4 sc [4]
Cut the thread, leaving thread for sewing (images 15 and 16).

LEFT HIND LEG
We will work with circular crochet. With the color Yellow. make:
1) 6 sc in MR [6]
2) (1 sc, 1 inc) x3 [9]
3) FLO:
1 slst, go up 3 ch, turn; skip 1 ch, 2 hdc, 1 slst in next loop FLO; 1 ch, turn (image 17);
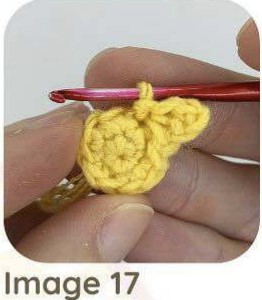
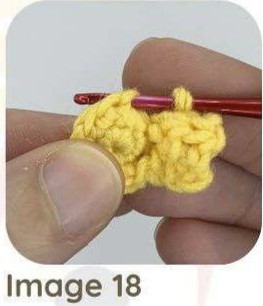
Skip the ch and the slst, 2 hdc BLO, go up 1 ch and turn; 2 hdc BLO, 1 slst in next loop FLO (image 18). Repeat this 2x.
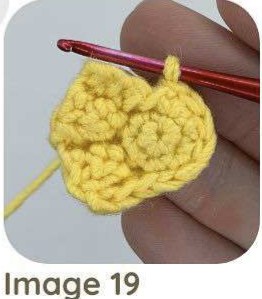
5 slst.
Note: this will be the part of the shark’s fins (image 19)
4) BLO: 1 sl st in the 1st BLO loop, go up 1 ch, 1 sc in the same stitch as the ch, 8 sc [9]
Now we will change colors. In this part we will work with 2 colors: Silver (S) e White (W):
5) BLO S: 3 sc; W: 4 sc; S: 2 sc [9]
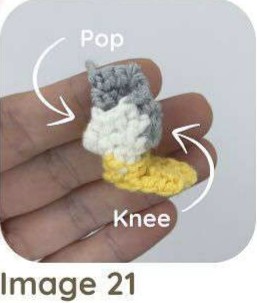
6) (S: 3 sc; W: 1 sc, 1 ch, turn; 1 sc; S: 3 sc, 1 ch, turn; 3 sc; W: 1 sc); W: 1 inc, 2 sc, 1 pop; S: 2 inc [13]
Note: the part in parentheses will be the shark’s knee
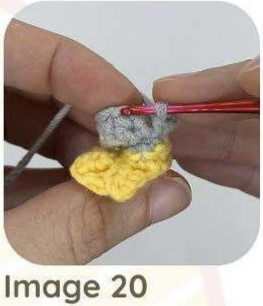
7) S: 3 sc; W: 6 sc; S: 4 sc [13] (image 20)
From round 8 onwards we will work only with the color Silver and with 2D crochet:
Note: leave some White thread for sewing later.
8) 1 sc, turn; skip 1 stitch, 4 sc, turn [4]
9) Skip 1 stitch, 3 sc [3]
Cut the thread, leaving thread for sewing (image 21).
RIGHT HIND LEG
Image 20 We will work with circular crochet. With the color Yellow, make:
1) 6 sc in MR [6]
2) (1 sc, 1 inc) x3 [9]
3) FLO:
1 slst, go up 3 ch, turn; skip 1 ch, 2 hdc, 1 slst in next loop FLO; 1 ch, turn;
Skip the ch and the slst, 2 hdc (BLO), go up 1 ch and turn; 2 hdc (BLO), 1 slst in next loop FLO. Repeat this 2x.
5 slst
Note: this will be the part of the shark’s fins.
4) BLO: 1 slst in the 1st BLO loop, go up 1 ch, 1 sc in the same stitch as the ch, 8 sc [9]
Now we will change colors. In this part we will work with 2 colors: Silver (S) and White (W)
5) BLO W: 1 sc; S: 5 sc; W: 3 sC [9]
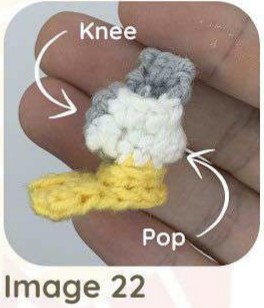
6) (W: 1 sc; S: 3 sc, 1 ch, turn; 3 sc; W: 1 sc, 1 ch, turn; 1 sc; S: 3 sc); 2 inc; W: 1 pop, 2 sc, 1 inc [13]
Note: the part in parentheses will be the shark’s knee
7) W: 1 sc; S: 7 sc; W: 5 sc [13]
8) W: 1 slst; S: 2 slst, 4 sc, turn [4]
From round 9 we will work only with the color Silver and with 2D crochet:
Note: leave some White thread for sewing later.
9) Skip 1 stitch, 3 sc[3]
Cut the thread, leaving thread for sewing (image 22).
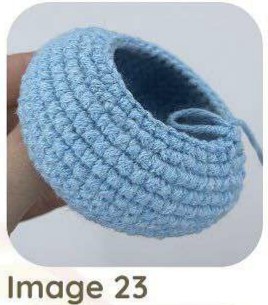
FLOAT
Here we will work with joined rounds, whenever you finish a row, skip 1 stitch from the previous row, make 1 slst in the 1st stitch of the current row and go up 1 ch. With Blue color, make:
1) 37 ch, 1 slst in the first ch; 36 sc [36]
2) (1 sc, 1 inc) x18 [54]
3-8) 54 sc [54] – 6 R
9) (1 sc, 1 dec) x18 [36]
Cut the thread, leaving thread for sewing (image 23).
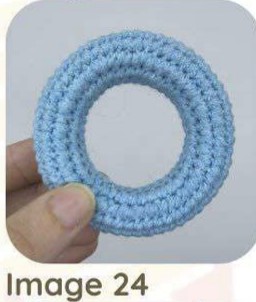
Using a tapestry needle, join the two edges of this piecе, sewing rows 1 and 9. After that, cut the yarn and weave in (image 24).
Note: add stuffing while sewing.
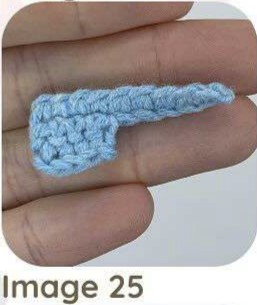
SWIMMING GOGGLES – LENSES
We’ll work with 2D crochet. Start with Blue color and make:
1) 10 ch, turn; 9 sc, turn [9]
2) 1 ch, 4 sc, turn [4]
3) skip 1 stitch, 3 sC [3]
Cut the yarn and weave in (image 25).
Turn the piece over and, with the same color thread, make a slip knot and fit it on the other side of the piece (image 26).
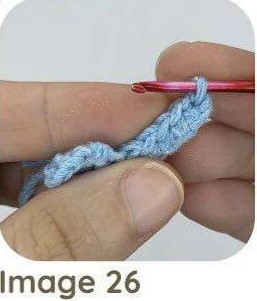
Now make:
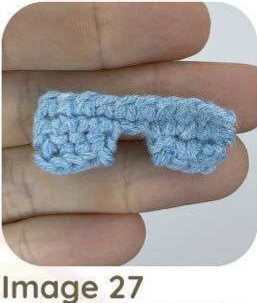
1) 1 ch, 4 sc, turn [4]
2) skip 1 stitch, 3 sc [3]
Cut the yarn and weave in (image 27).
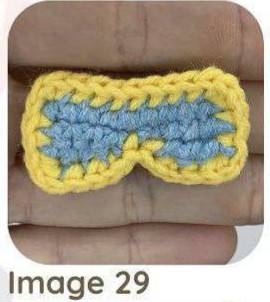
Now, with the Yellow color, we will finish this part. Make a slipknot and fit it on the edge of the part made with the Blue color (image 28).

Go up 1 ch and make: 1 sc in the same stitch as the ch, 7 sc, 1 3-sc inc, 2 sc, 1 3-sc inc, 1 sc, 1 inc, 3 sc, 1 inc, 1 sc, 1 3-sc inc, 2 sc, 1 sc in the 1st stitch. Cut the yarn and weave in (image 29)
SWIMMING GOGGLES – ELASTIC
We will work with 2D crochet. At the end of each row, make 1 ch and turn.
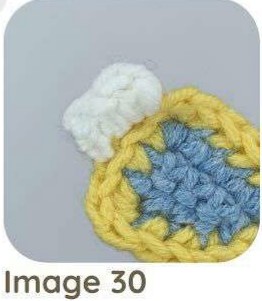
With the White color, make a slip knot and fit it on the side of the glasses. Go up 1 ch and make:
1) BLO 3 hdc [3] (image 30)
Switch to Yellow color and continue:
2-21) BLO 3 hdc [3] – 20 R
Switch back to White color and continue:
22) 3 hdc [3]
Cut the yarn, leaving thread for sewing (image 31).

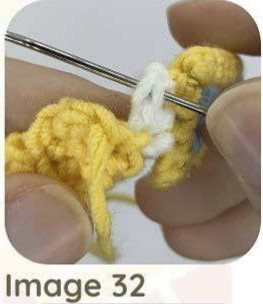
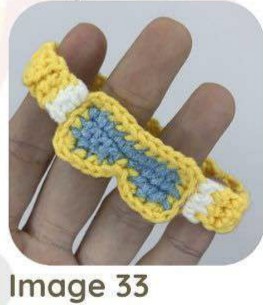
Now sew the end of this part to the other side of the lenses (BLO) and finish off (images 32 and 33).
FINALIZATION
Take the 1st dorsal fin and sew it between rounds 15 and 21 on the center part of Jeff’s “back” (image 34)
Take the tail and position it so that the larger part is at the top and the smaller part is at the bottom of the body base. Sew it on (image 35);
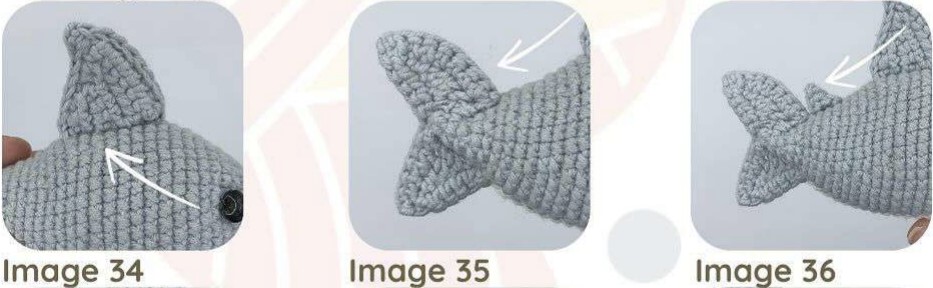
Sew the 2nd dorsal fin just after the top of the caudal fin
(image 36);
Sew the front legs between rounds 11 and 15, leaving them at the same level as the white part (image 37);
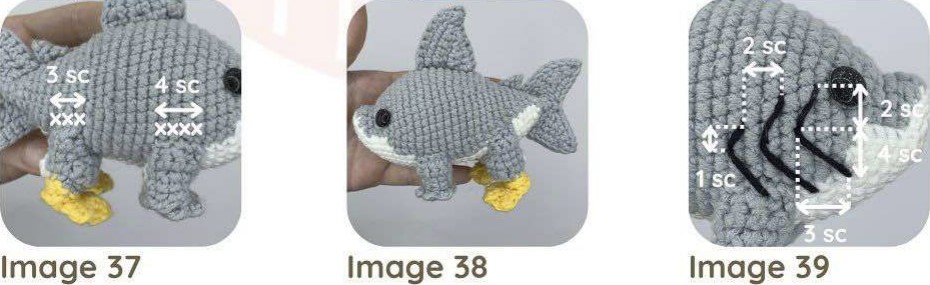
Sew the back legs between rounds 22 and 25, 1 stitch above the level of the front legs (image 38);
Using smaller tex yarn in Black, sew Jeff’s gills, as shown in image 39;
Embroider Jeff’s smile as shown in images 40 and 41;
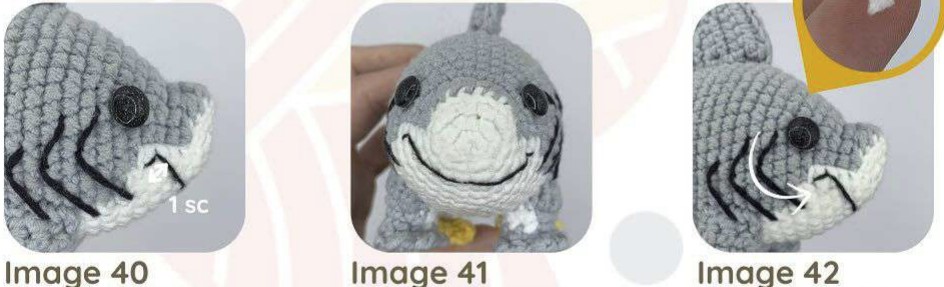
After that, take the white felt and cut 2 equilateral triangles of the same size, each side the size of 1 point (image 42) and glue them to the edges of the mouth;
Paint Jeff’s nostrils with black fabric paint, as shown in image 43;
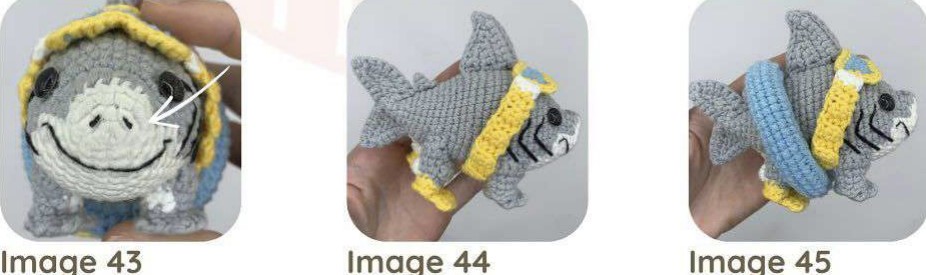
Fit the diving goggles as shown in image 44;
Finally, fit the float as in image 45.

